Event Creation & Management
Creating 360° immersive experiences has never been this easy.
- Create Event & Start Streaming
- Event Features
- Shopping & Other In-Stream Services
- Invitations & Management
- Dashboard (Manage Live Event)
- Intro
- Dashboard Moderation
- Guest Management
- Content Moderation
- Video Wall Management
- Control Room
- Poll Bot Management
- Presenter Control Hub
- Event Settings
- Event Statistics & KPI's
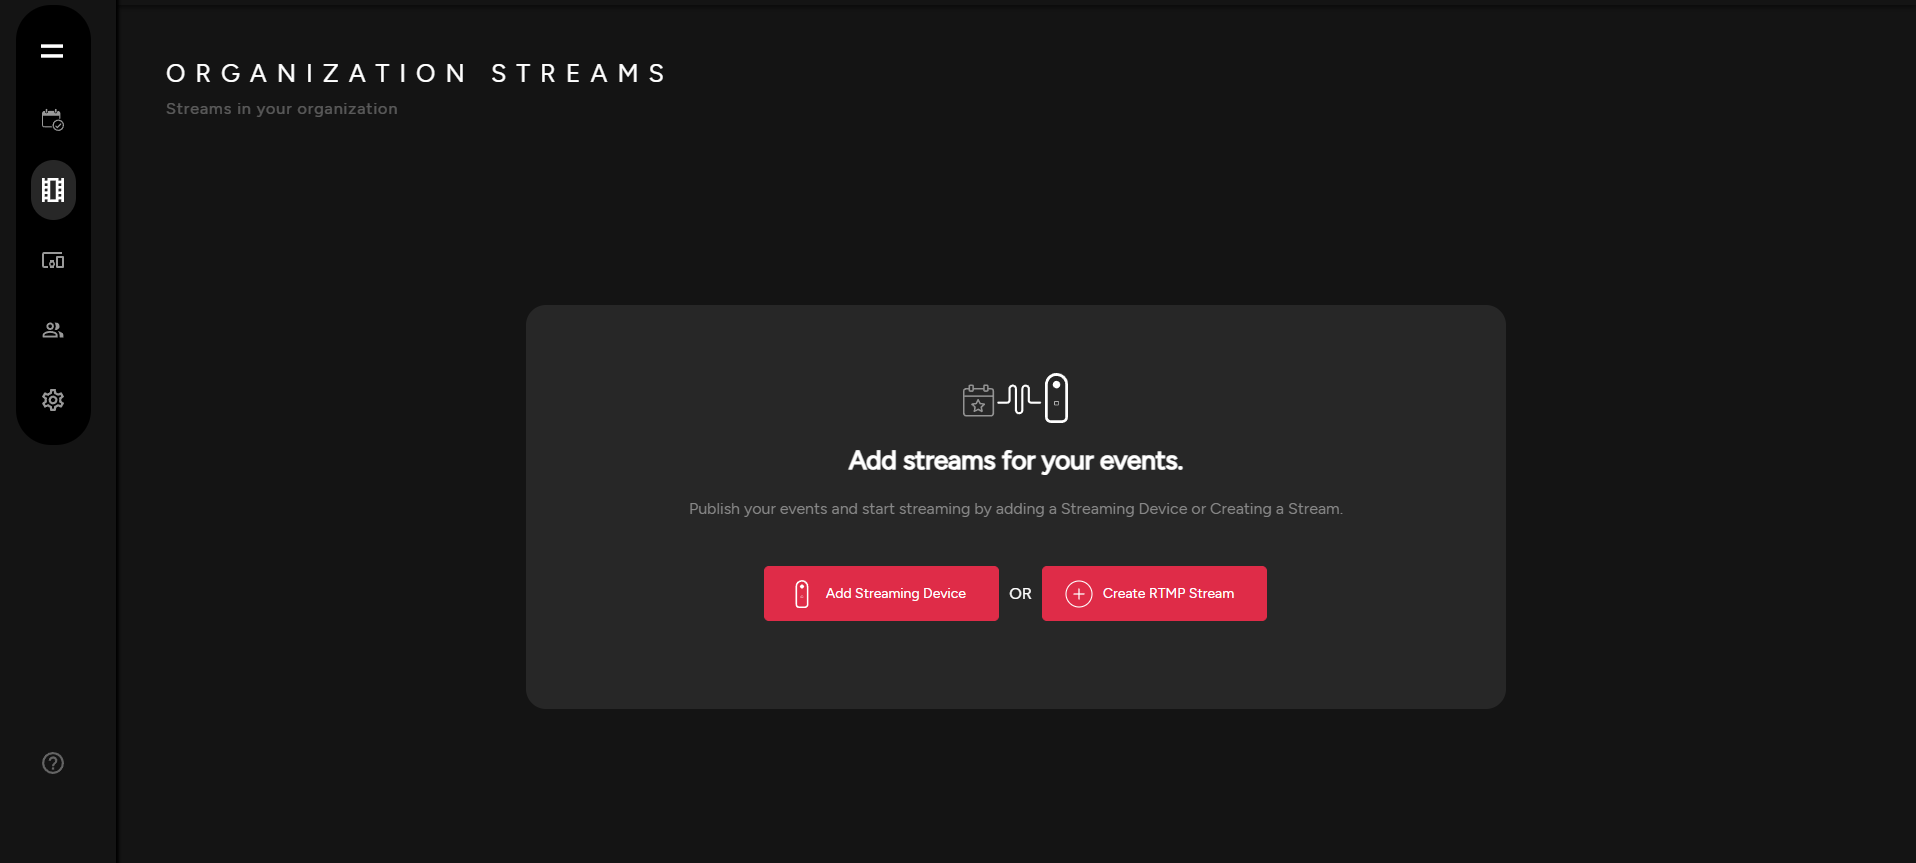
Create Event & Start Streaming
Create Event
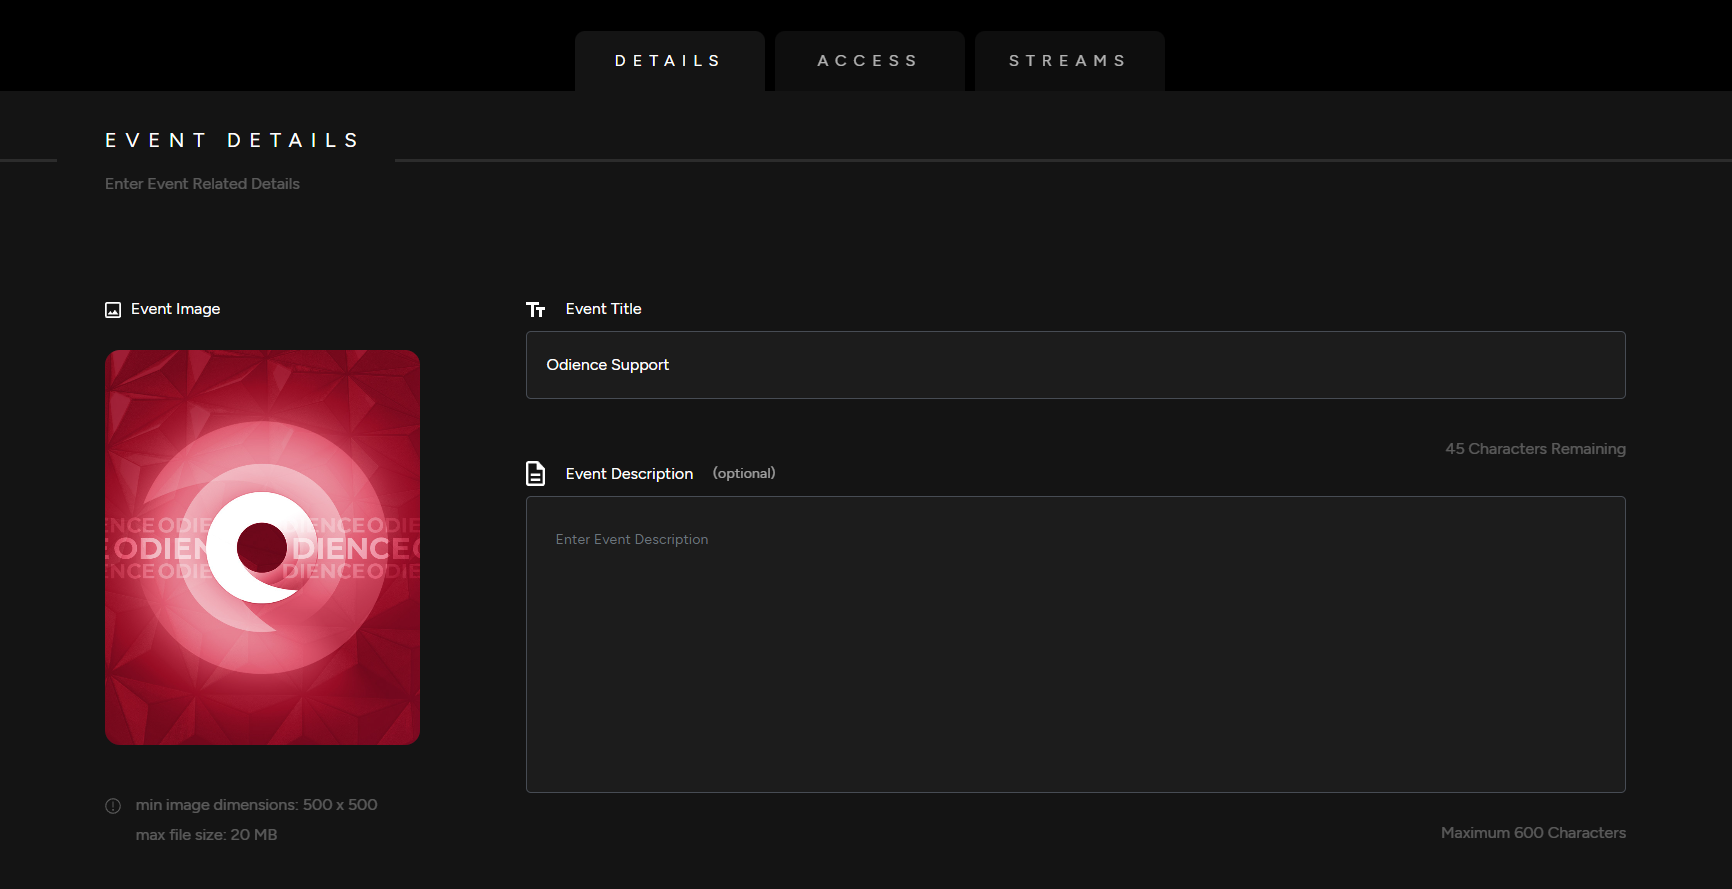
Details
1. Enter your your Event Details, Add a Title, Event Image & Description (description is optional).
Event Type
2. Select from the variety of Event Types offered.

Listing Add Ons
3. Include featured artists, host and brands. Use relevant hashtags & upload a promo video to engage your audience.
Note: All Listing Add Ons are optional.
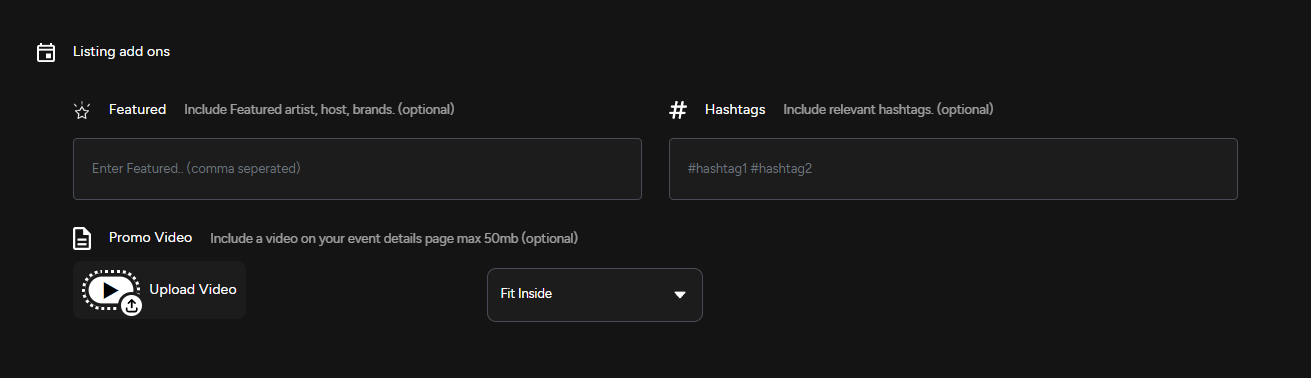
3. Include featured artists, host and brands. Use relevant hashtags & upload a promo video to engage your audience.
Access
4. Select which Platform your event will be published on. Publishing options include our mobile app, the web client, or using a VR head mounted display. Odience supports all VR headsets, including Vision Pro
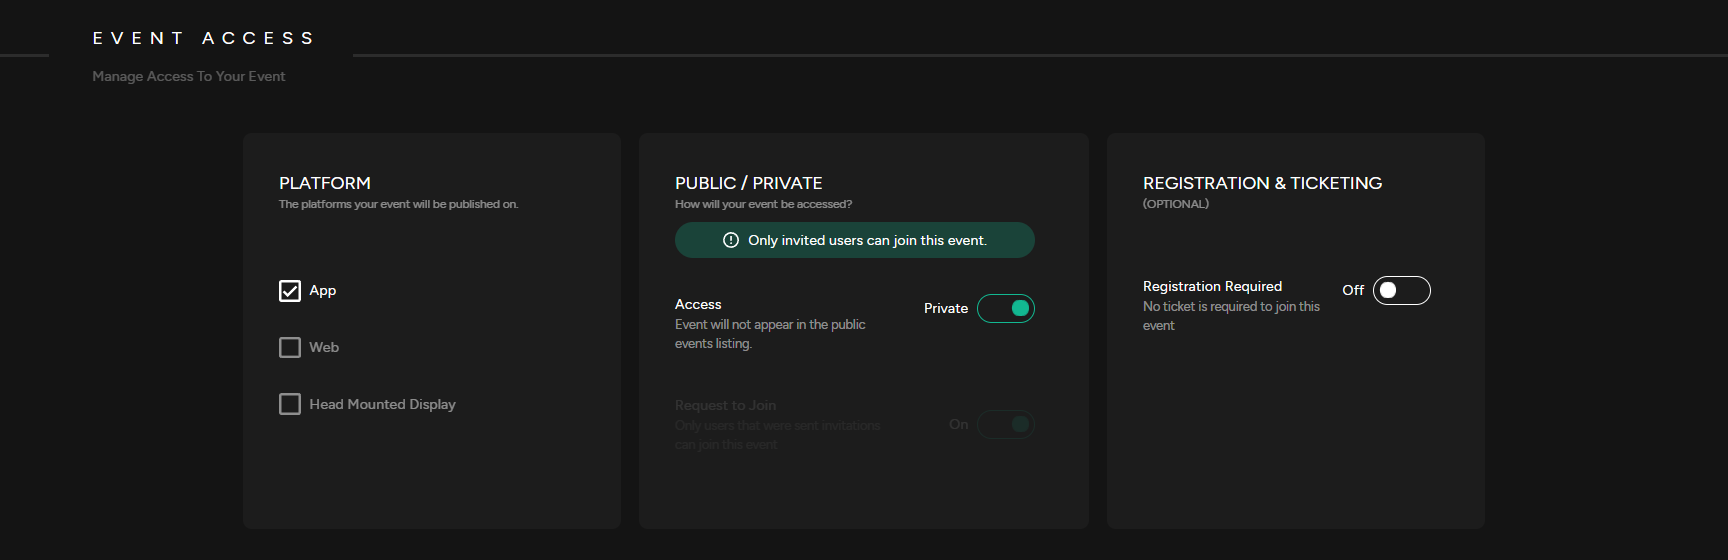
5. Public / Private
- Private Event: A Private Event does not appear in the public events listing. Users will need to be invited to access the event.
- Public Event: A Public Event is listed in the public directory and visible to everyone.
- Request to Join: If enabled, users will need to request to join the event.
6. Registration & Ticketing (optional): Enable registration before joining your event. Set-up a ticketing system that allows you to administer free or paid tickets. Select a platform to distribute your tickets, pick a currency & include ticket classes to sell different types of tickets.

7. Select the Start/End date of your event, set a capacity & add an event location.
Streams
8. Pair a 360 Camera by scanning QR code in the pop up screen or create and then assign an RTMP stream to your event.
- See our detailed guide on how to Pair a 360 Camera or how to Create an RTMP Stream.
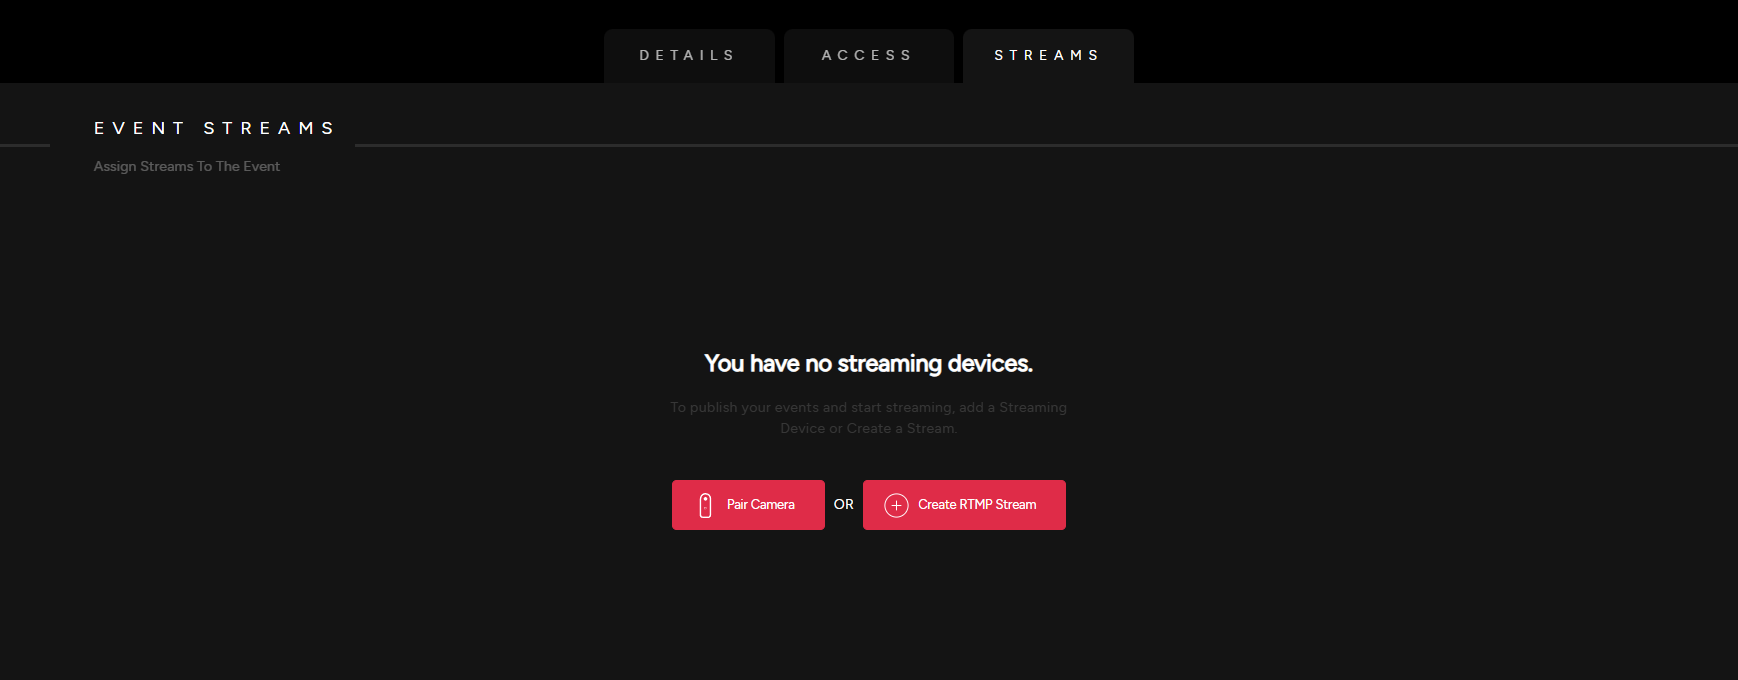
Already assigned a stream to your event? Invite an audience to join your event.
Create RTMP Stream
Create a Planar video stream or a 360 video stream in less than a minute, it's that easy.
Create Stream
- Click Create RTMP Stream.
Stream Details
- Give your stream a name and select the resolution.
Stream Options
- Pick your preferred video format, access type and recorded type depending if it will be a live stream or a pre-recorded stream.
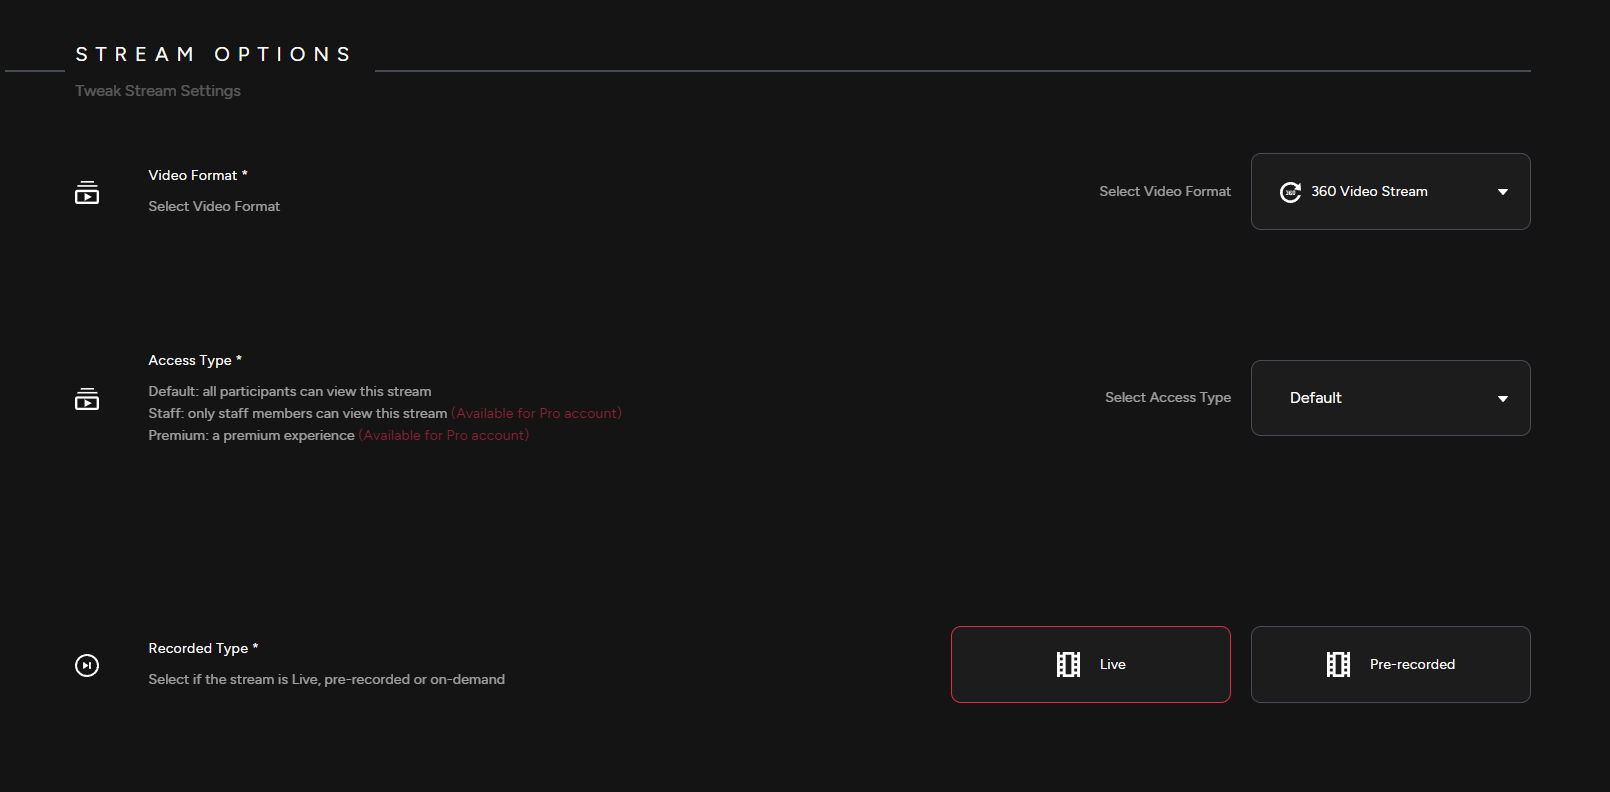
Events Assigned
- Assign your stream to an event. Click Create Stream to confirm.
Looking to pair your 360 camera? See our guide on how to pair your device.
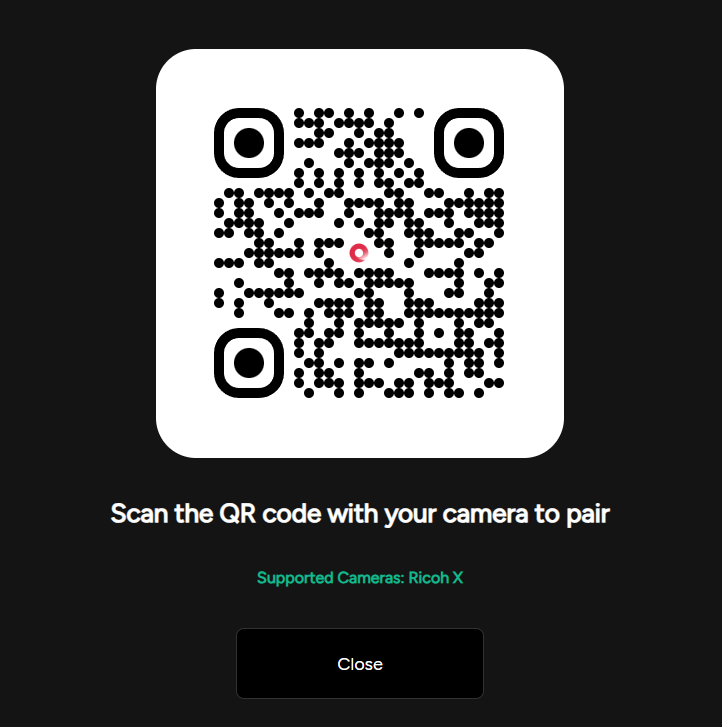
Pair 360 Camera
Note: Only select cameras are currently supported through Bluetooth pairing. For all other cameras, see our Create RTMP URL section.
Add 360 Camera
- Select Add Streaming Device. You will be directed to your devices options, select Pair Camera.

Pair Your 360 Camera
- Scan QR code to pair device.
Event Features
Stream Chat
1. The stream chat is an optional feature. Click the gear icon to to customize settings.
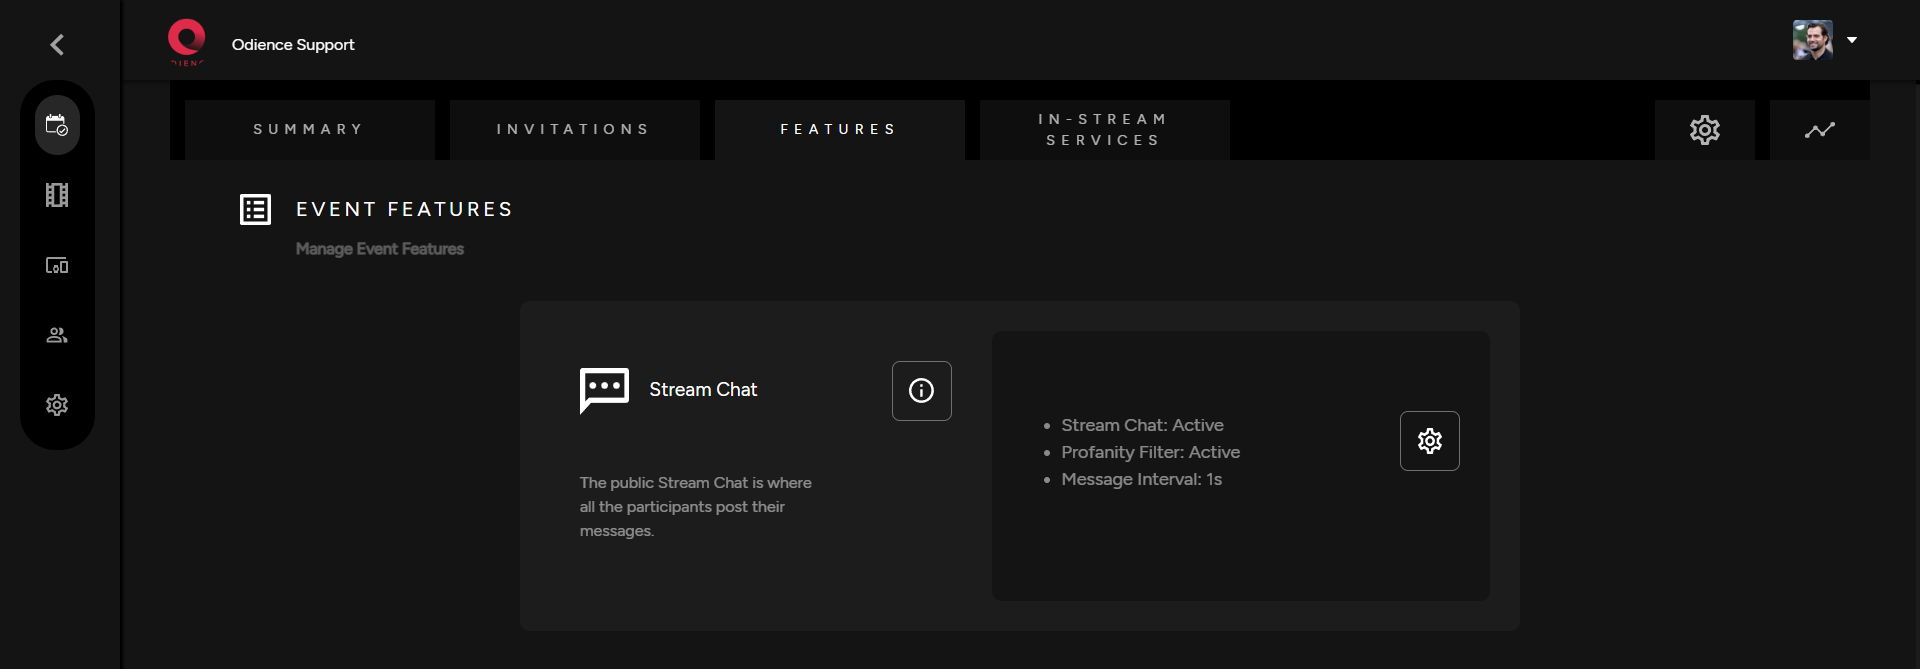
2. Adjust Stream Chat settings. Activate or Deactivate chat, adjust message interval & enable a profanity filter .
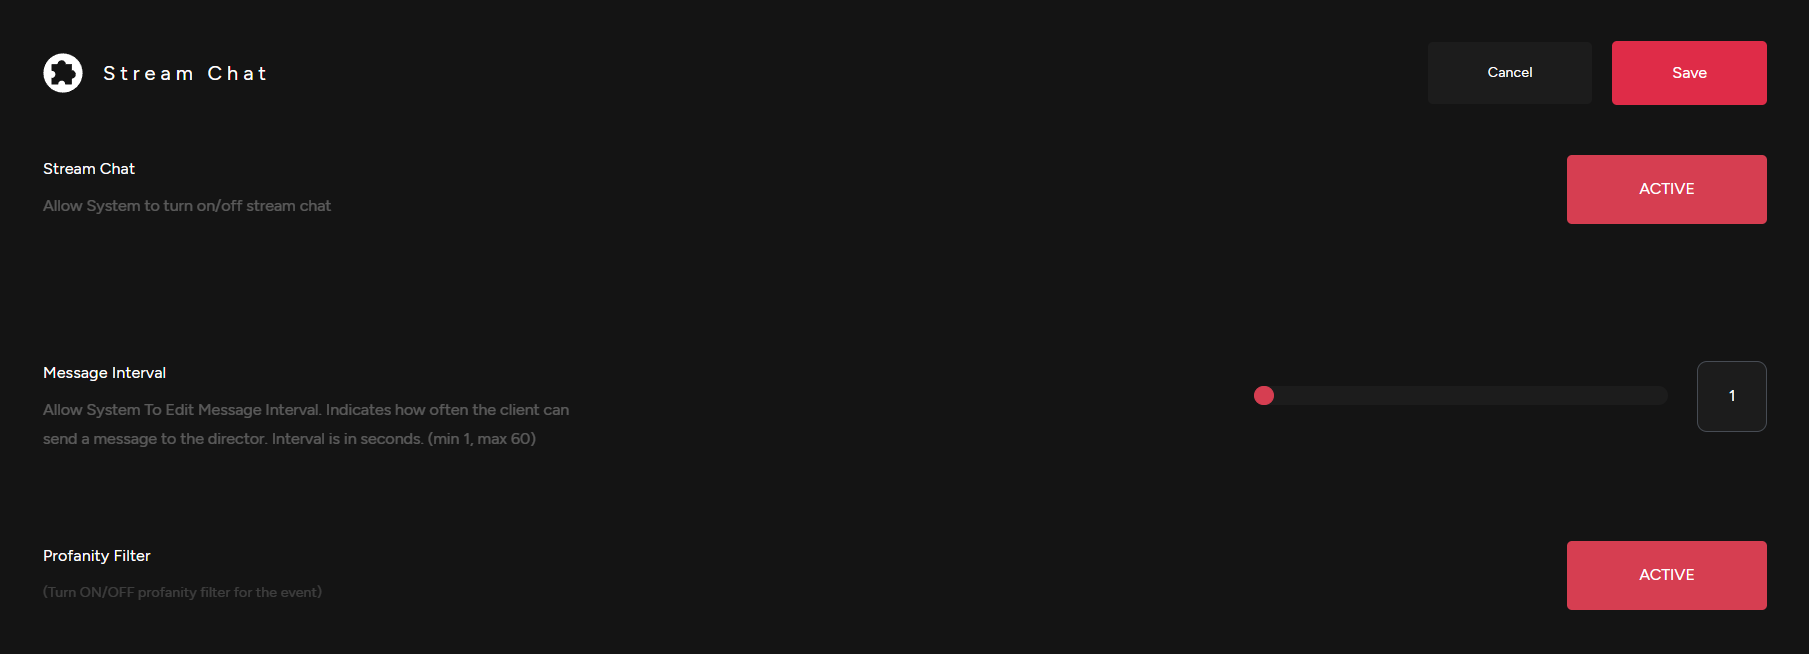
3. Click save to apply changes to your Stream Chat.
Assign a Video Wall
What is a Video Wall?
- Video Walls elevate your event by allowing you to display products and communicate with event participants.
- Click the "i" icon to see get a glimpse of what you can achieve with Odience Video Walls.
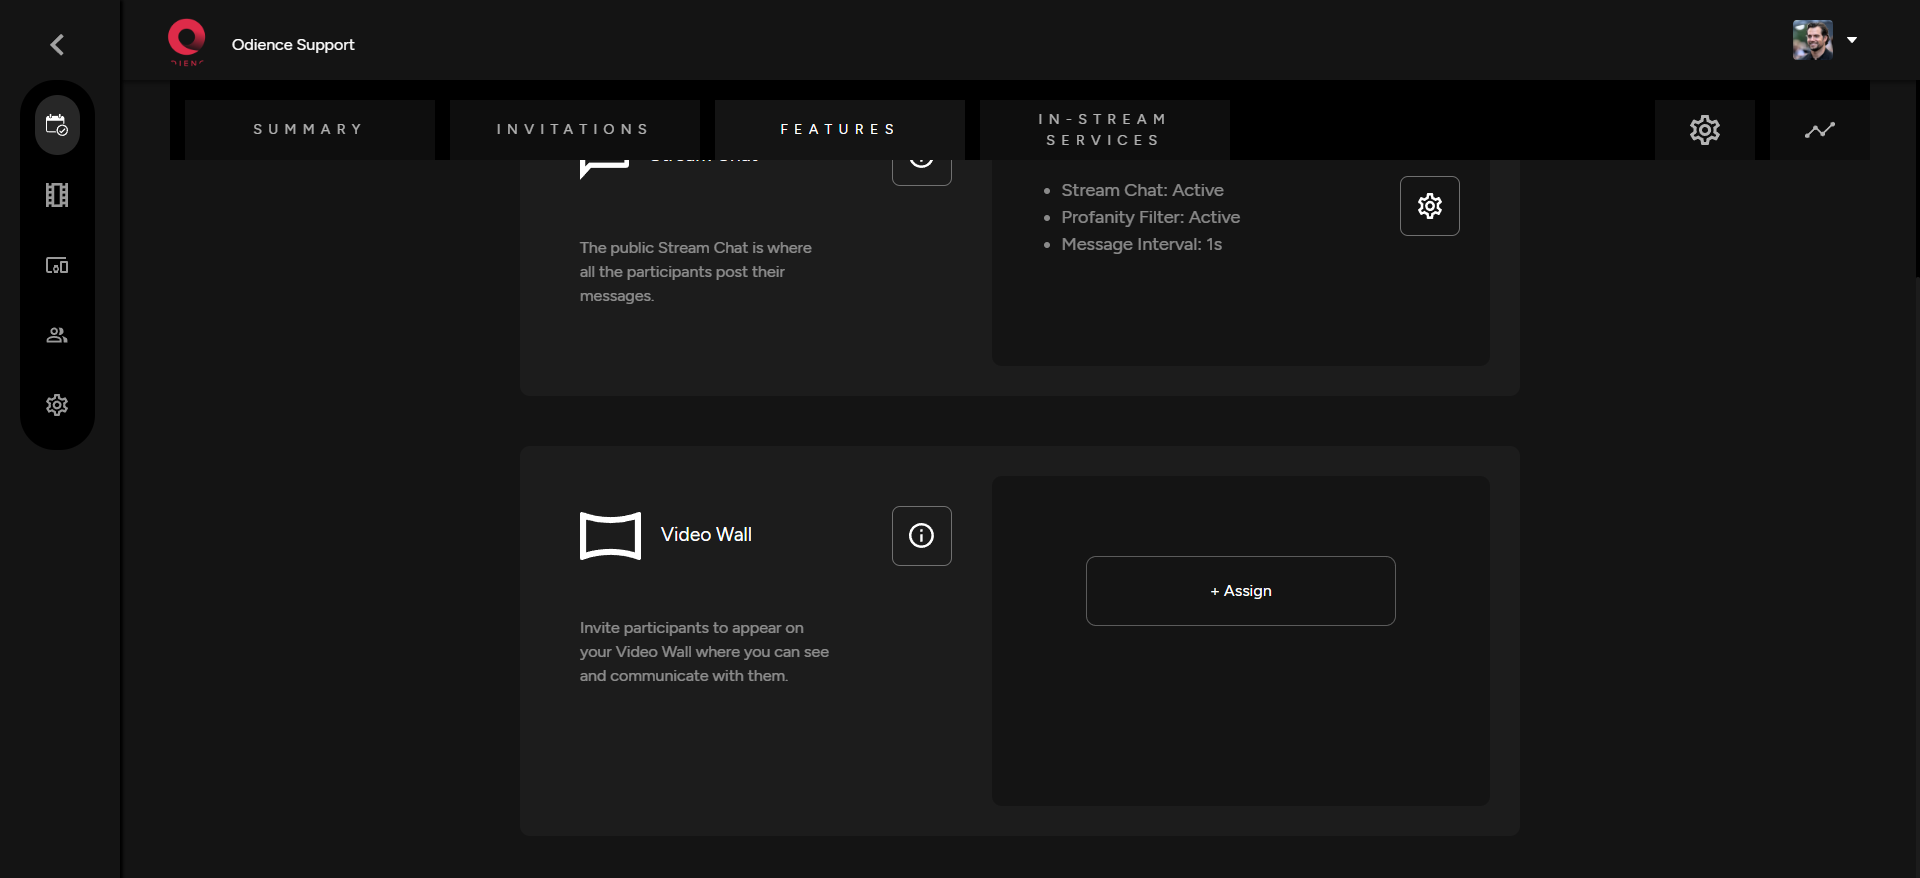
Assign a Video Wall
- Create or assign an existing video by selecting one from the options in your dropdown. Click Assign and you are good to go.
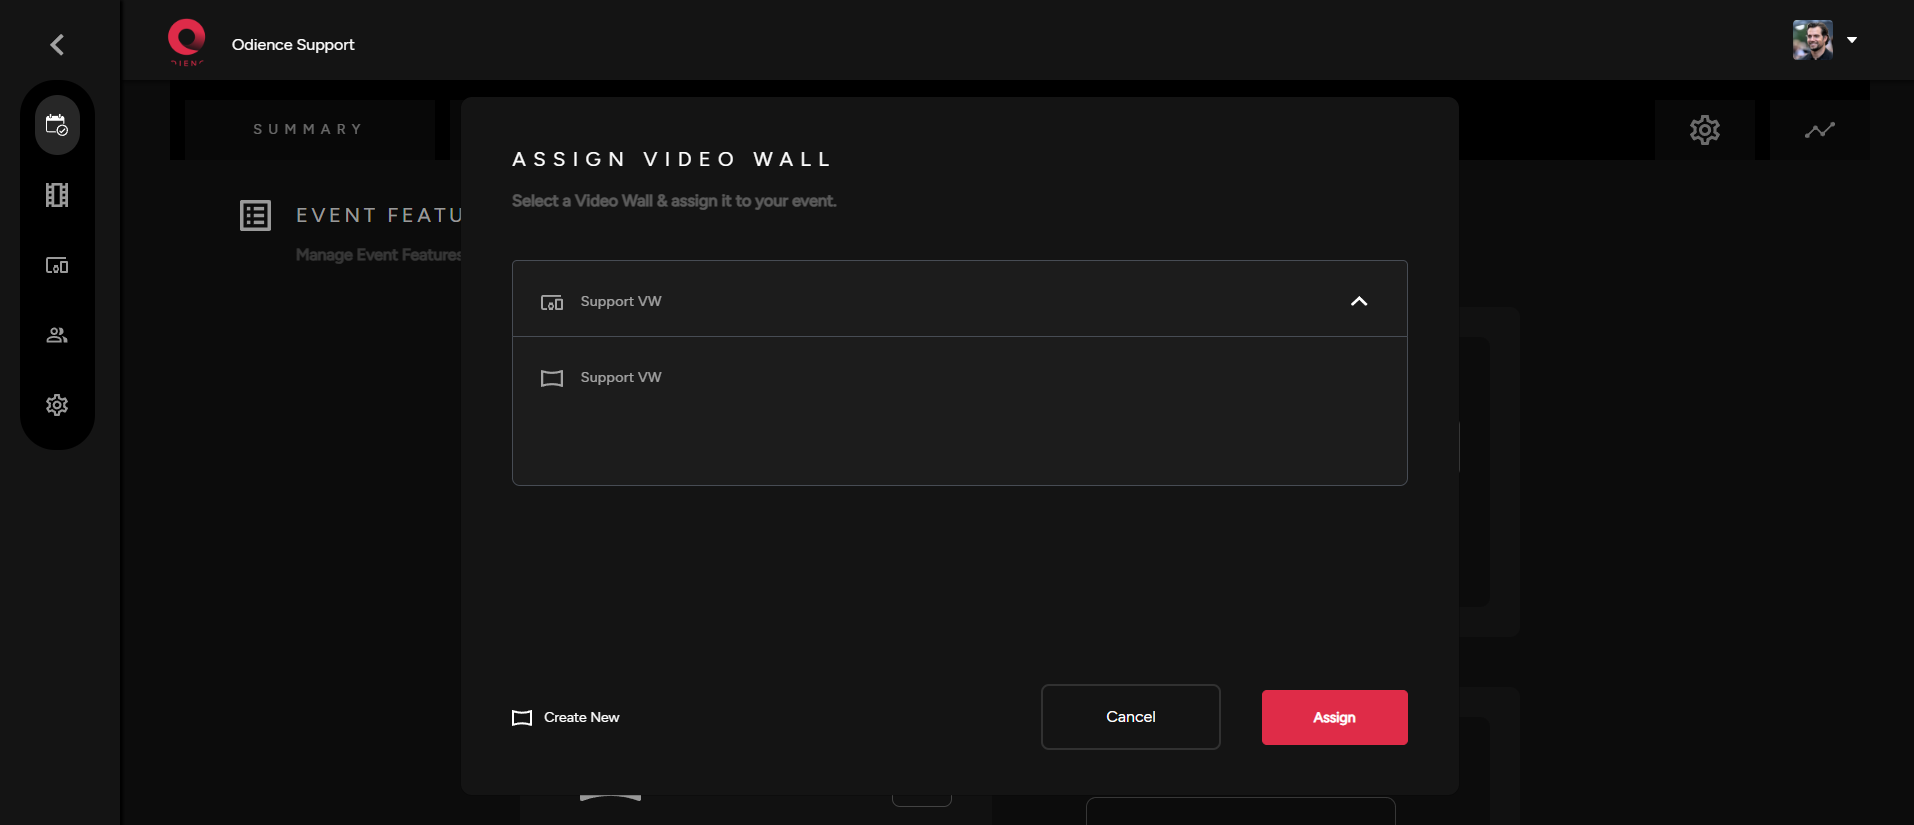
- To create your very own custom Video Wall, click here to see our Create Video Wall guide.
Assign Front Row Device
Front Row allows a lucky viewer to get closer to the event via a 1 on 1 video call with the host, artist, etc.
Assign Front Row Device
Assign a Front Row device. You can enable or disable this feature. If there is not a Front Row device created, you will need to first create one.
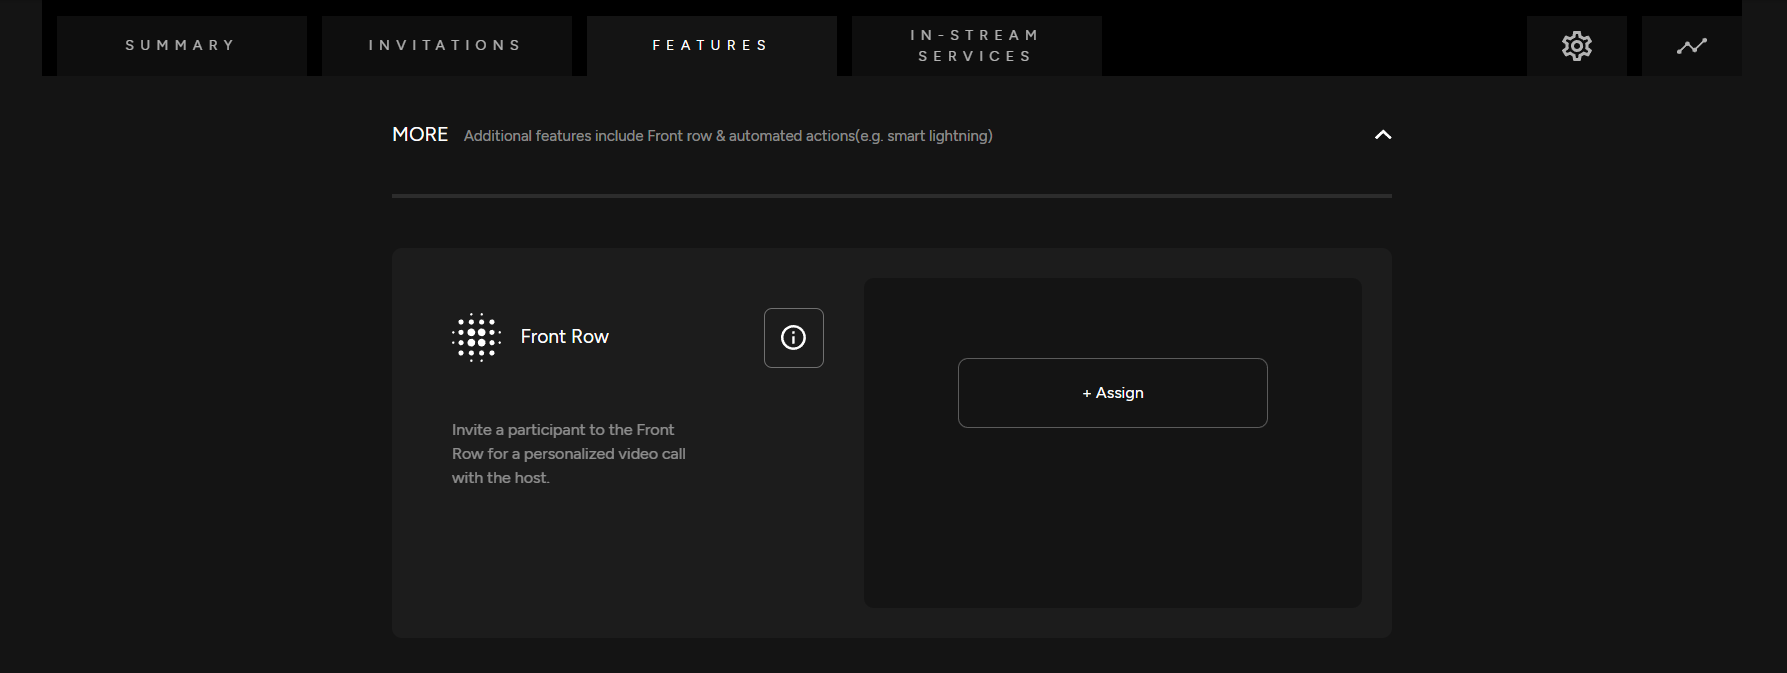
- For more information, see our guide on how to Create a Front Row Device.
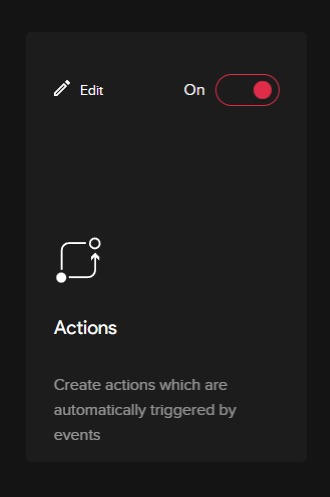
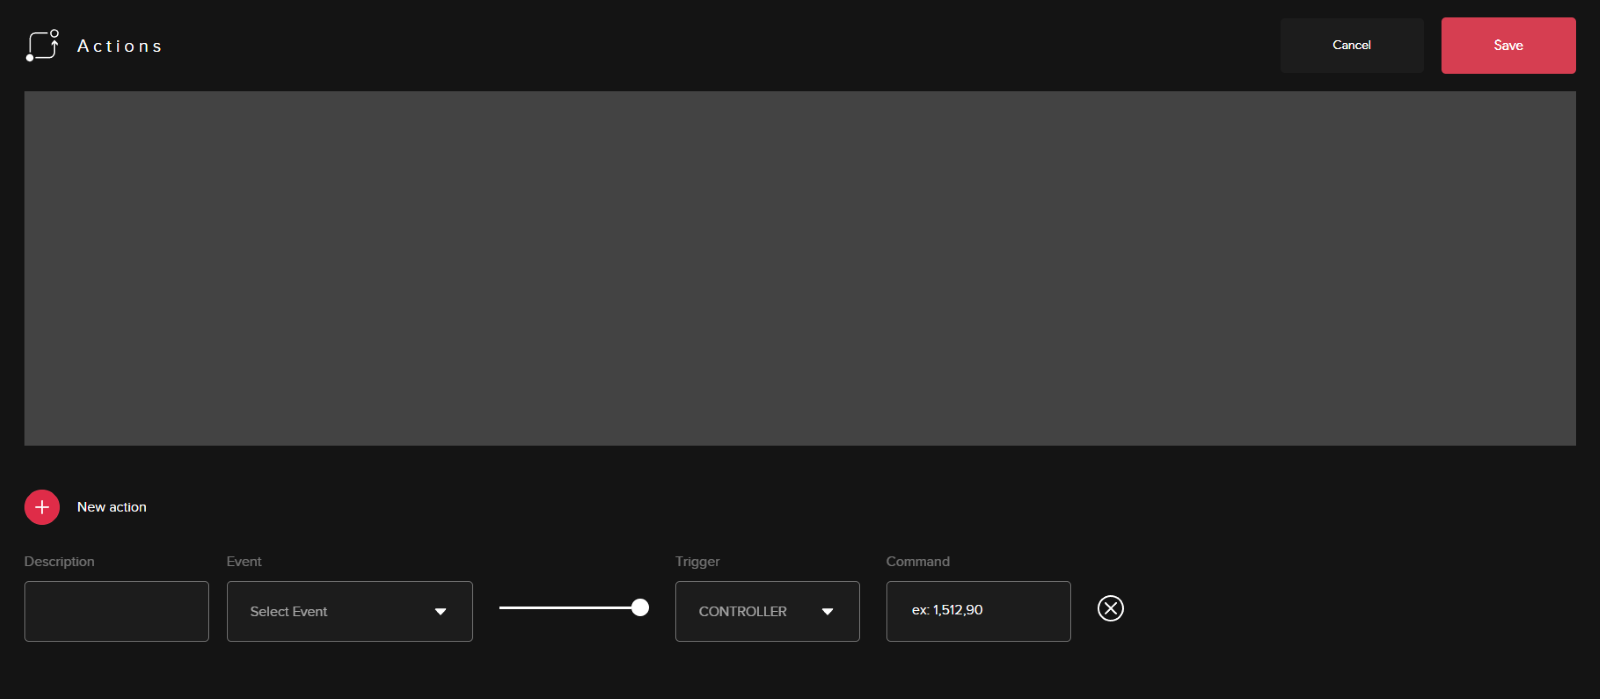
Automated Actions
Actions (Need more info on how to use/configure)
-Create actions which are automatically triggered by certain events. The specific event/action will have to be programmed in the edit section of the actions section.
-
The main part of the editing panel will be setting up the actions trigger than initiating a command.
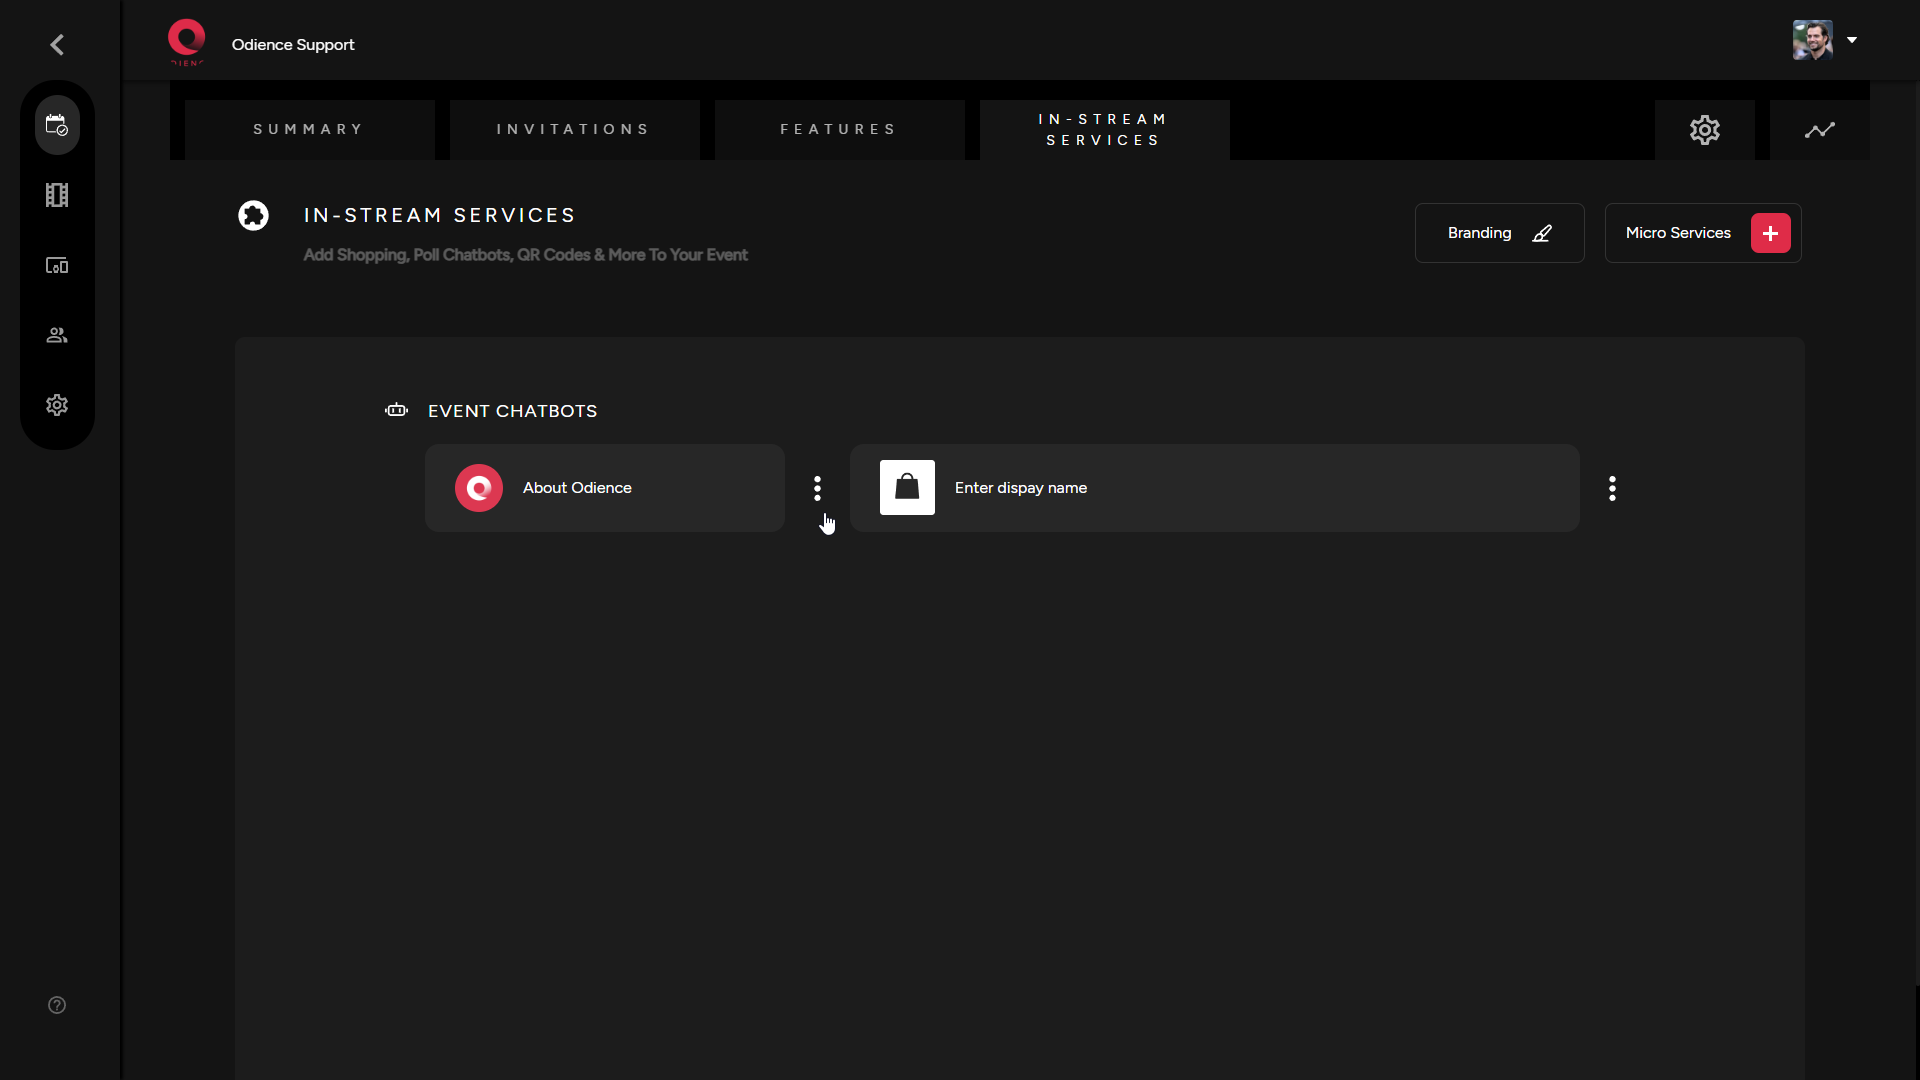
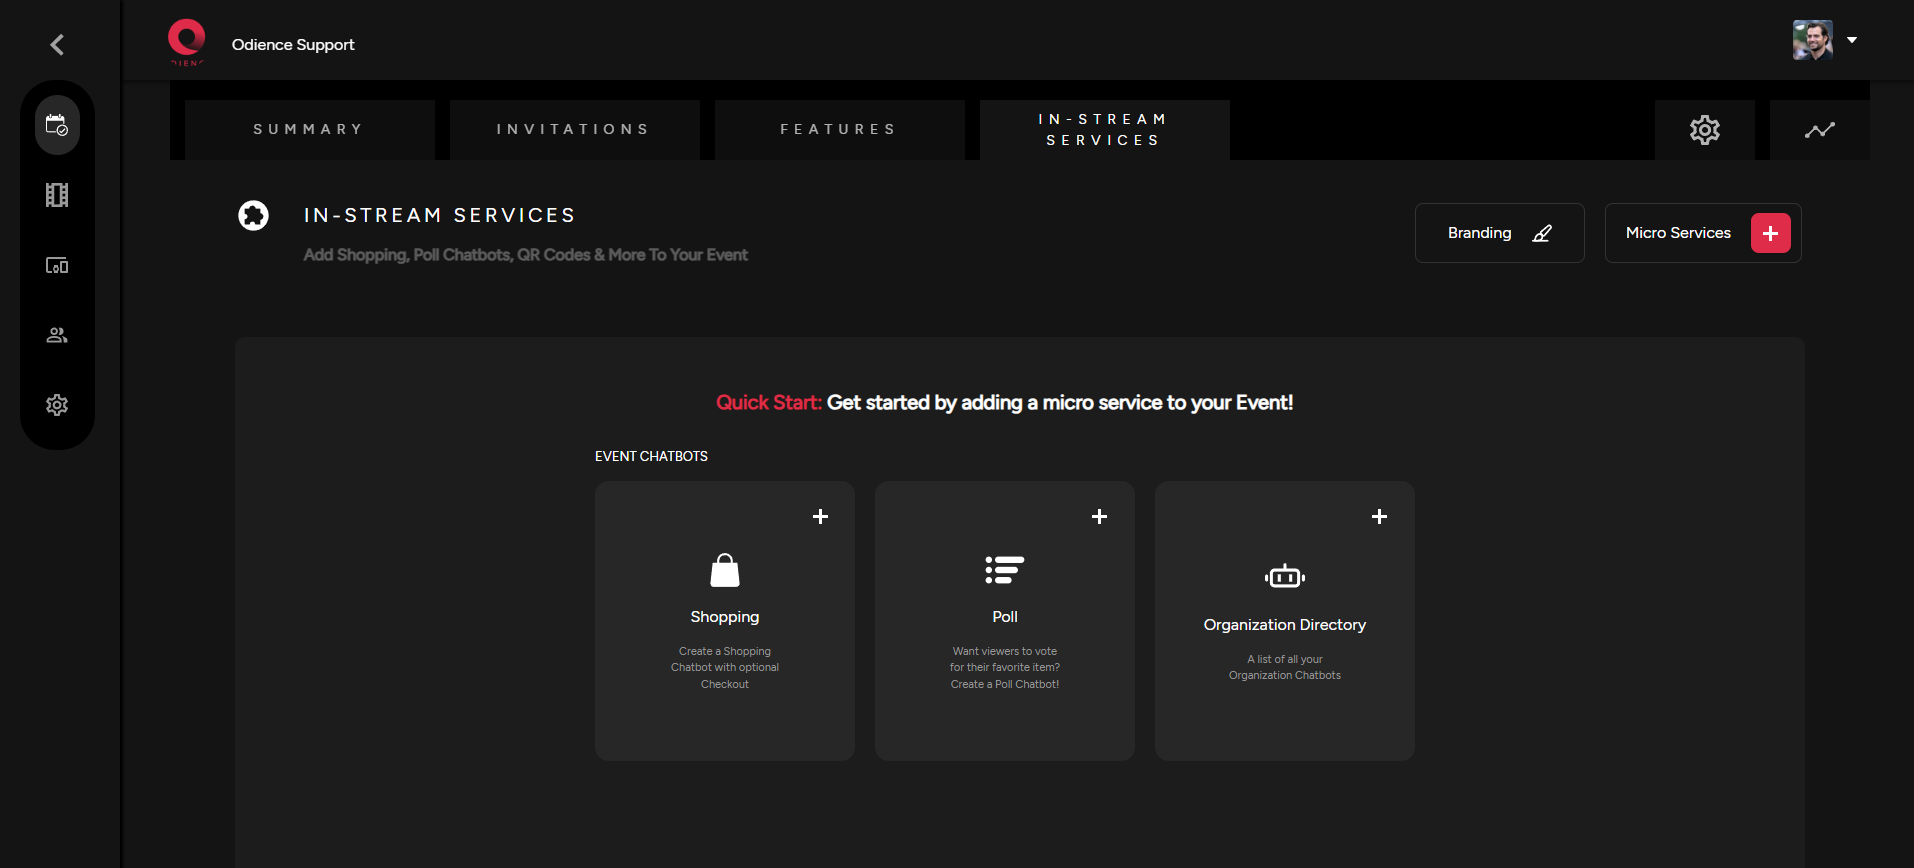
Shopping & Other In-Stream Services
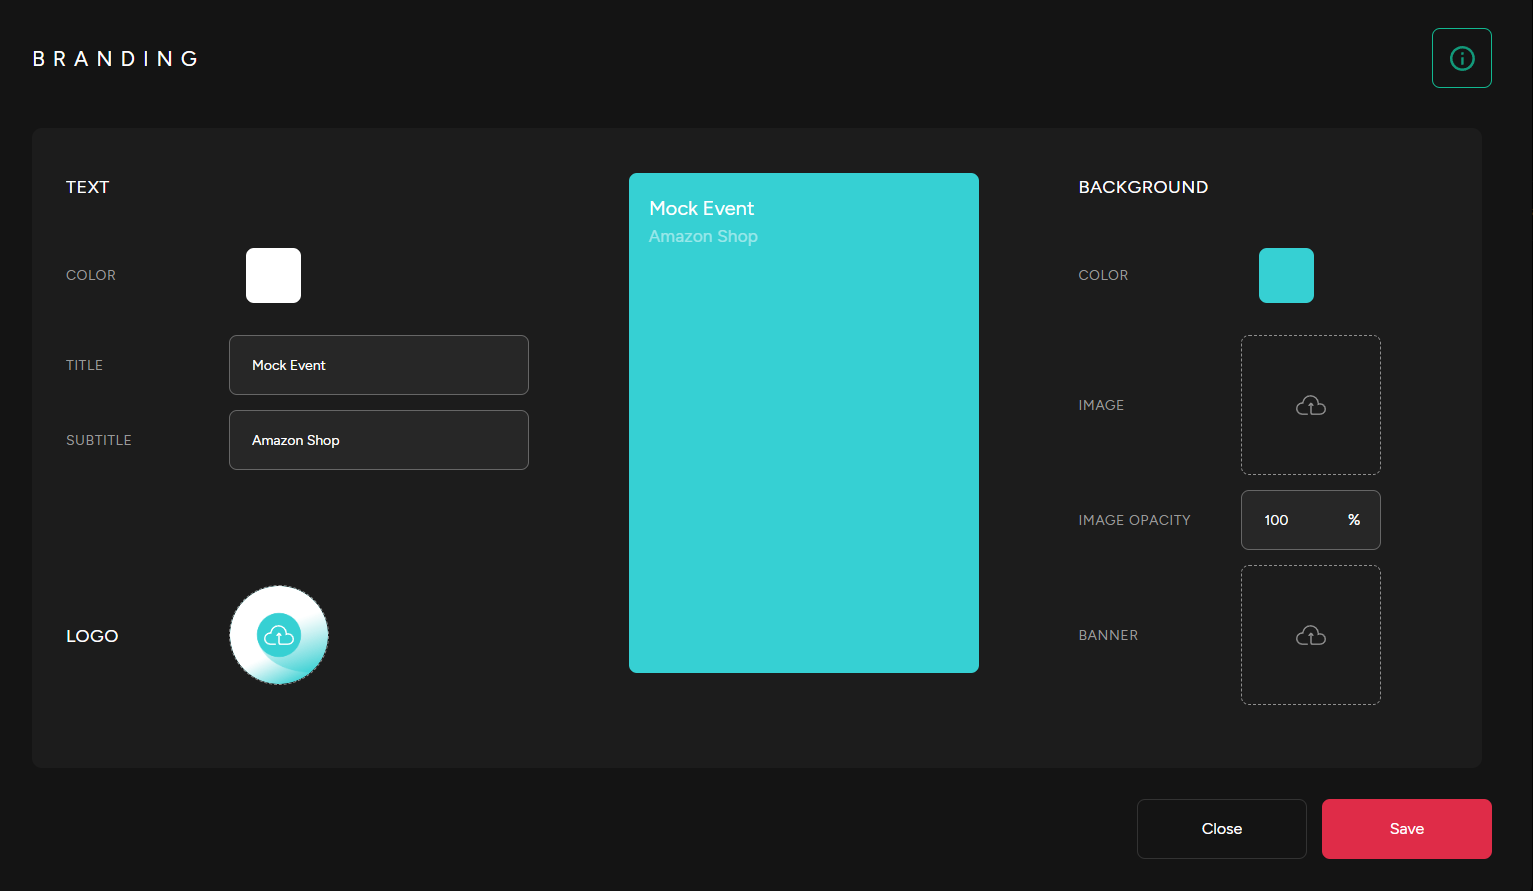
Branding
Customize Your Branding
- Customize the design in your branding section where all in-stream/micro-services can be accessed. You can see a preview at the center get an accurate sense of how it will look in your live event.
Shopping Chatbot
Create Shopping Chatbot
Connect to a Shopify, Magento & other stores or to a Merchant Product Feed.
Note: Creating a Shopping Chabot with an Ecommerce platform or with a Merchant Product Feed is identical. Only difference is in the product links you will need to provide. Follow steps below for more details...
1. Select Shopping in your Quick Start or by selecting Add Chatbot in your Micro Services dropdown.

2. Select “Ecommerce platform”.
Note: Odience supports Ecommerce Platforms such as Shopify, Magento and others. Odience also support the use of Google, Amazon & other XML merchant feeds.
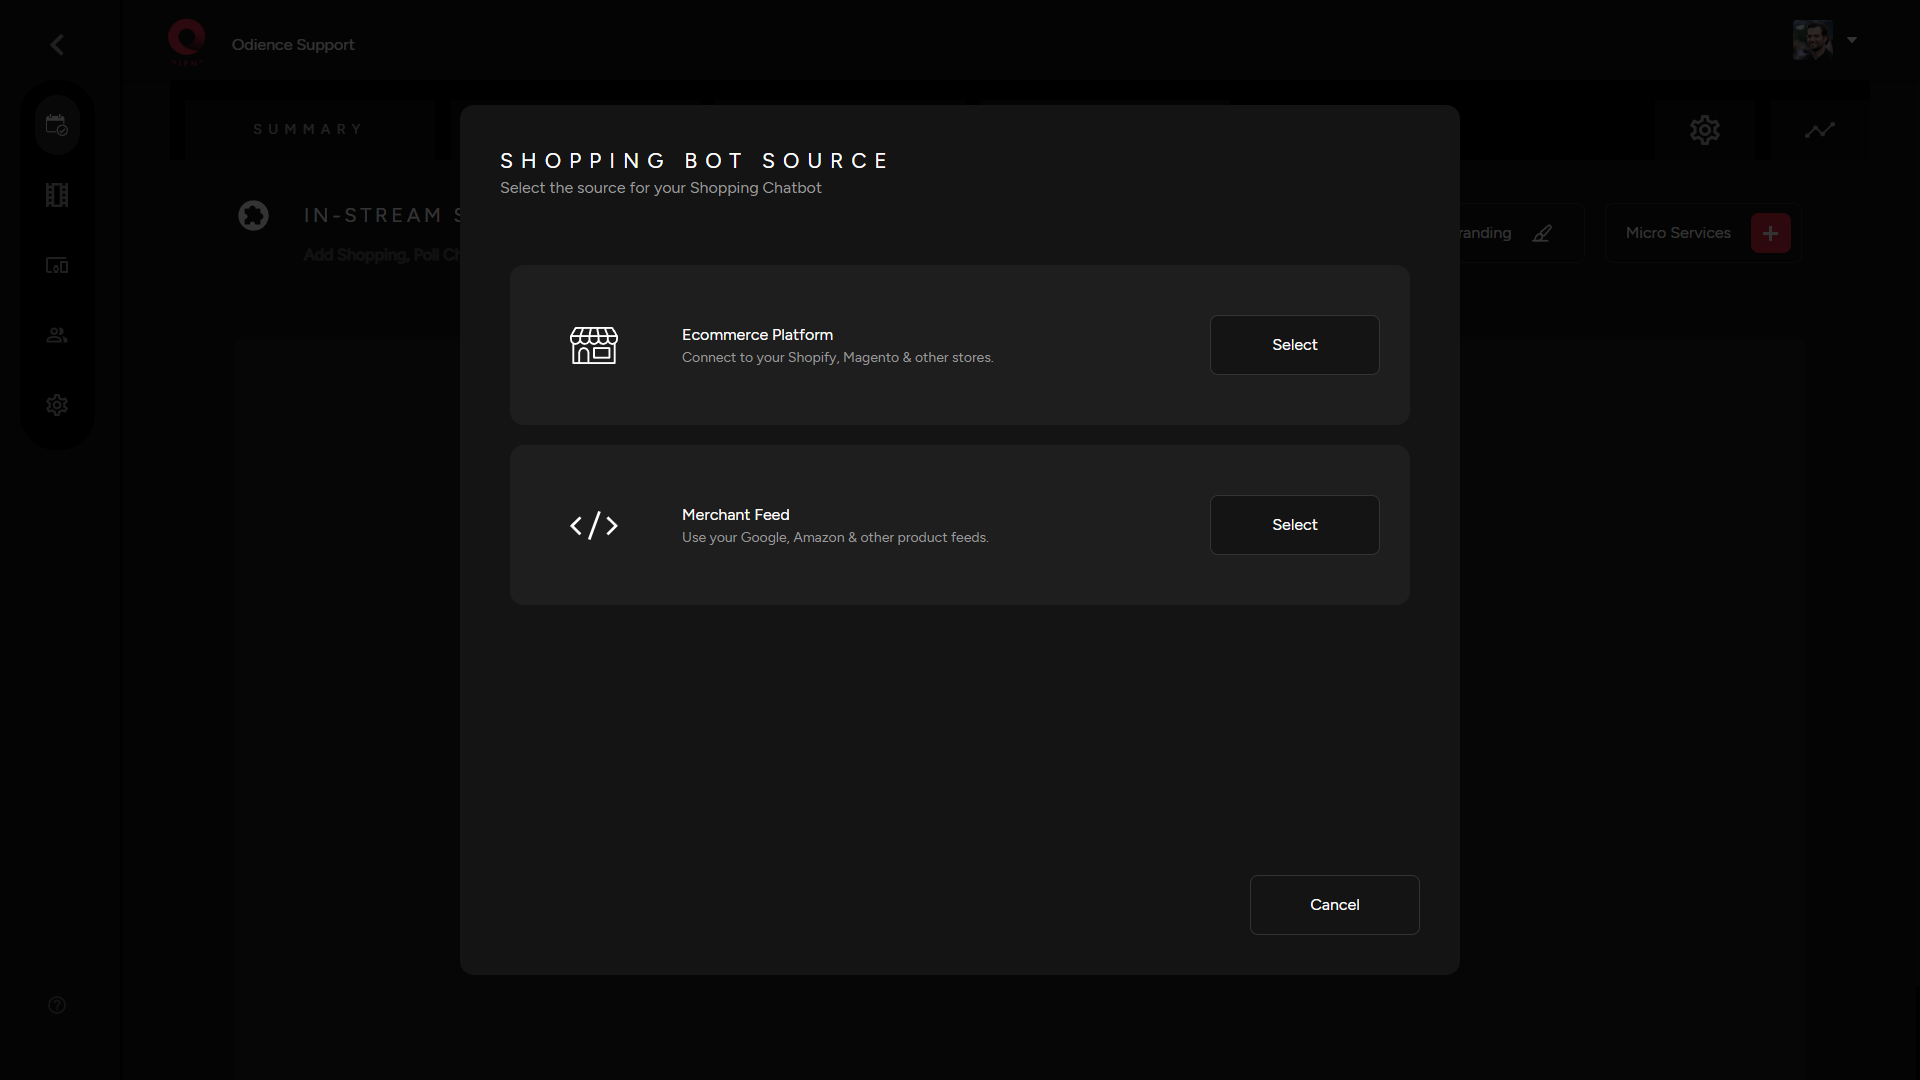
3. Select the platform you will be transferring your items from.
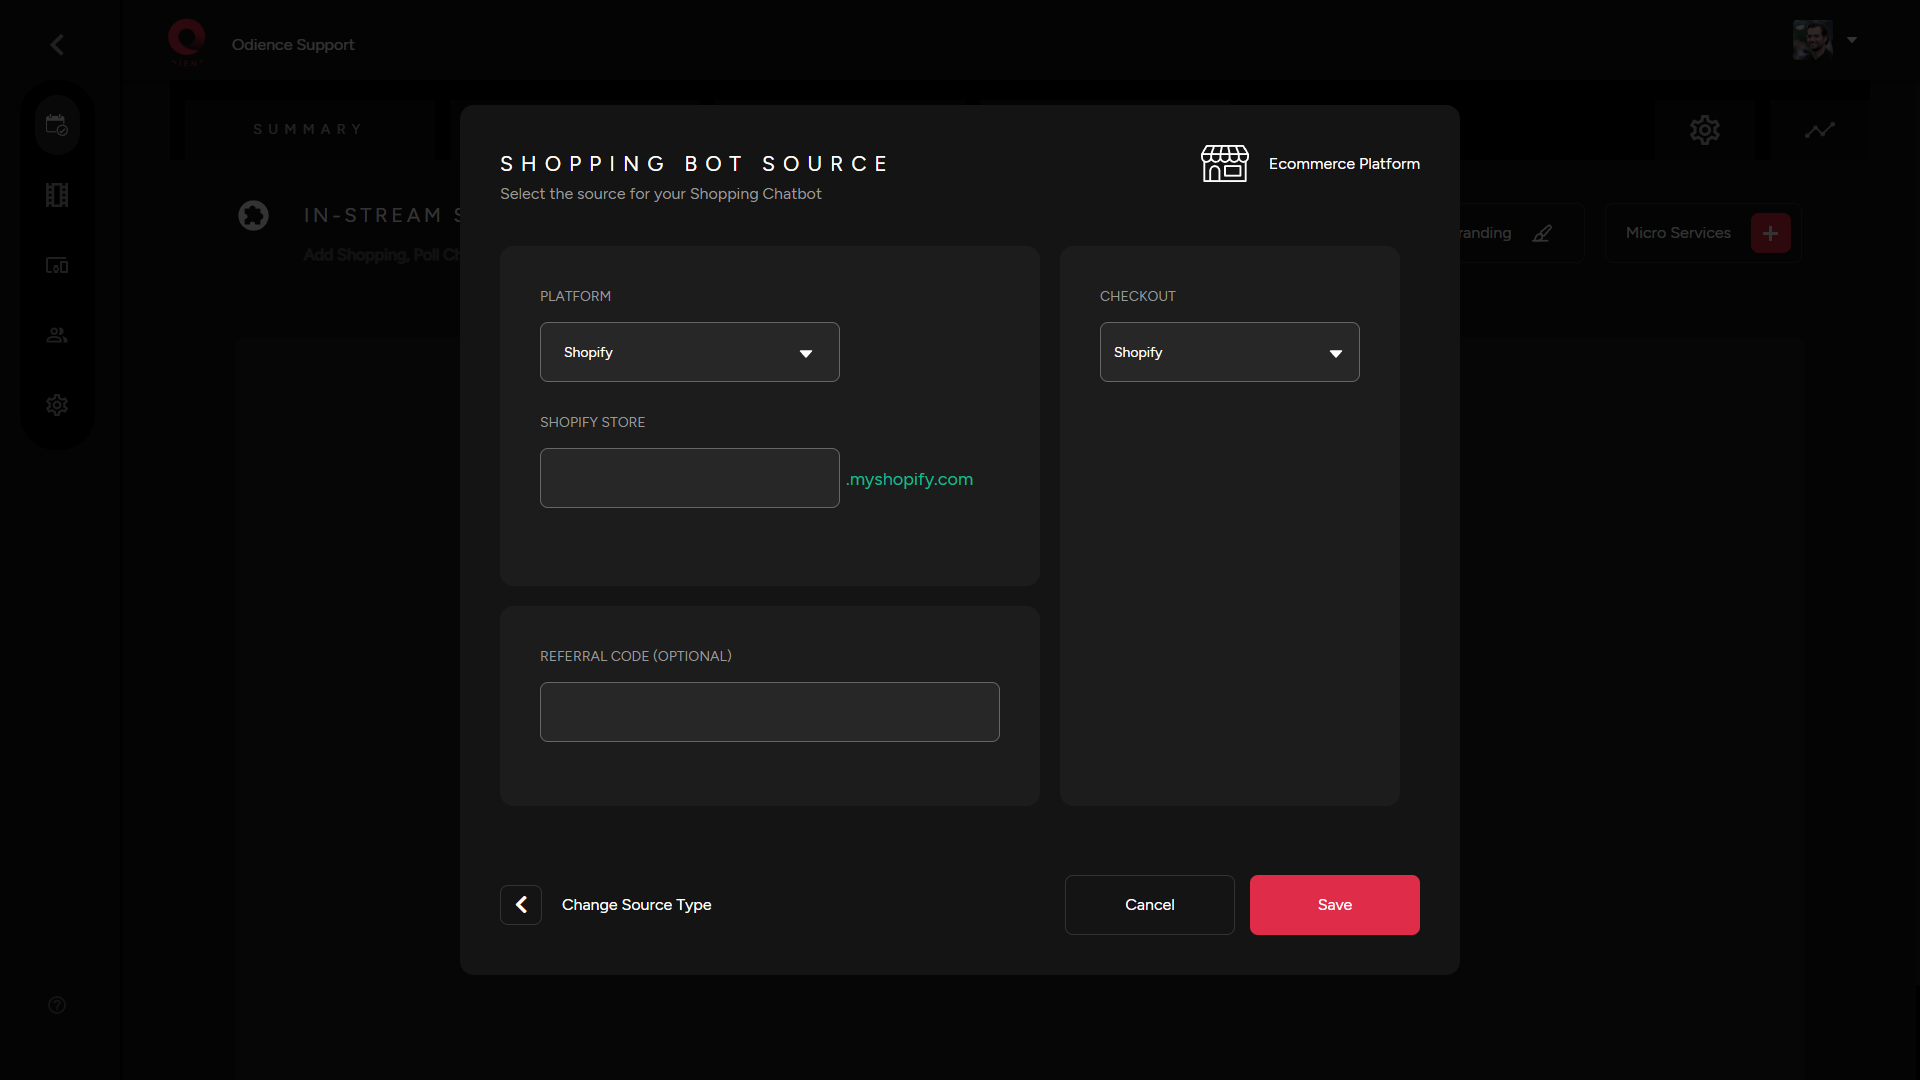
4. Link your Store to connect products to your chatbot. Referral Codes can also be created but is optional.
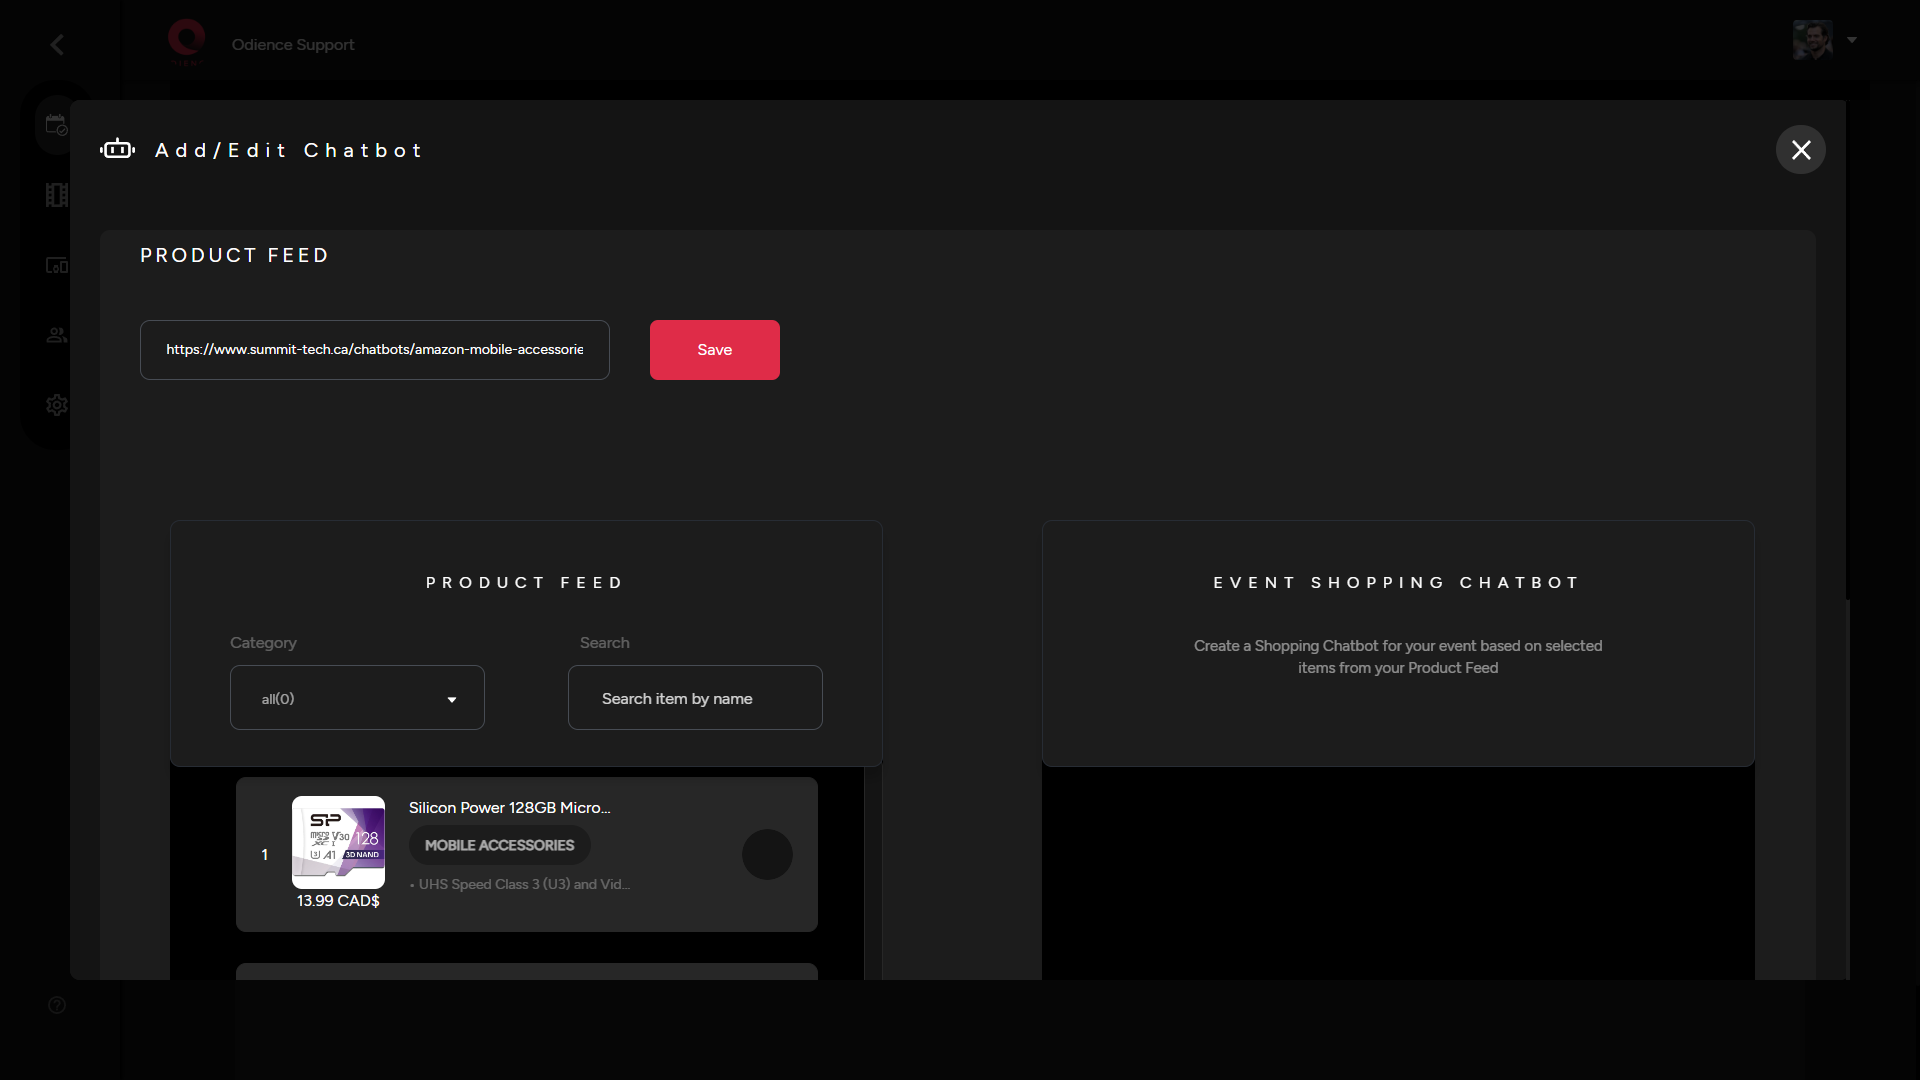
4.1. If Merchant Feed was selected over Ecommerce, you will need to provide an XML product feed URL (see screenshot below for reference). All steps before and after stay the same regardless of the shopping source.
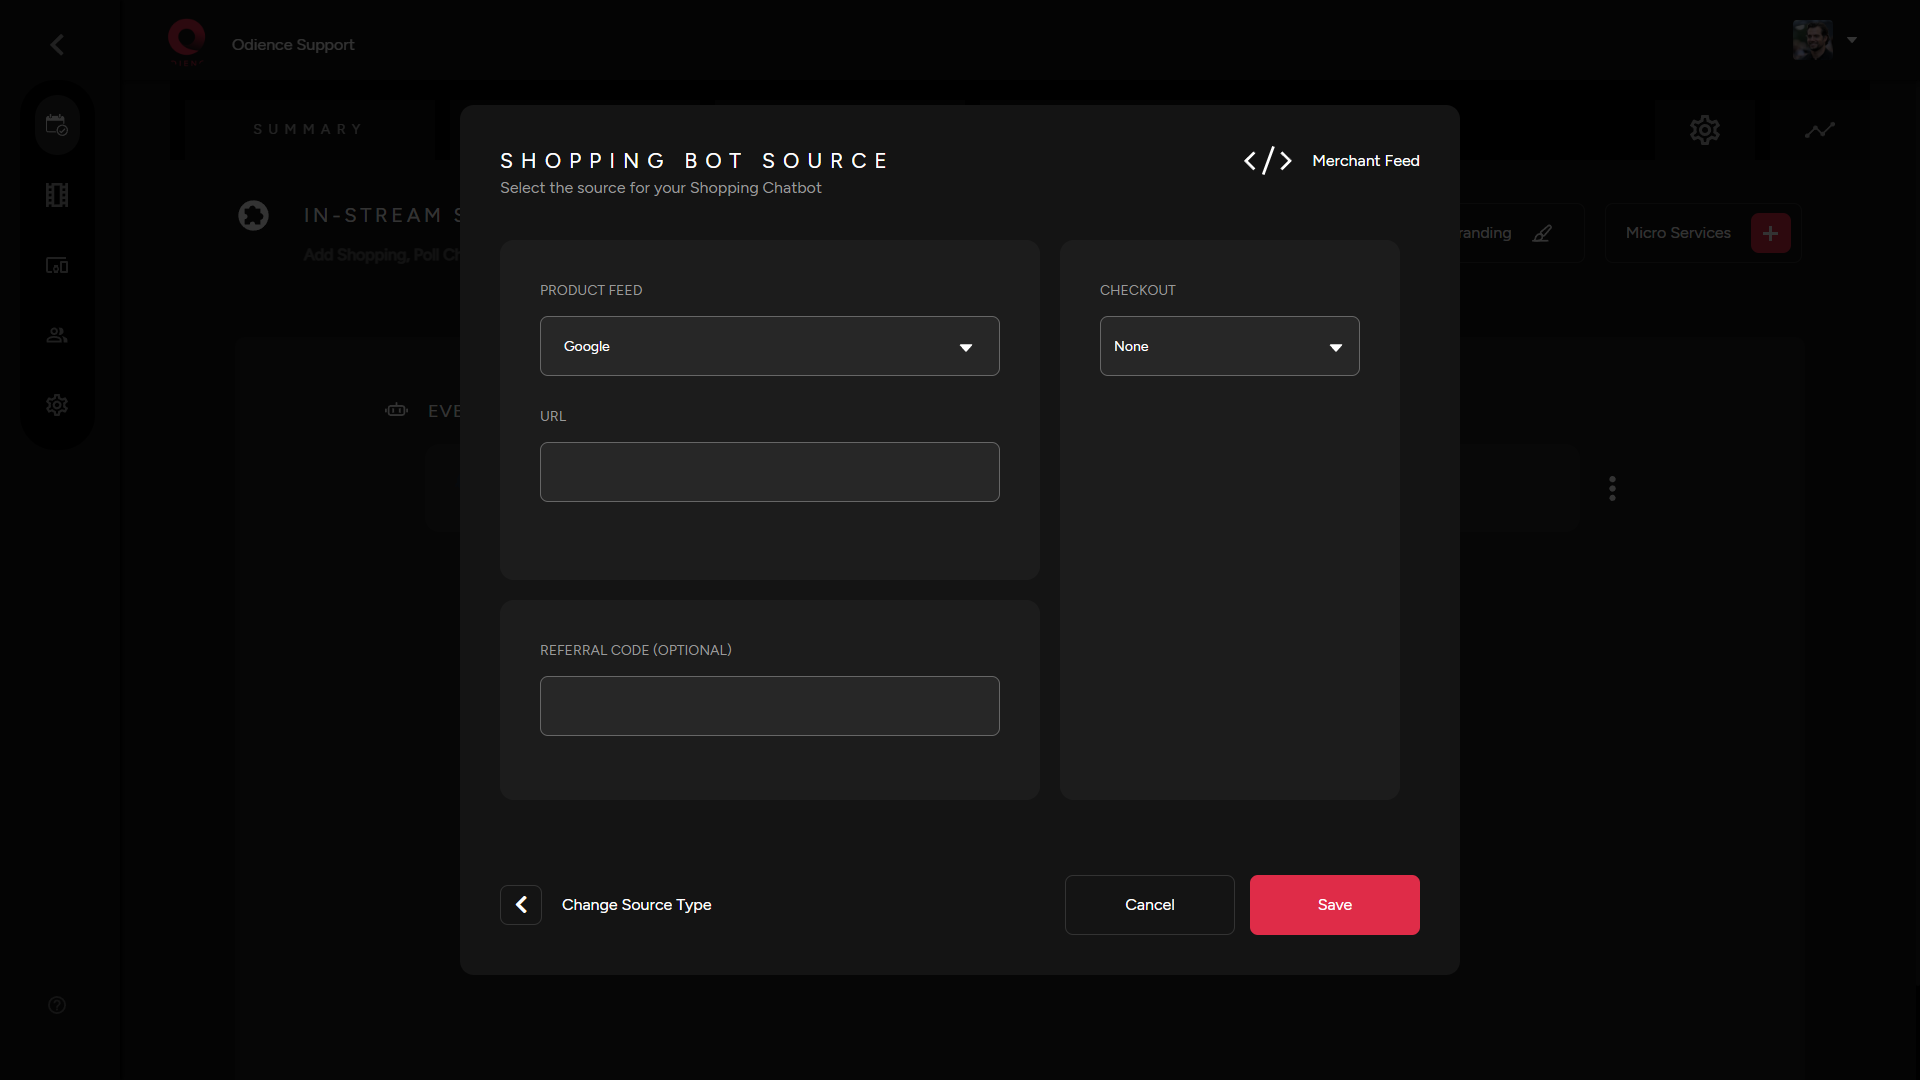
- Note: Odience supports the use of Google, Amazon & other XML merchant feeds.
5. Select checkout platform & Click Save.
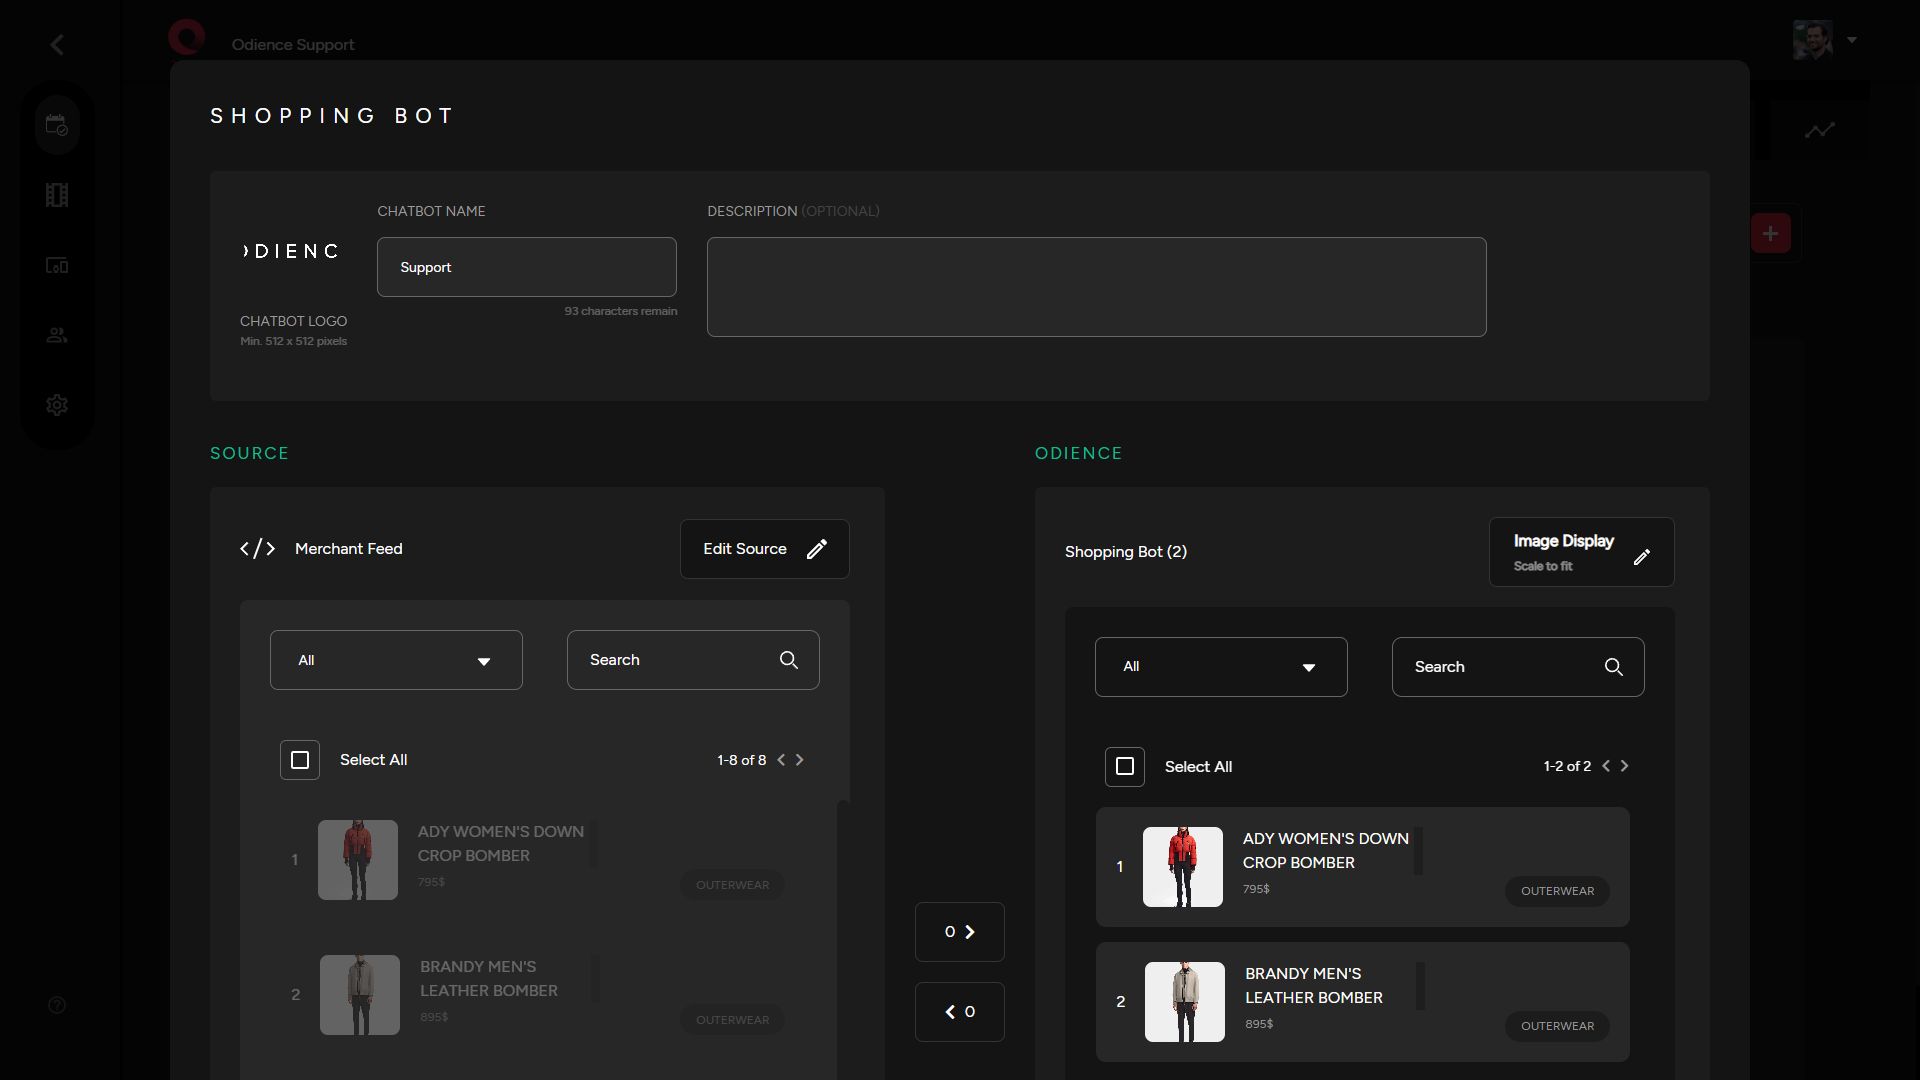
6. Add a Chatbot Logo, Name, Description (optional) & then select which products from your source you want to include in your Odience shopping chatbot.
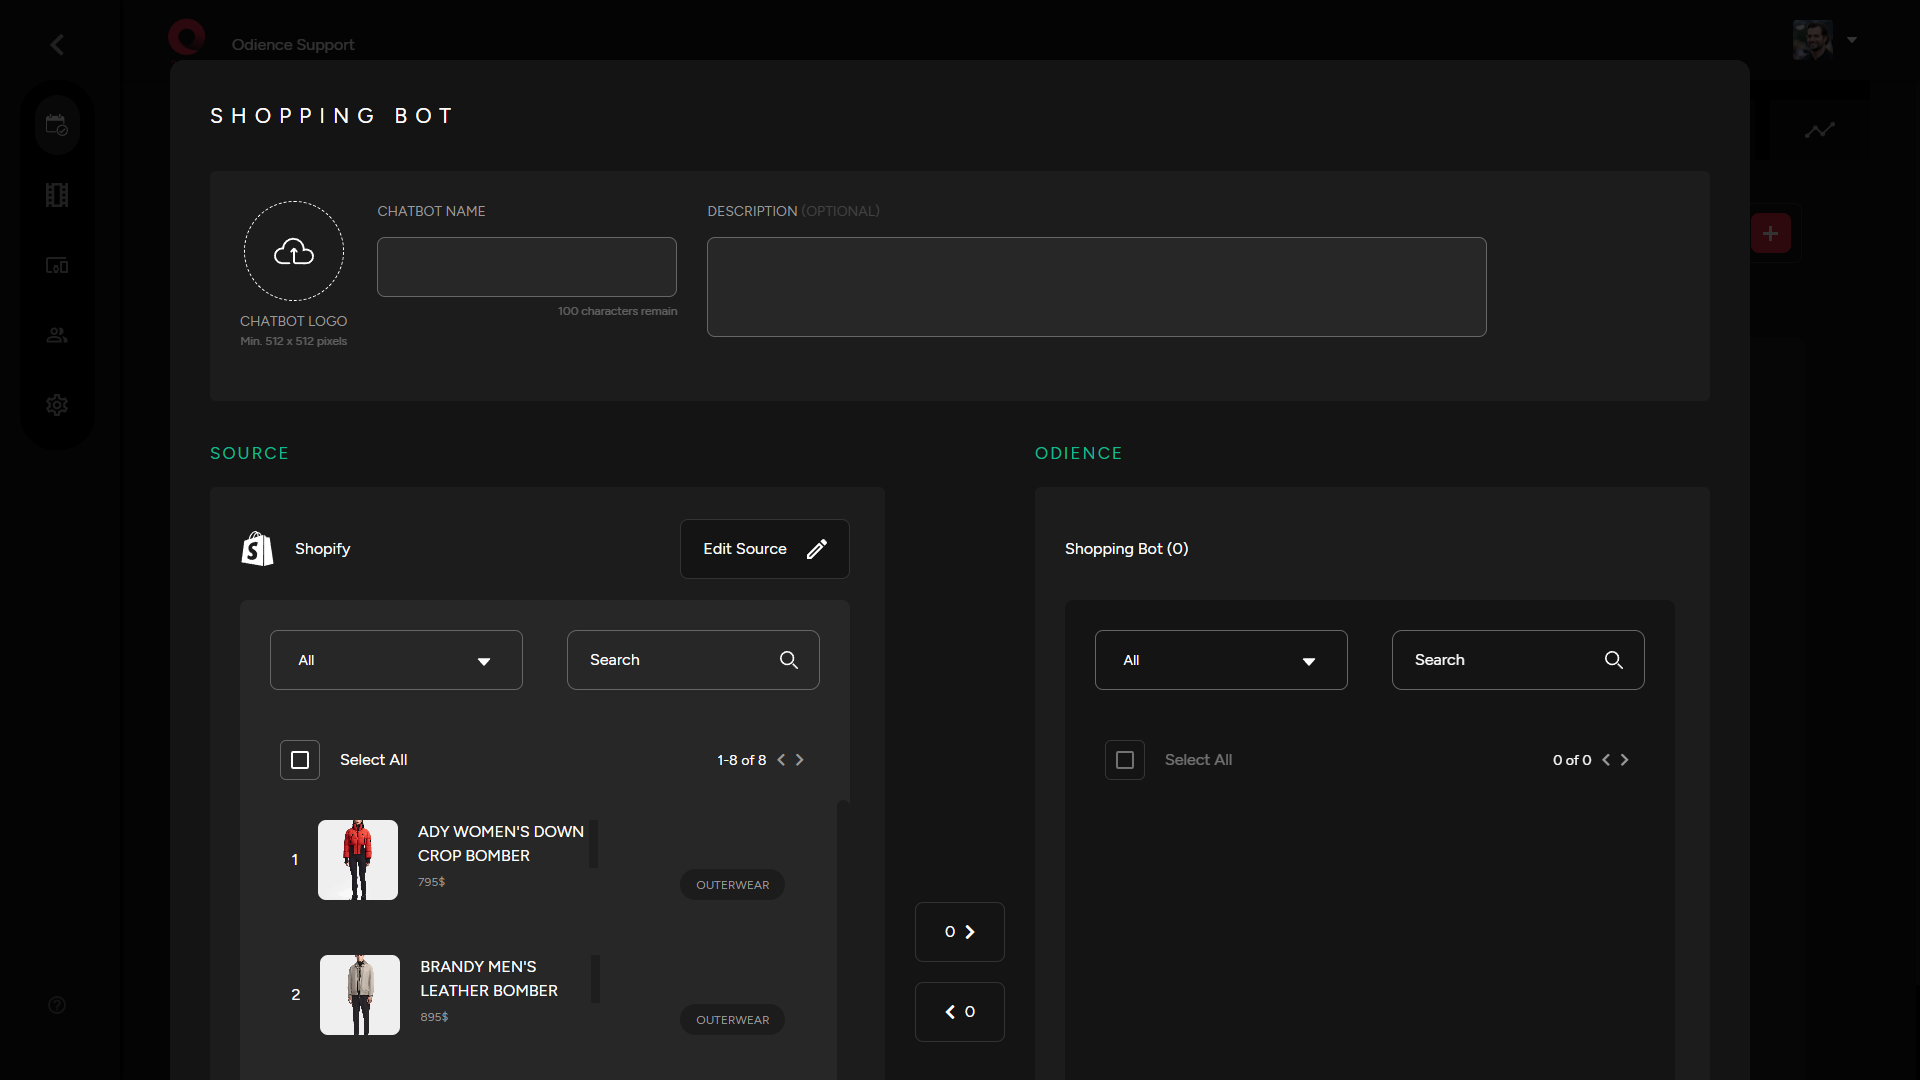
8. Click save to add Chabot to your event. The information can be edited.
Edit Chatbot
1. Select the stacked bullets for more options and click Edit.
2. Edit Chatbot Name, Description and Products used in your chatbot. Click Save to confirm changes.
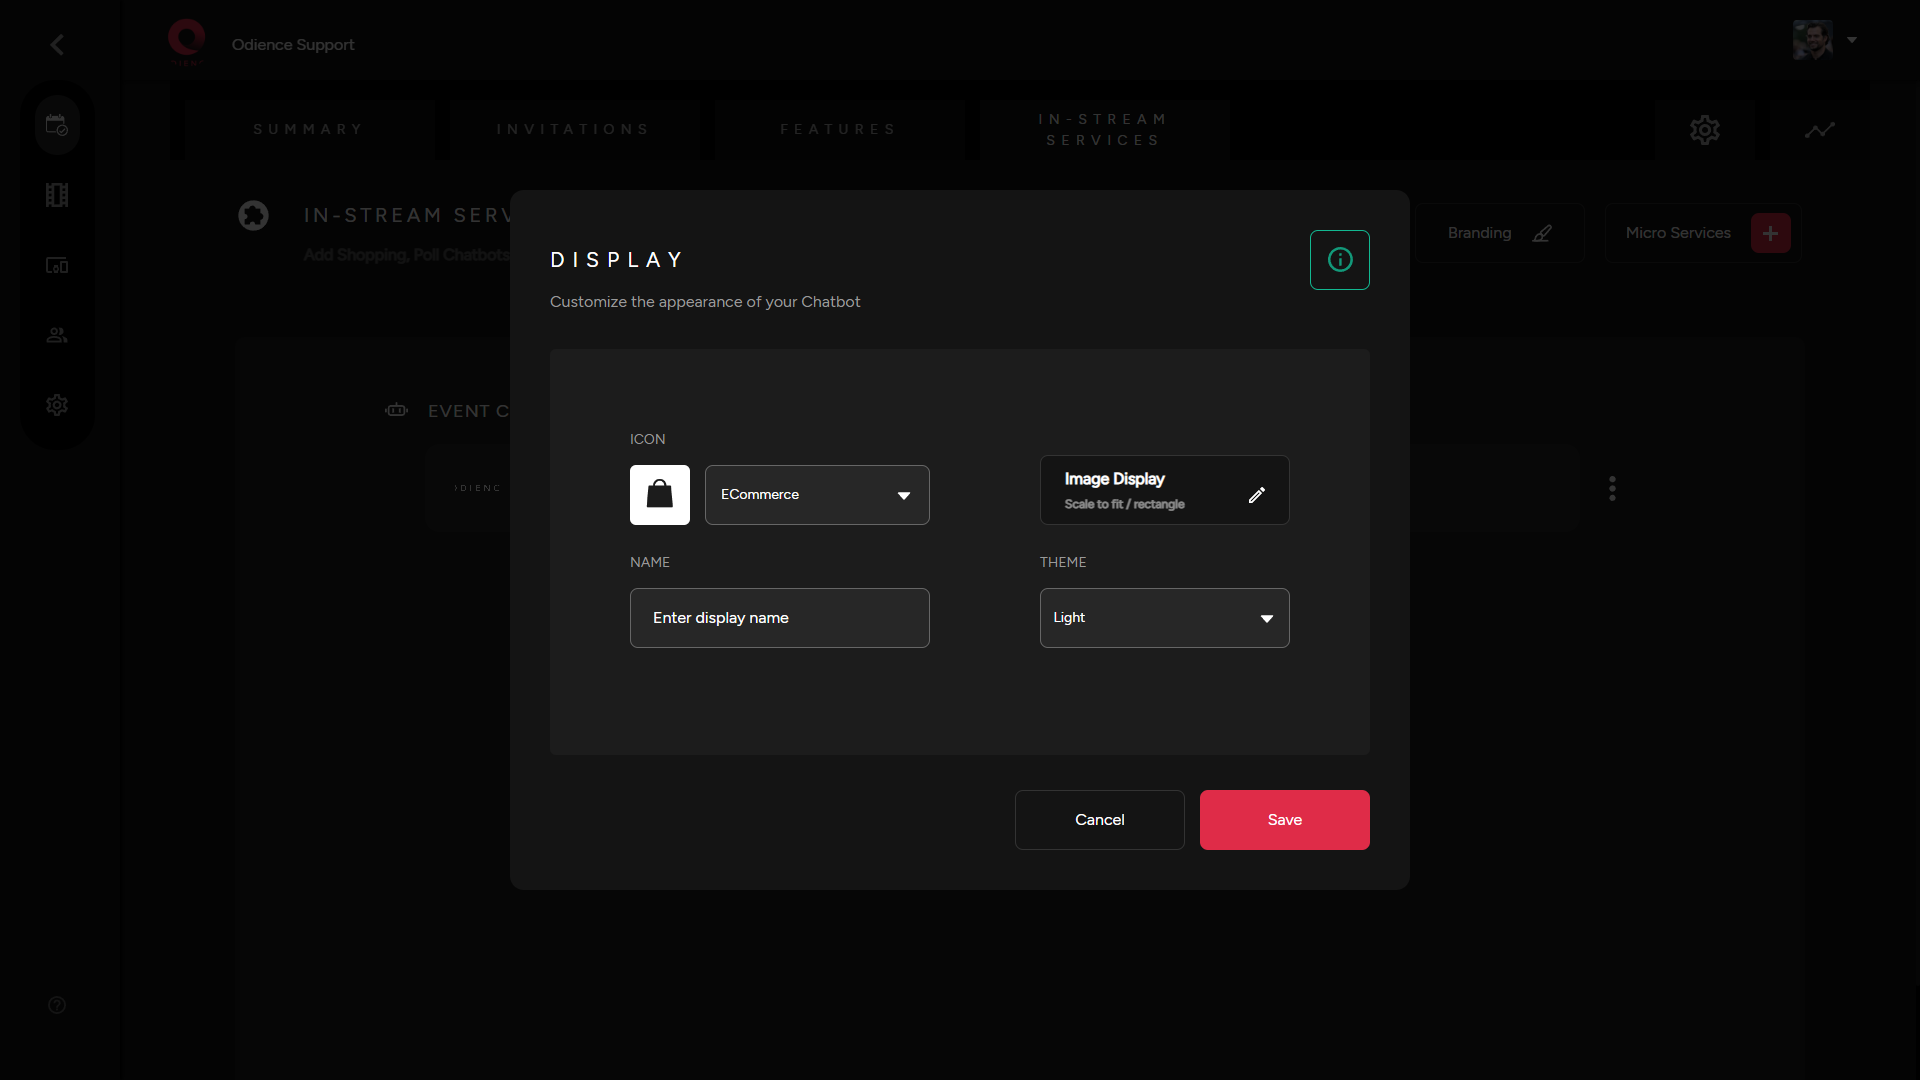
Customize Appearance
1. Select the three stacked bullets on the right side of your chatbot.
2. Customize the appearance of your chatbot. Click Save to confirm changes.

Poll Bot
Create Poll Bot
1. Start by selecting Poll in your Quick Start or by selecting Add Chatbot in your Micro Services dropdown.
2. Add a chatbot from your Organization.
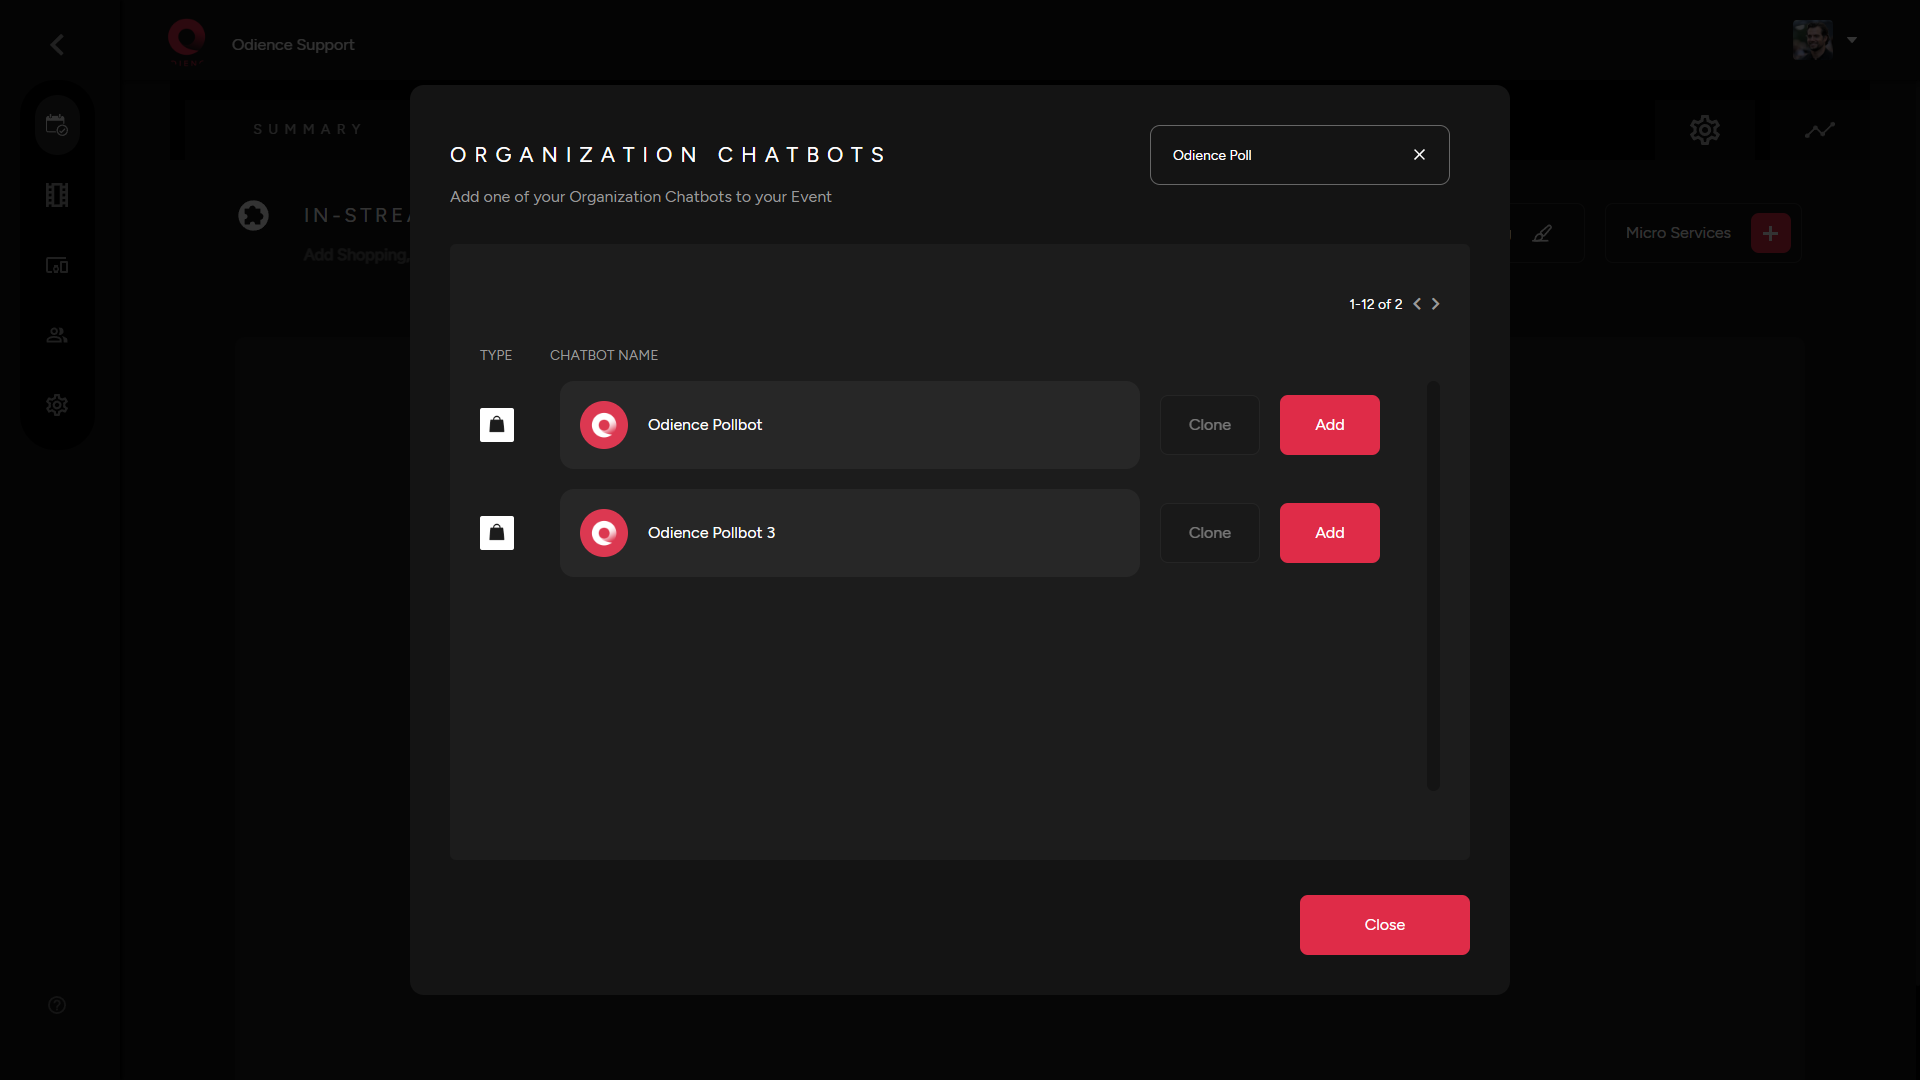
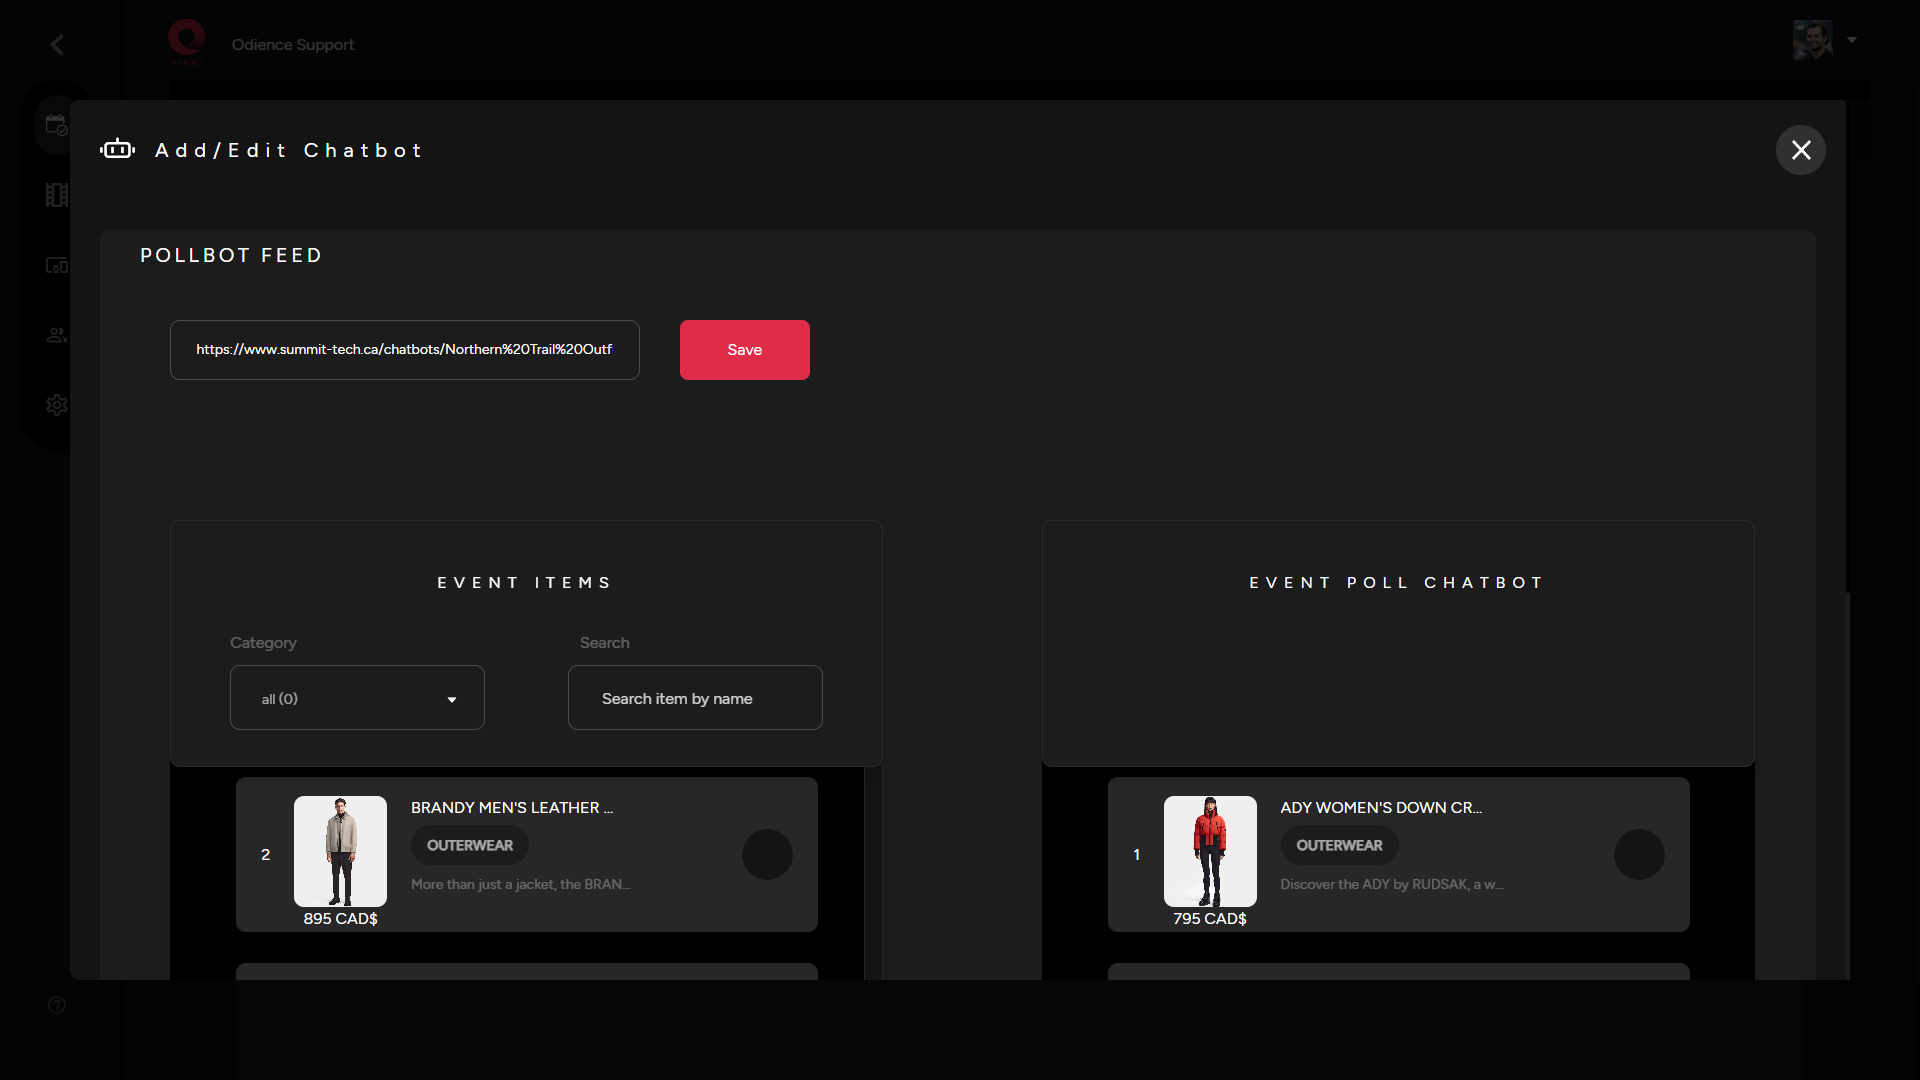
3. Add or edit Poll Feed by selecting the extra options right beside your Poll Bot. Select which products you want to include & then click Save
Customize Appearance
- Select the three stacked bullets toward the right side to customize the appearance of your chatbot. Click Save to confirm changes.
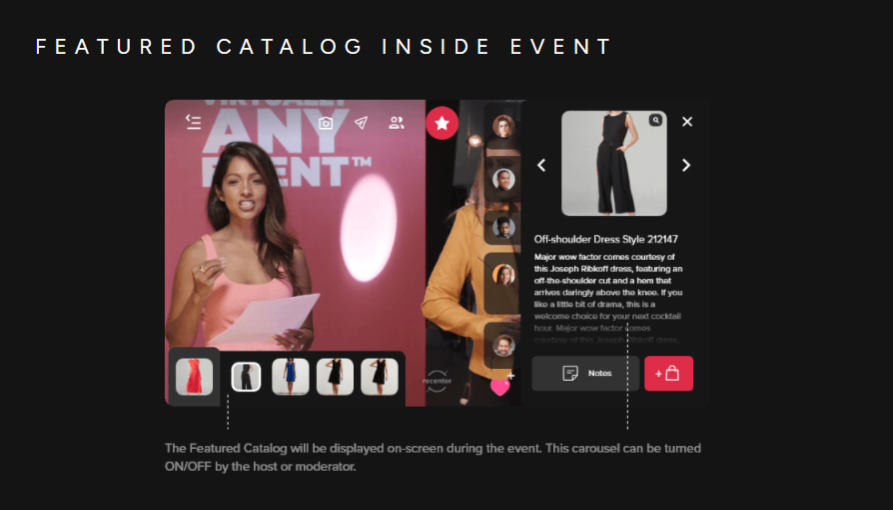
Featured Catalog
Create Featured Catalog
Note: If you don't have a shopping chatbot, you will need to create one first. Refer to our step-by-step guide on how to a Create a shopping chatbot.
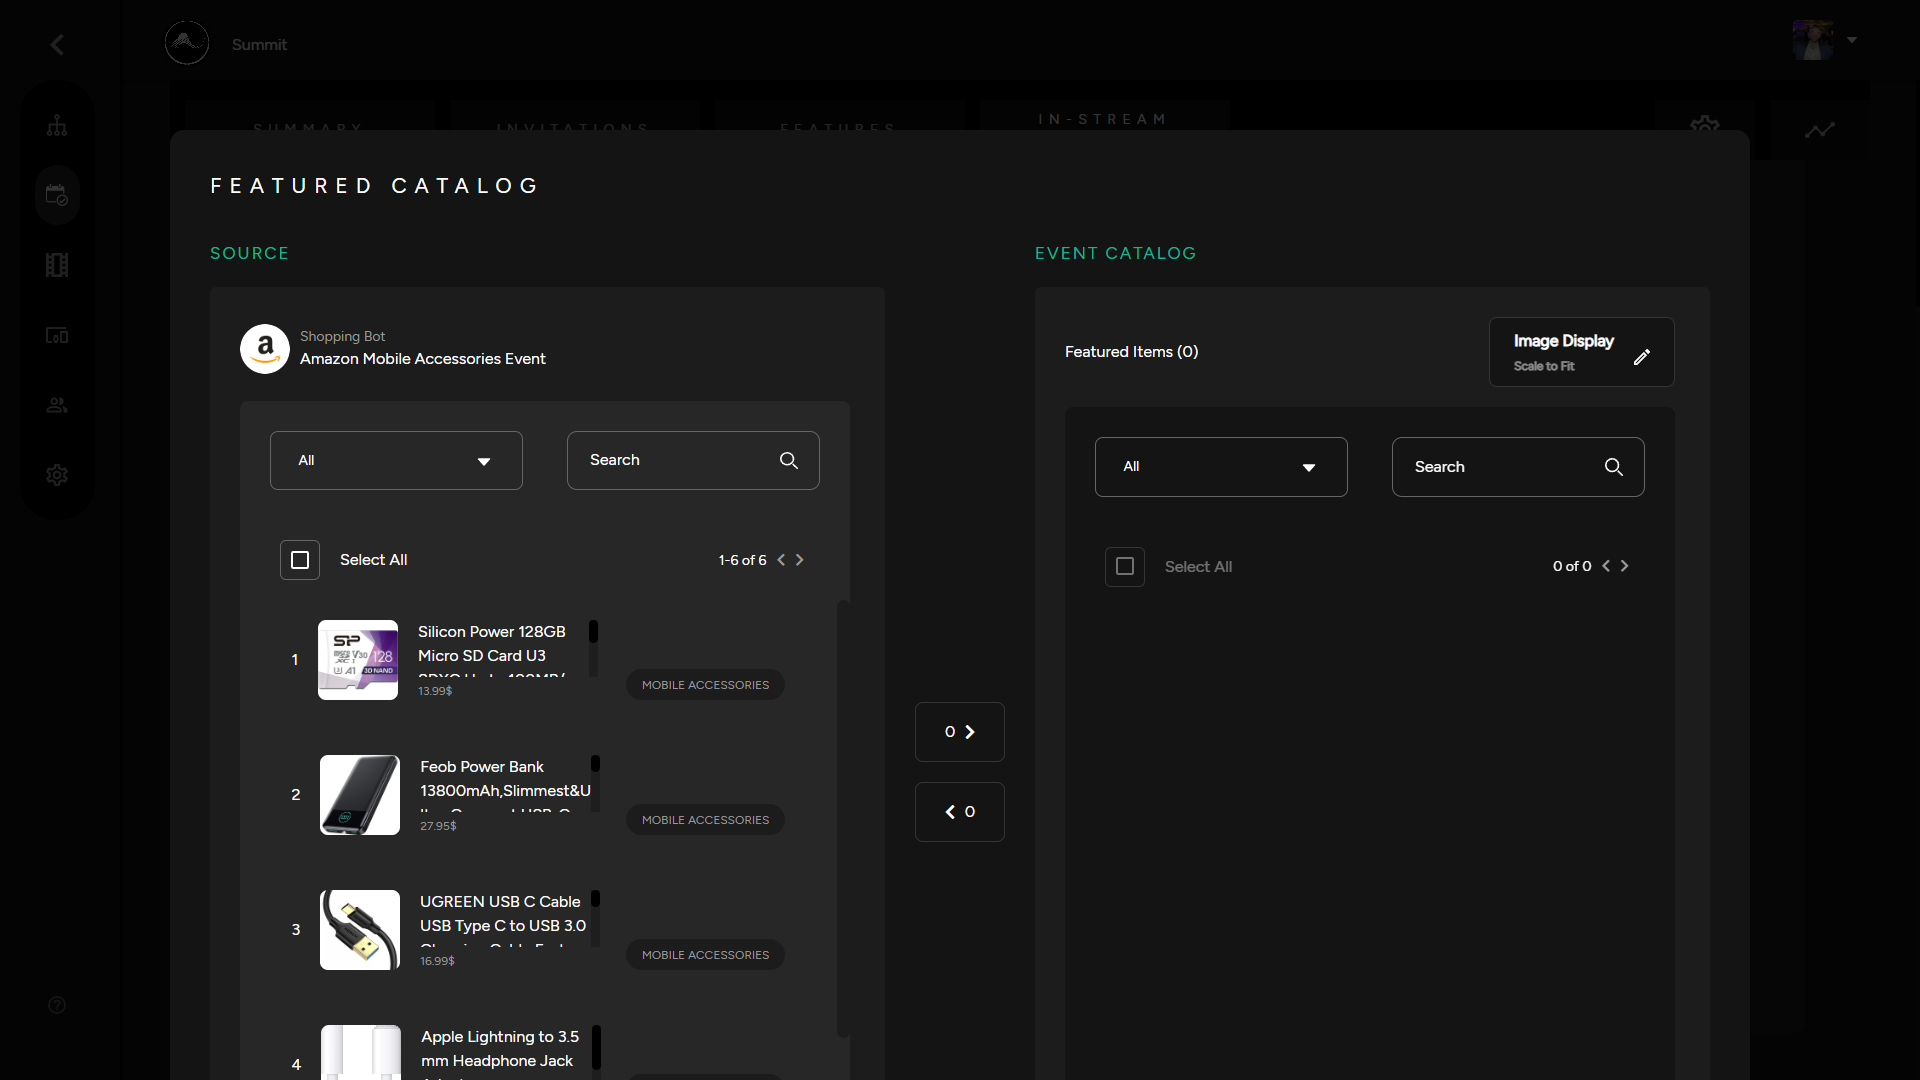
1. In the "Micro Services" drop down, select "Featured Catalog". Add a shopping chatbot from the Directory as the source.

2. Edit Poll Feed to select which products you would like to be featured in your event catalog.
Custom Featured Catalog
- You can create a custom Featured Catalog by adding an XML product feed as the source of your Custom Featured Catalog.
1. Add your Product Feed URL, Click Save to add products, then choose which products you would like to include in your catalog.
2. Click Save to apply your custom Featured Catalog.
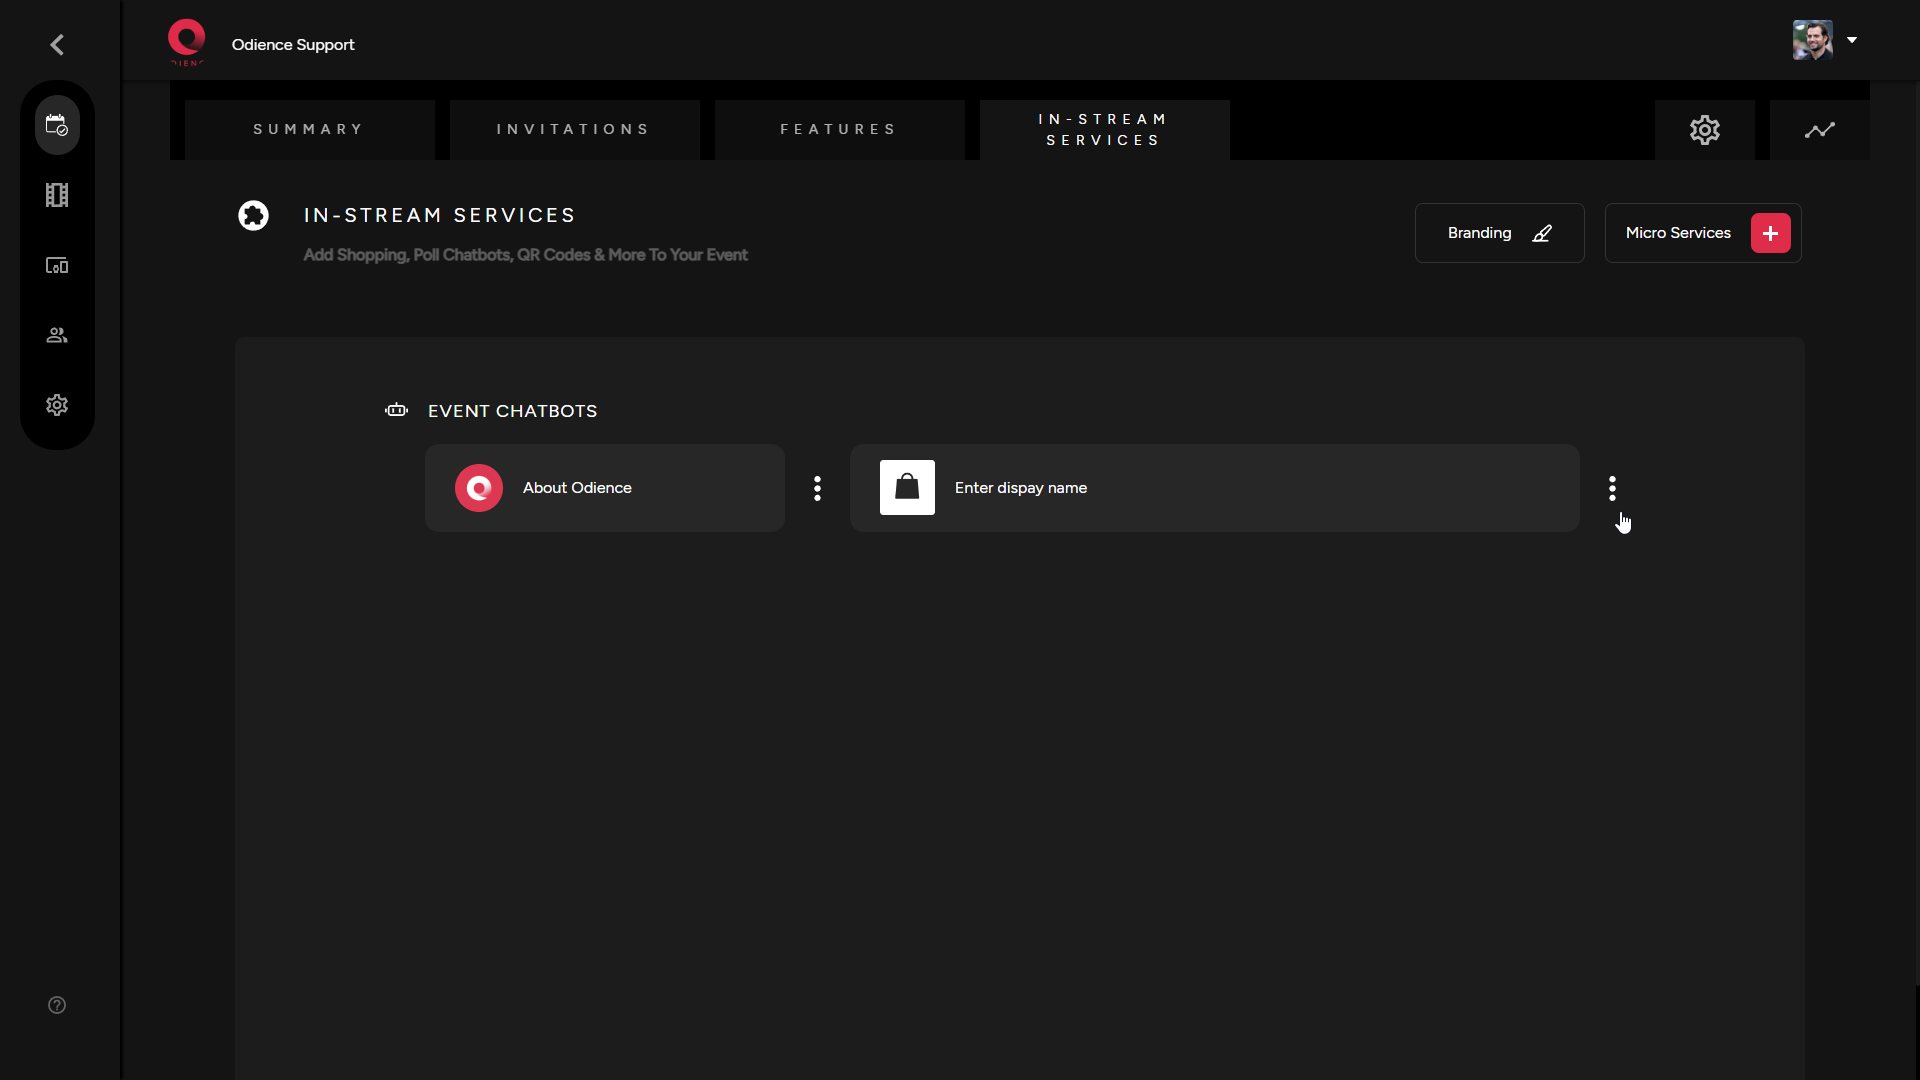
Chatbot Directory
Organization Chatbot Directory
The organization directory is a list of all your organizations chatbots. You can reuse or repurpose any previous chatbots that were created.
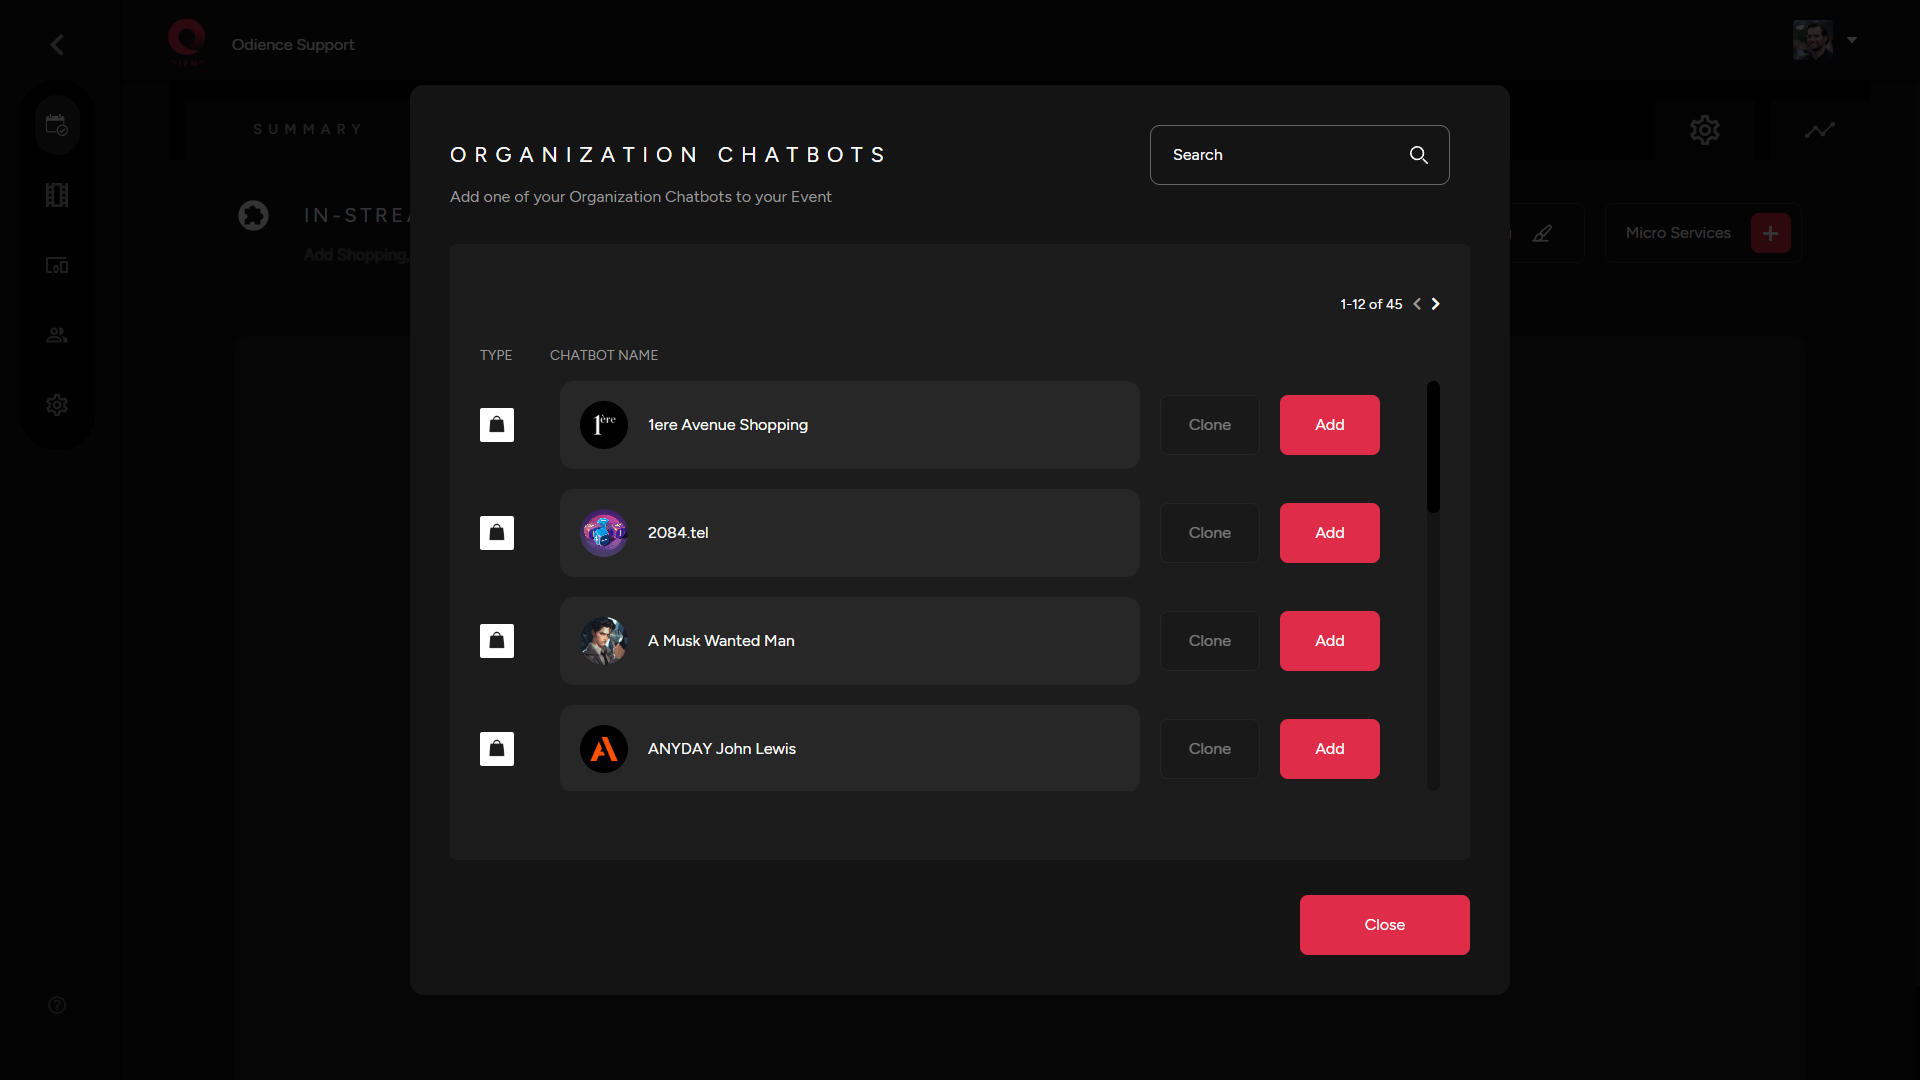
- No chatbots in your organization yet? See our guide on how to create your own custom Event Chatbot.
Actionable Items
Create QR Codes Interactions
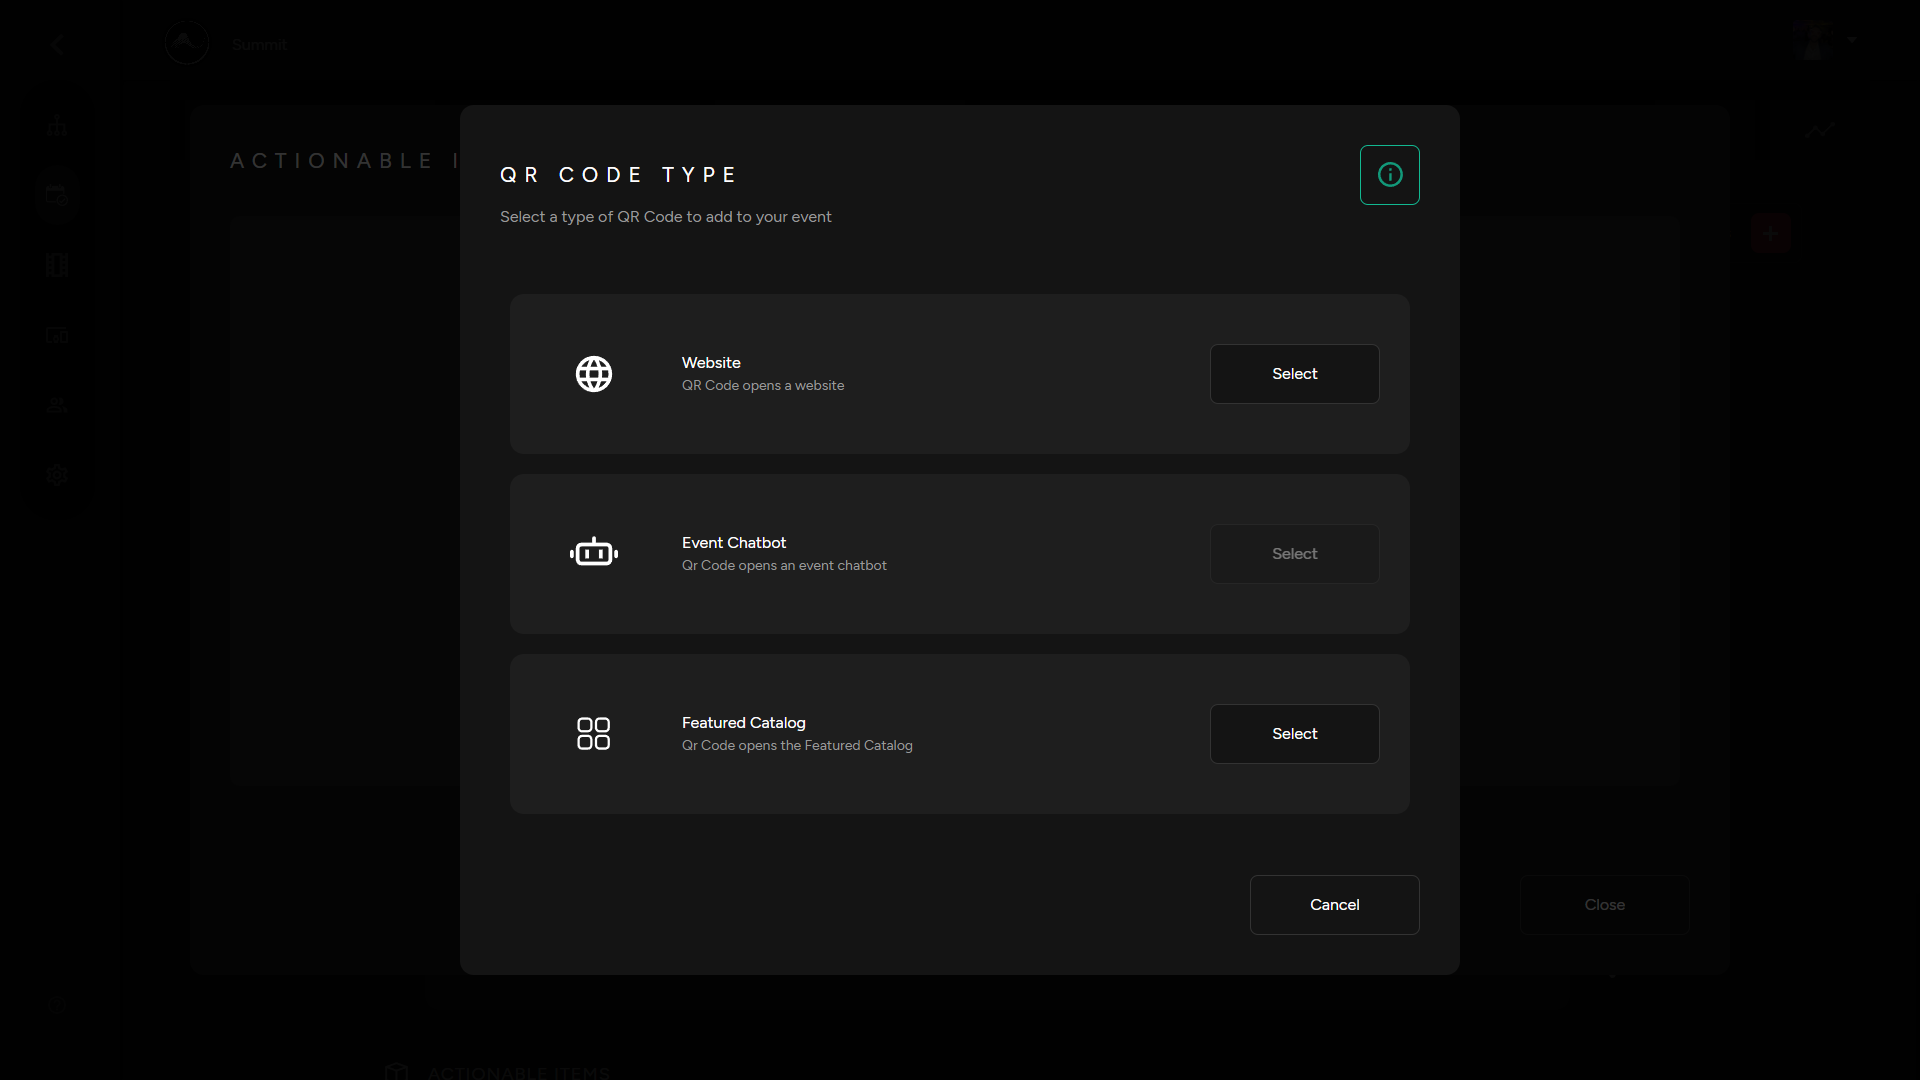
1. Select "Actionable Items" in your Micro Services drop down. Then Select the QR code type you would like to generate from the three options below.
- QR Code that opens a website
- QR code that opens up an Event Chatbot. See our guide on to create your own Event Chatbots.
- Connect a QR code to a Feature Catalog. See our guide on how to create your own Featured Catalog.
Add QR Code Tablets
1. From your instream services section, scroll to “Actionable Items” then click the QR code icon corresponding to the item you want to set-up a QR code for.
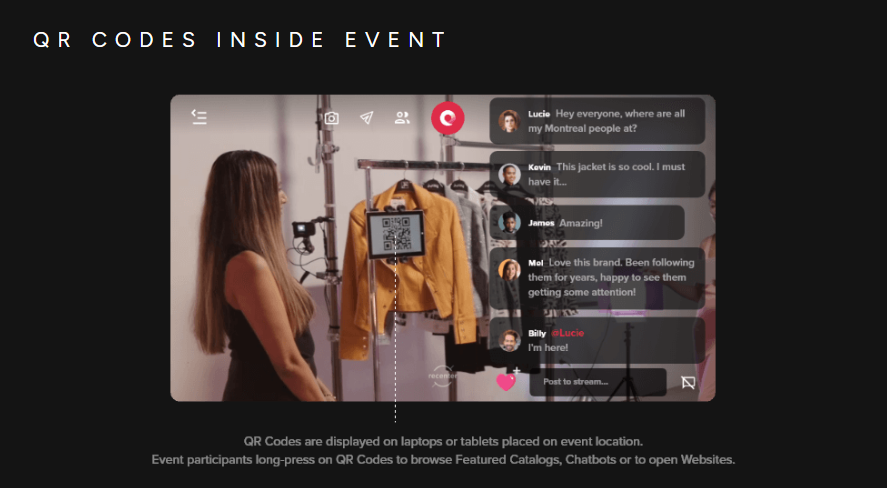
2. You will now have the QR code open in its own tab, ready to be used and placed within your event environment for viewers to interact with.
Invitations & Management
Create Invitation
Note: Custom invitation templates and Guest Lists are only available for Pro and Enterprise accounts. For more information on different accounts, see our guide on Account Types.
Create Guest List
1. Select create Guest List, then click Create New within the guest list window.
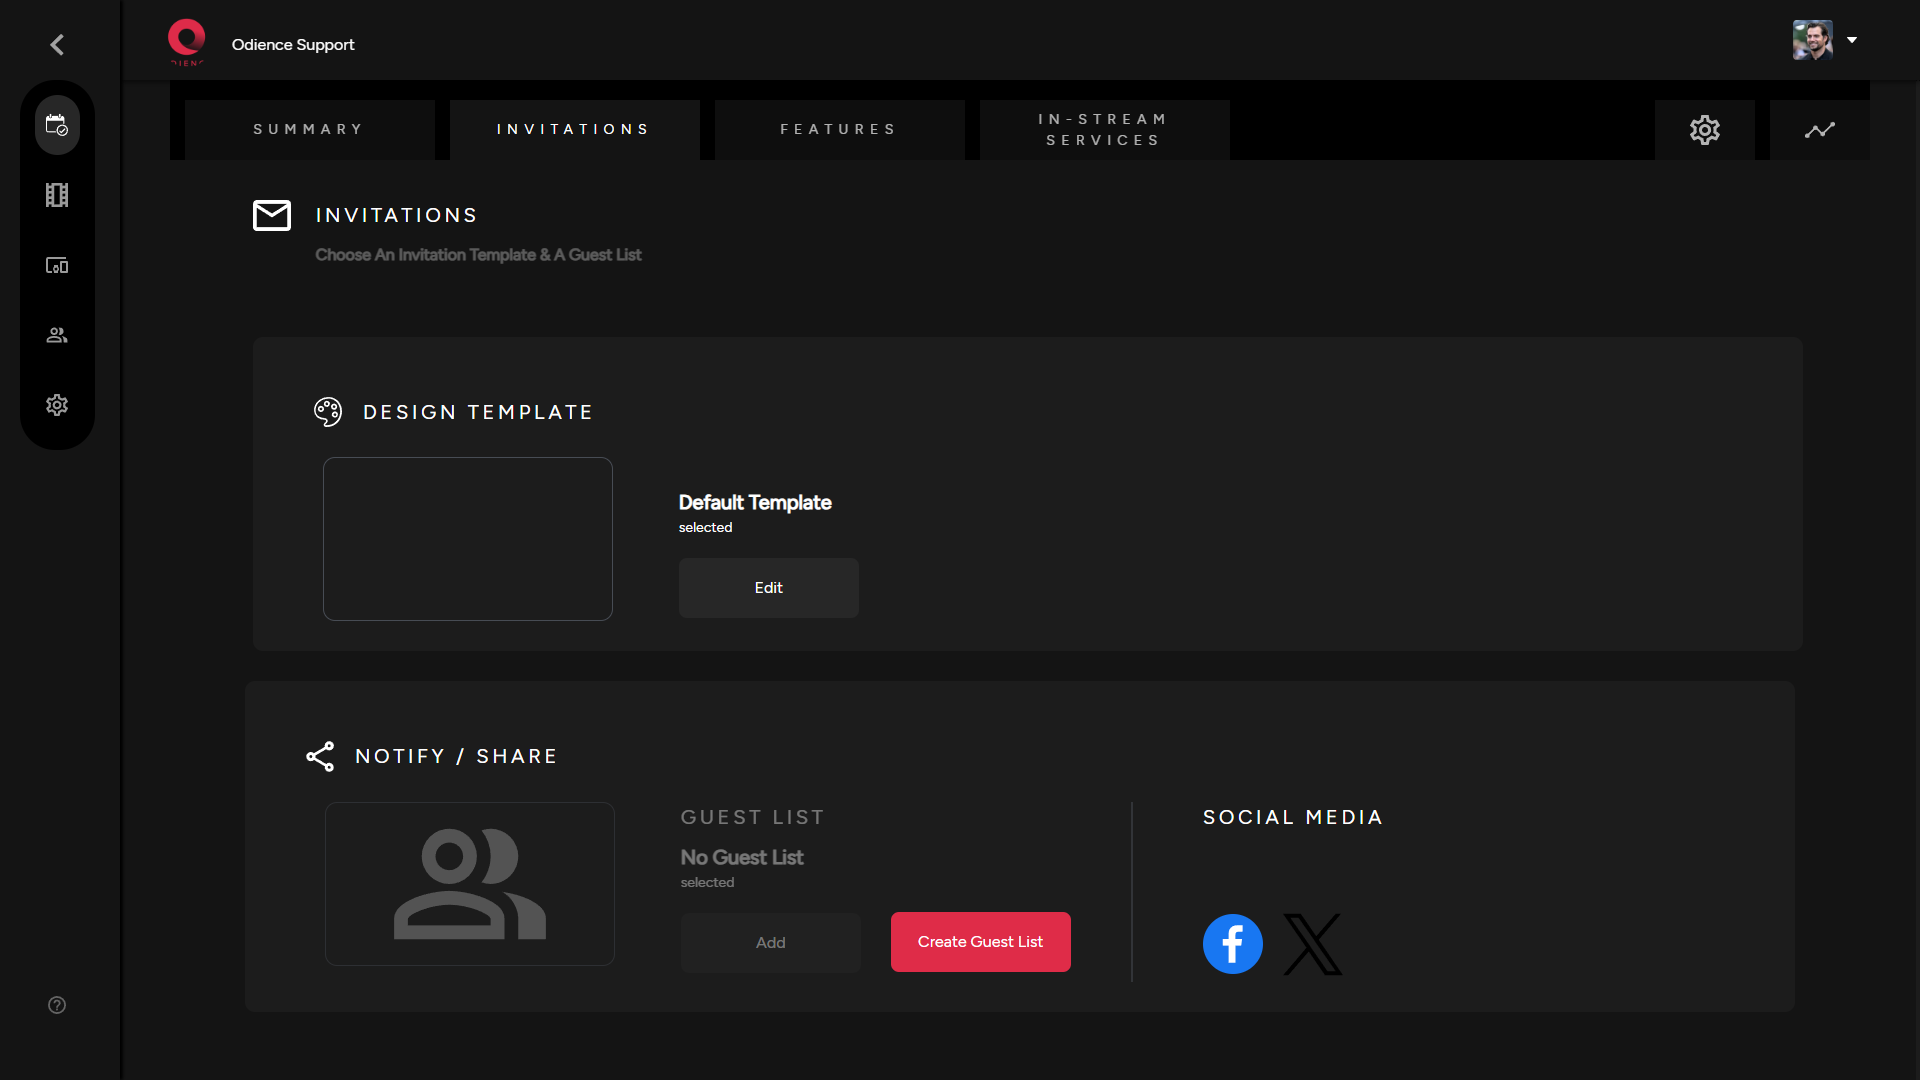
2. Fill out the information to create your guest list. Send invitation using phone numbers or send via email. Click Add Guest List to confirm.
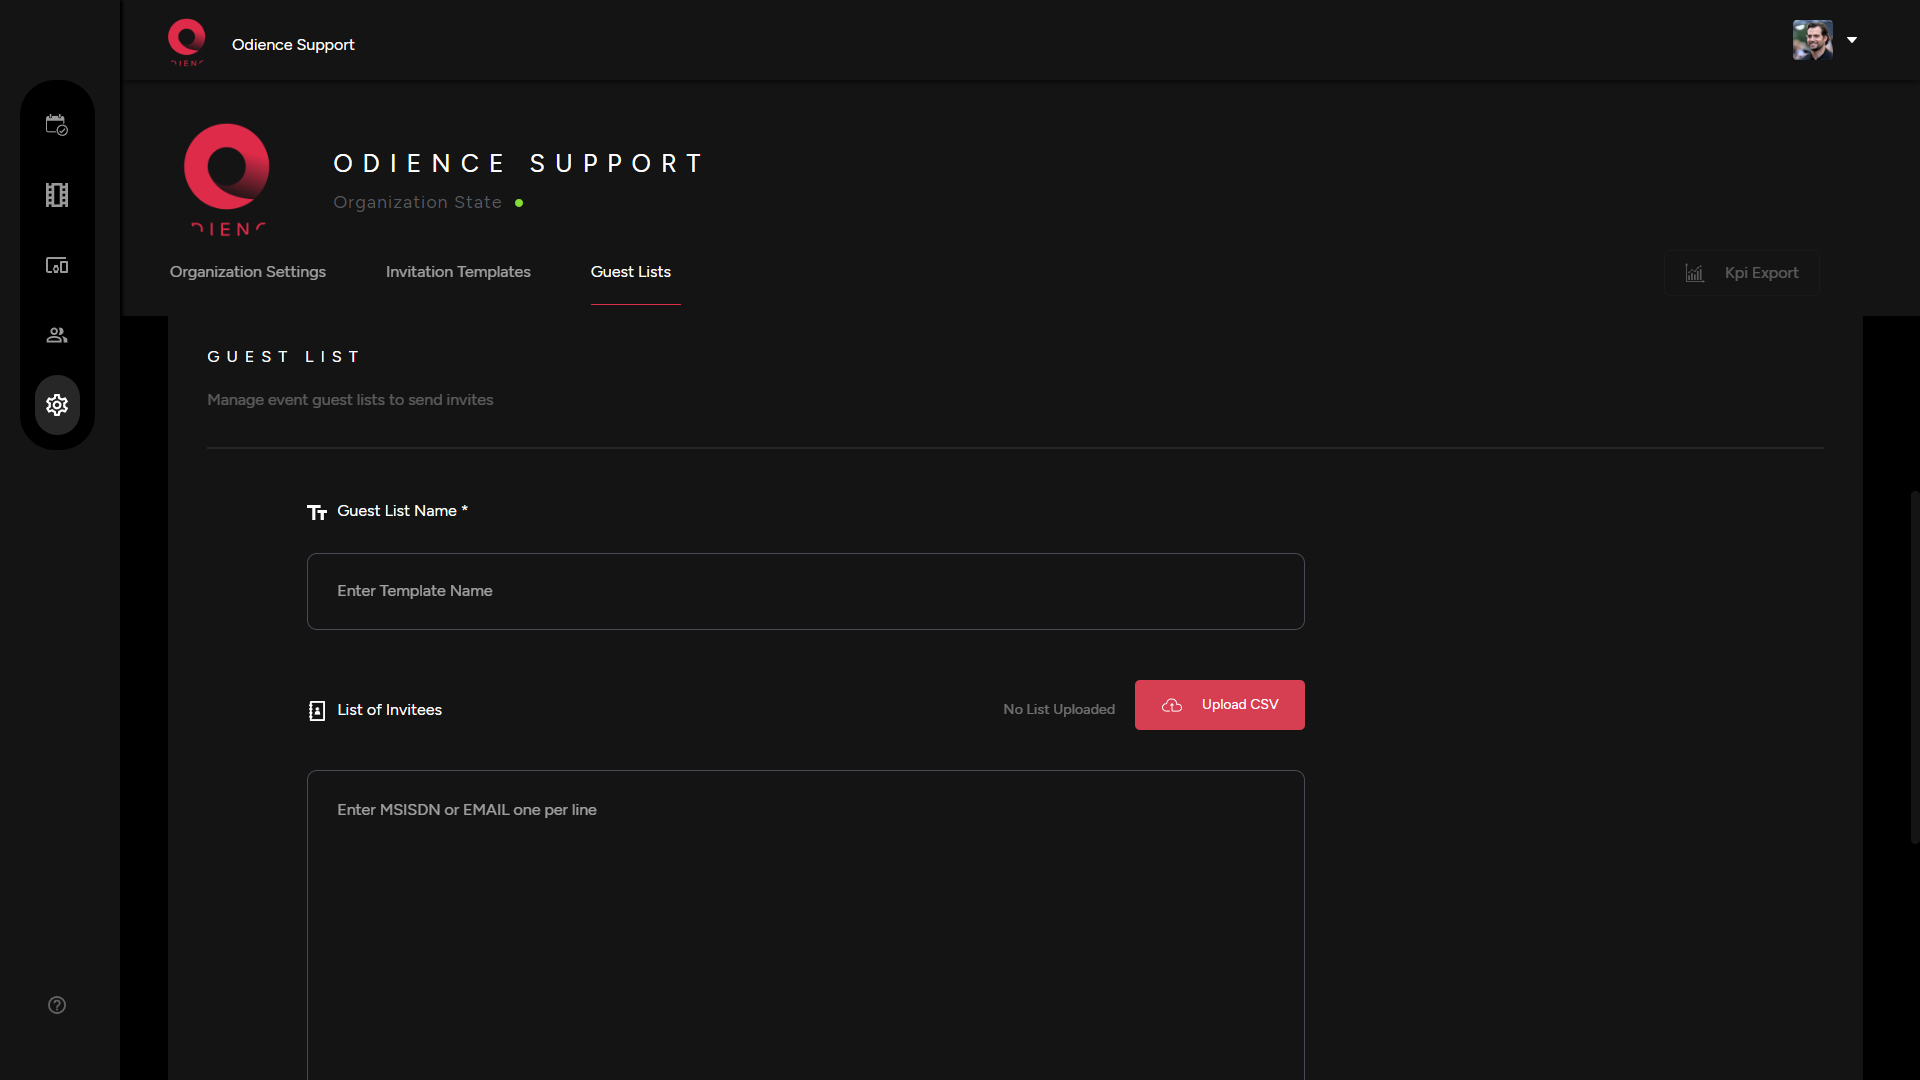
3. Go back to your event to apply your new guest list.
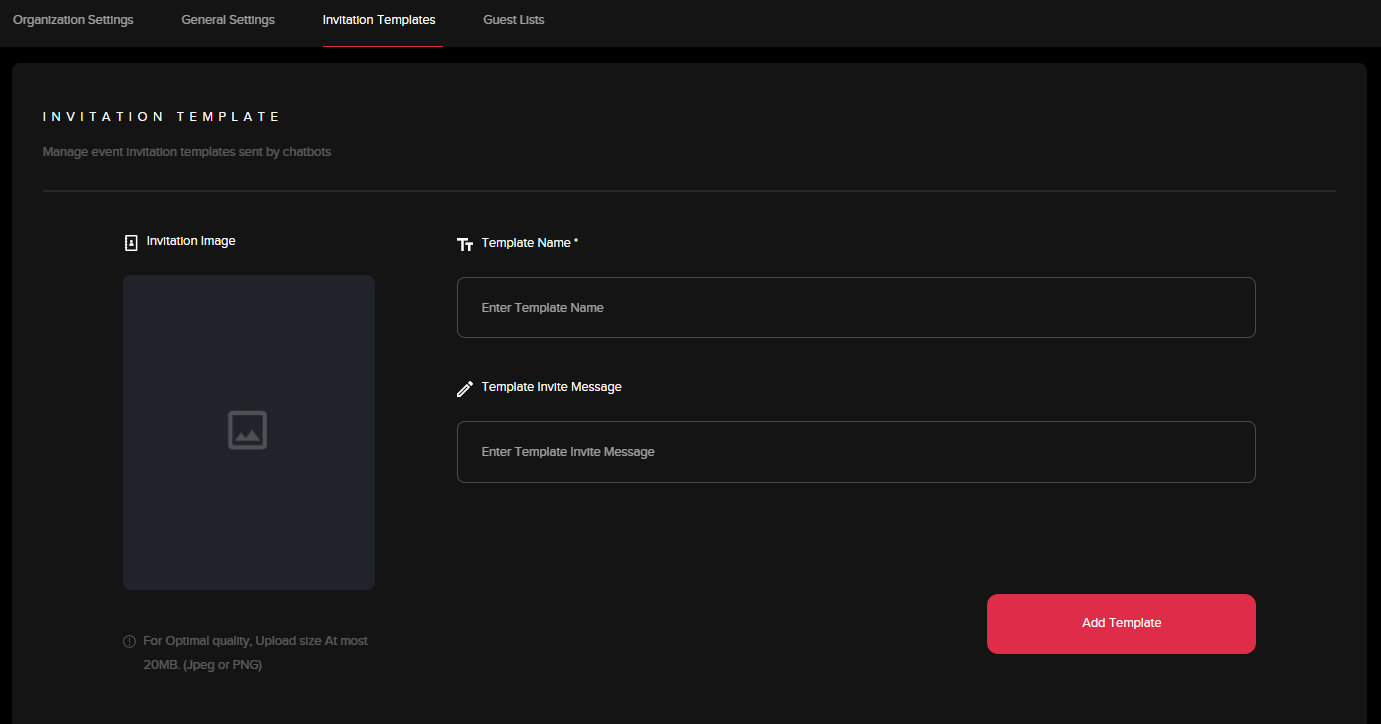
Create New Design Template
Your invitation design template allows you to edit the appearance and presentation of your invitations.
1. To create a new design template, click Edit to get directed to the invitations creation page.
- Note: If you have templates already created, a small window will open (see below) providing the option to add an existing template or to create a new one.
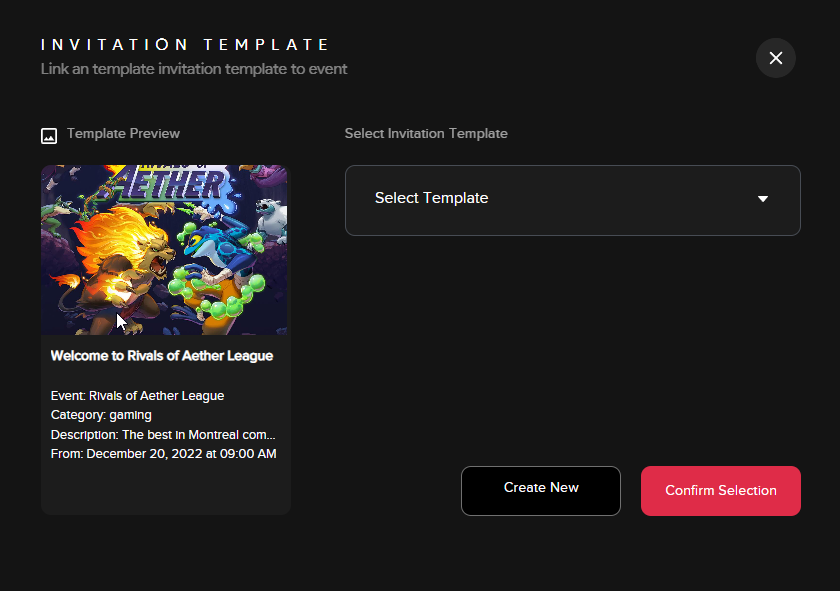
2. In the creation page, fill out the information to create your invitation template. Click "Add Template" to apply template.
Share via Social Media
1. Odience can be publicized to platforms like Facebook, Instagram and X. Simply select the social media platform & go through the steps to publish.
Invitation Requests
Manage Requests
You will have the option to view requests and decide whether to Accept or Revoke requests to join.
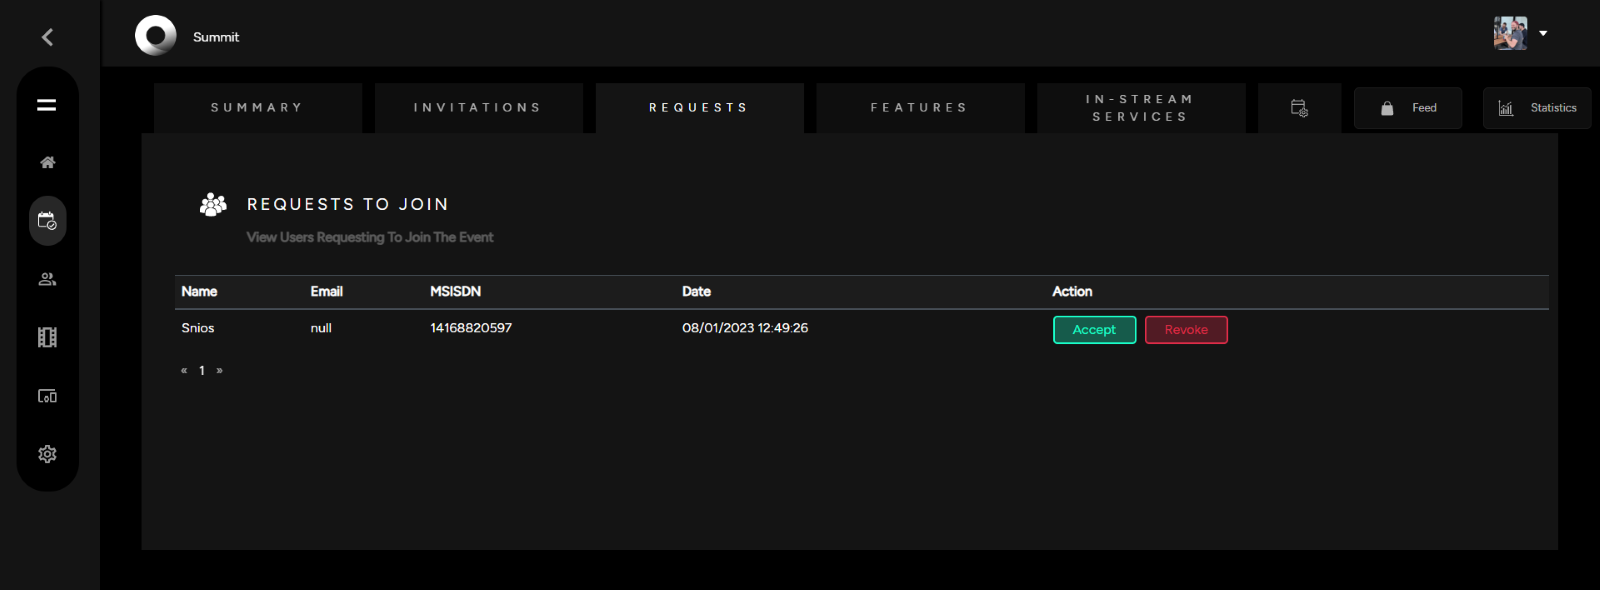
Note: Managing Requests will only be available if Registration was enabled in the Event Access Settings. See our guide to learn more about Registration & Event Access options.
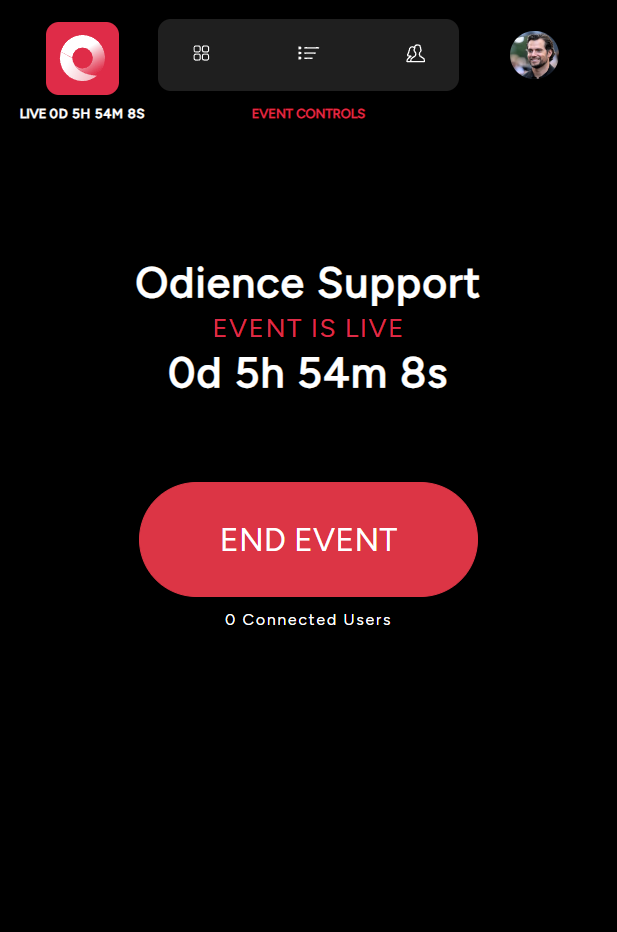
Dashboard (Manage Live Event)
Intro
Dashboard
Manage Connected Guests, Messages, Video Walls and much more in real-time.
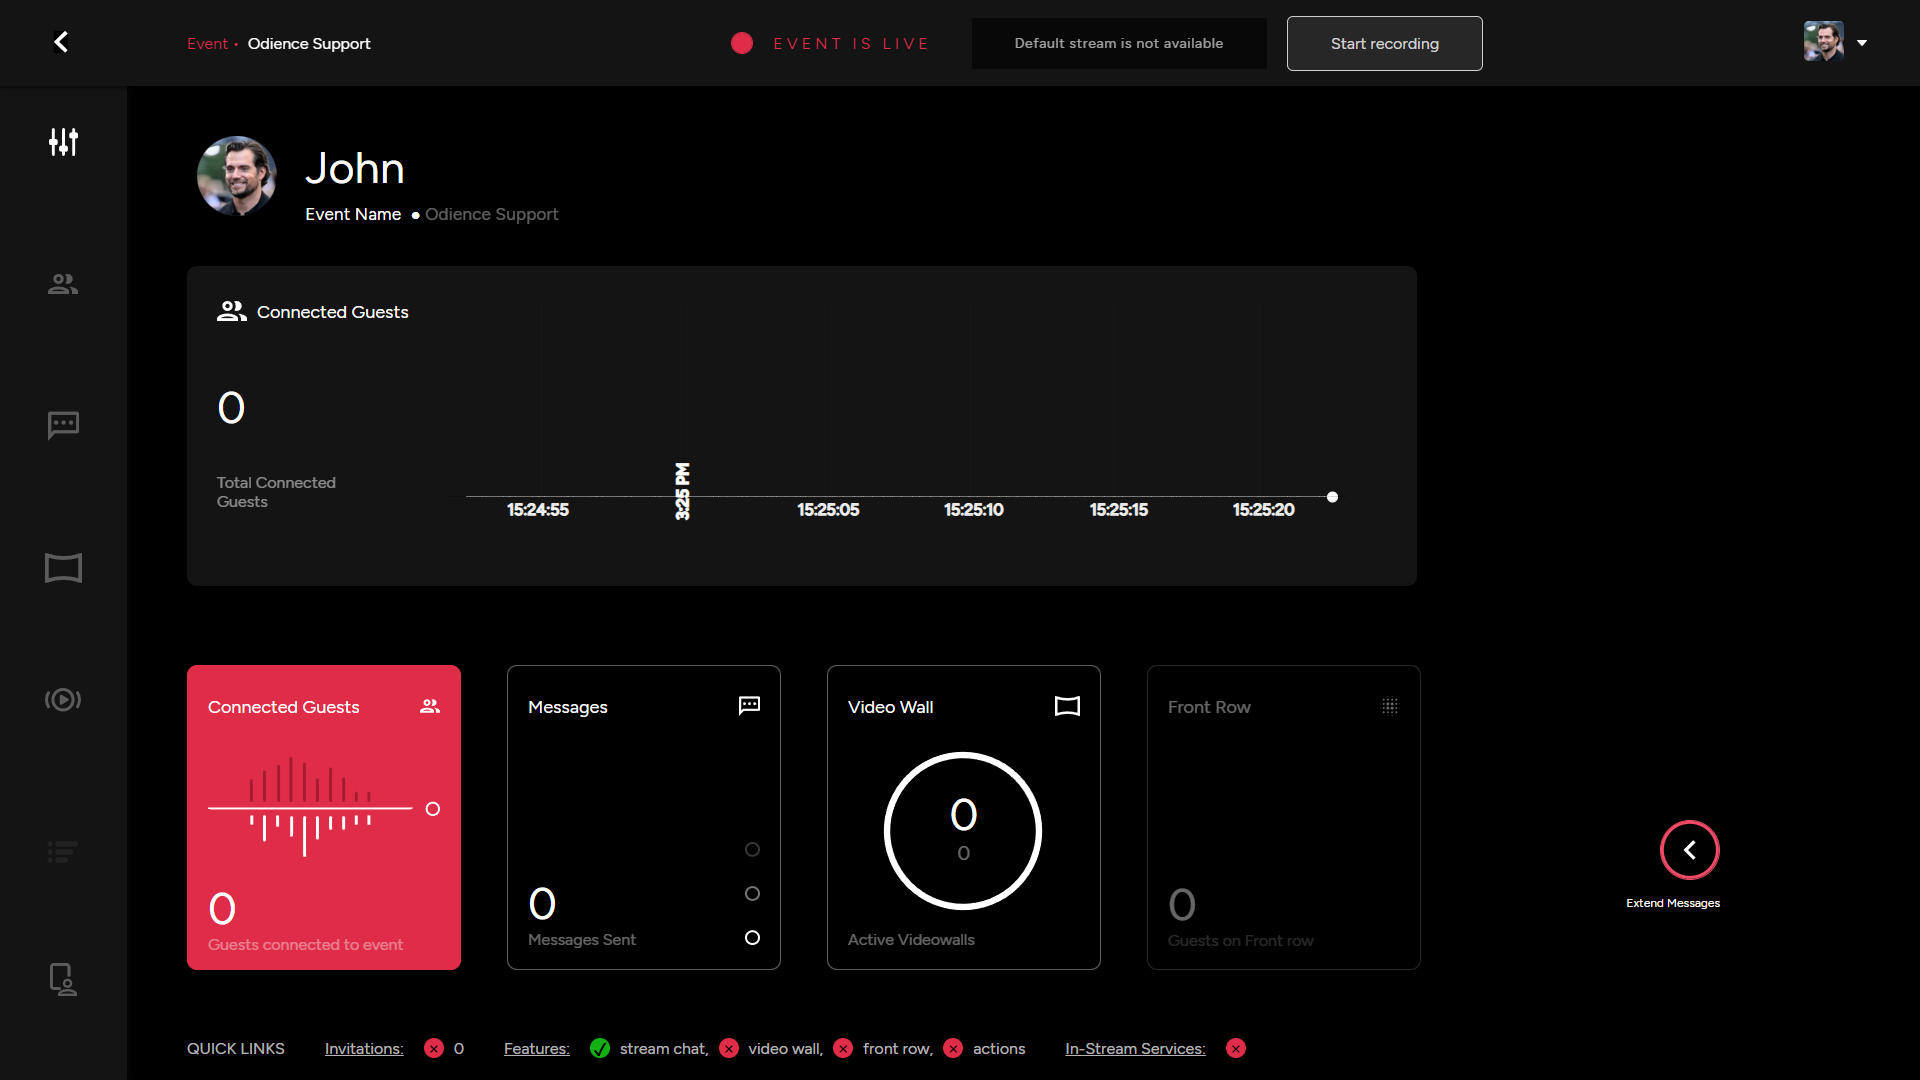
- For more details, see Dashboard guide.
Guests
Manage guests, Extend more invitations and initiate Action for specific Users.
- For more details, see Guests guide.
Moderation
- Moderate Live Messages circulating the chat and manage other chat as well as user related actions.
- For more details, see Moderation guide.
Video Wall
- Manage all areas of your video wall, from Spectators, Invitations, Front Row, Settings and so forth.
- For more details, see Video Wall guide.
Control Room
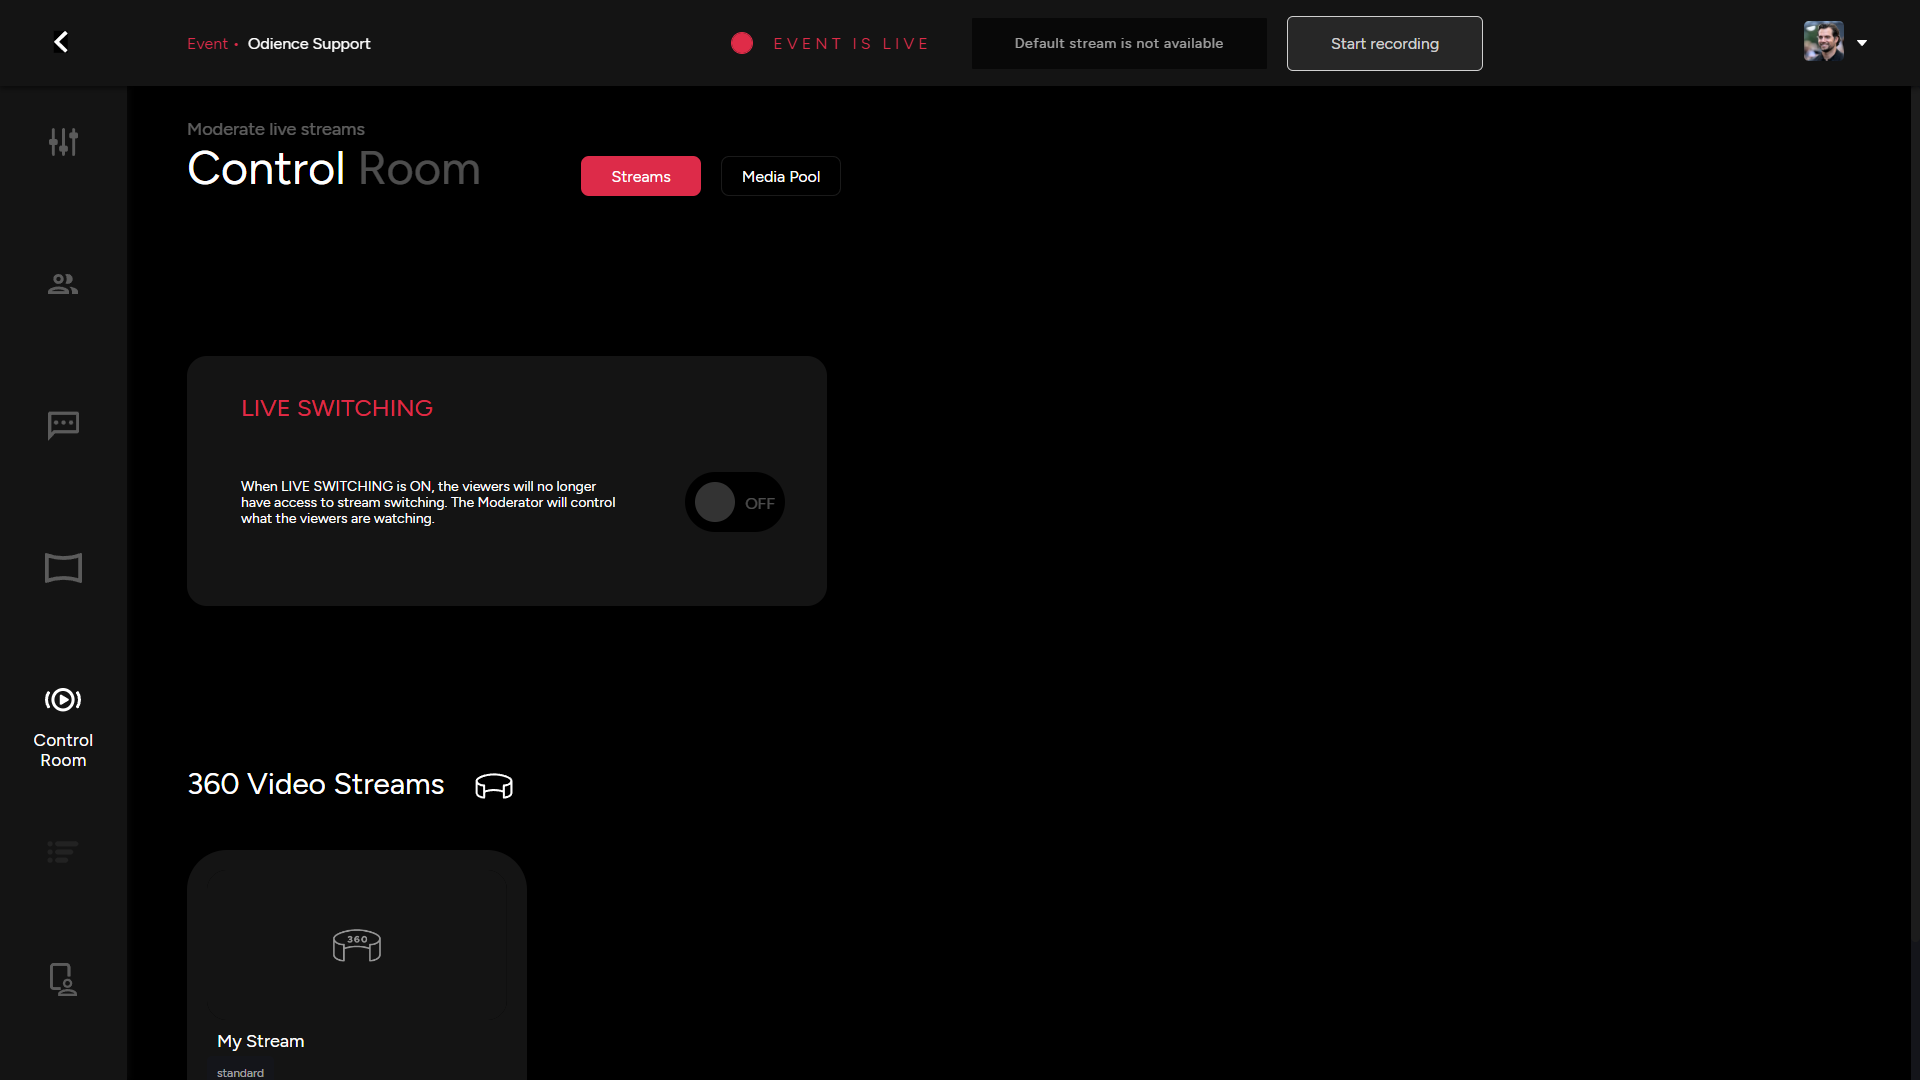
- Enable Live Switching to allow users access to switch between different streams within your event.

- For more details, see Control Room guide.
Media Pool
- Manage event and video wall content from your media control hub. Add new content or modify how it appears in your live event.
- For more details, see Control Room guide.
Poll Bot
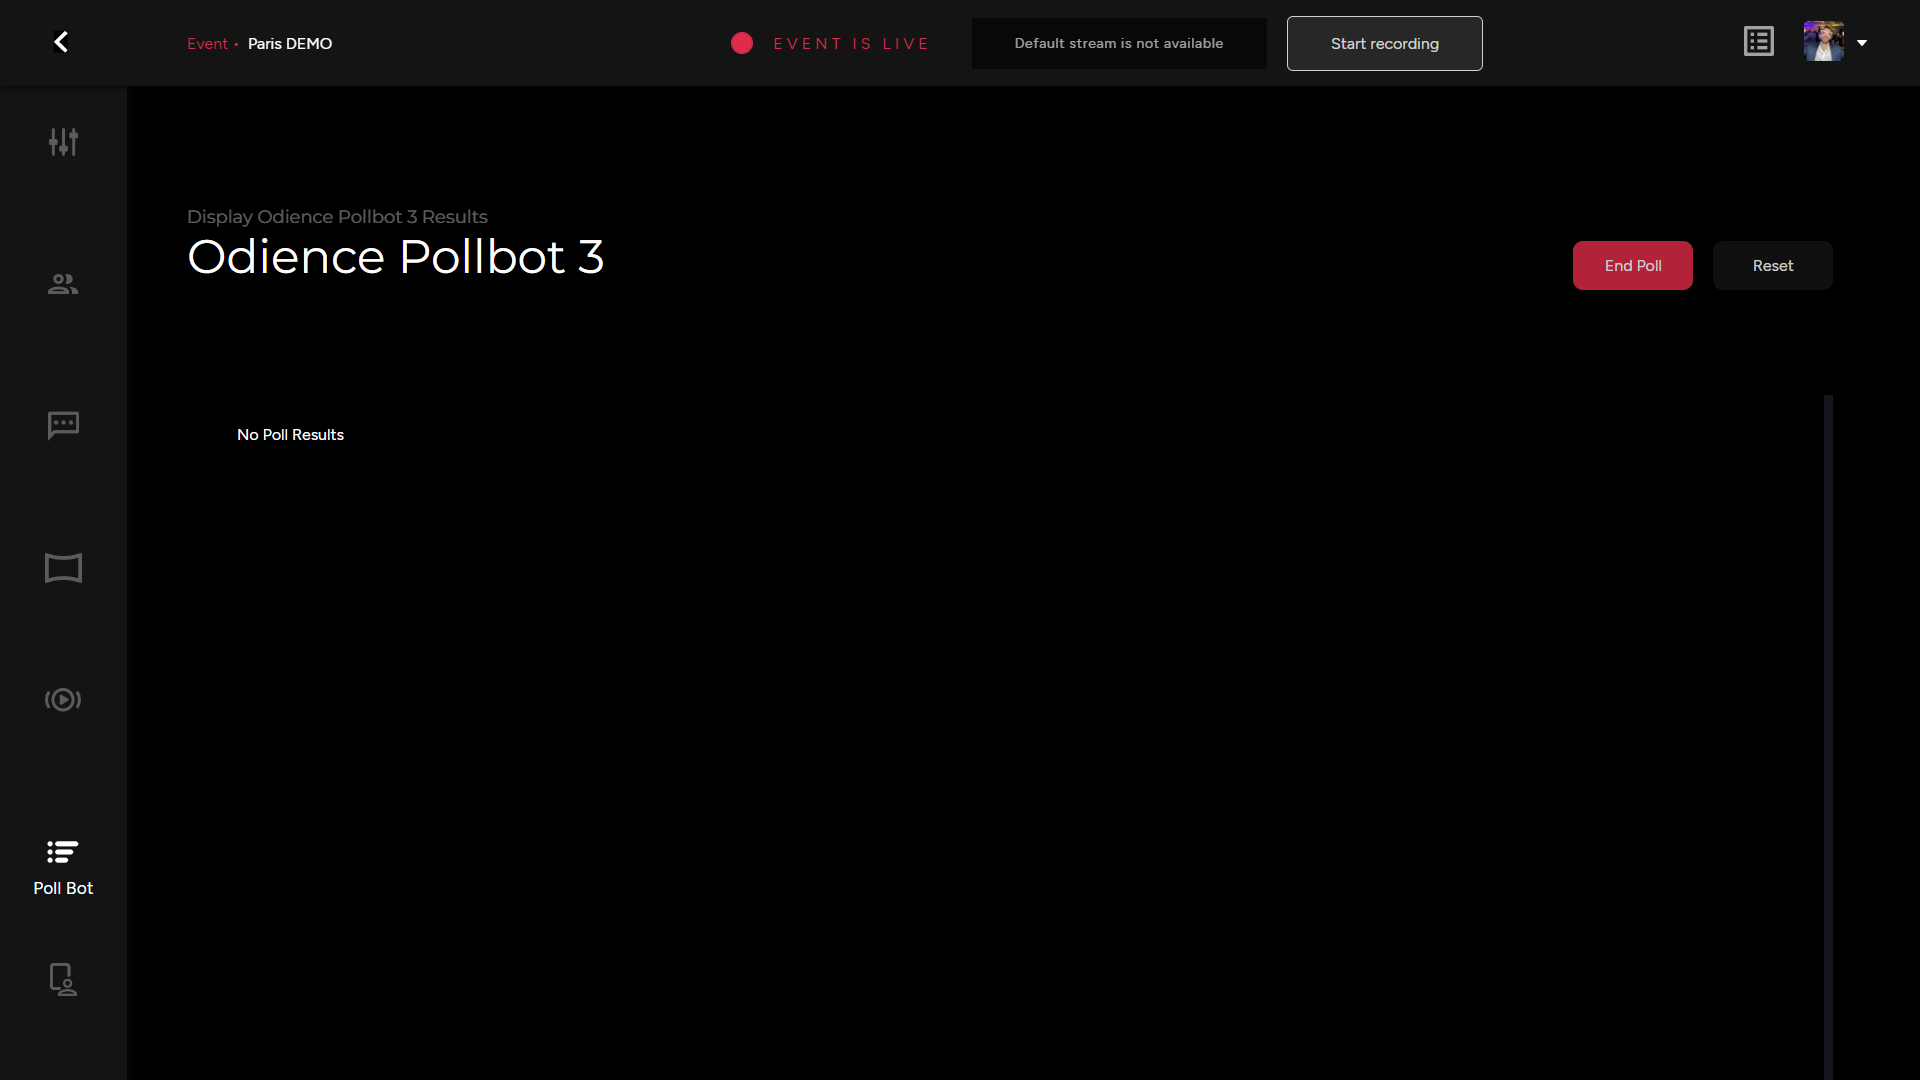
- Start & End Poll, the results will be displayed here.

- For more details, see Poll Bot guide.
Presenter
- Access all presenter controls from your Moderation Dashboard. This is also where you can set-up a host tablet to manage the event.

- For more details, see Presenter guide.
Dashboard Moderation
- Manage and track the activity of several interactive components within your event in real-time. See connected guest, number of messages, video wall connections, the amount of guest in Front Row, & last extend messages to see the live feed of your chat.

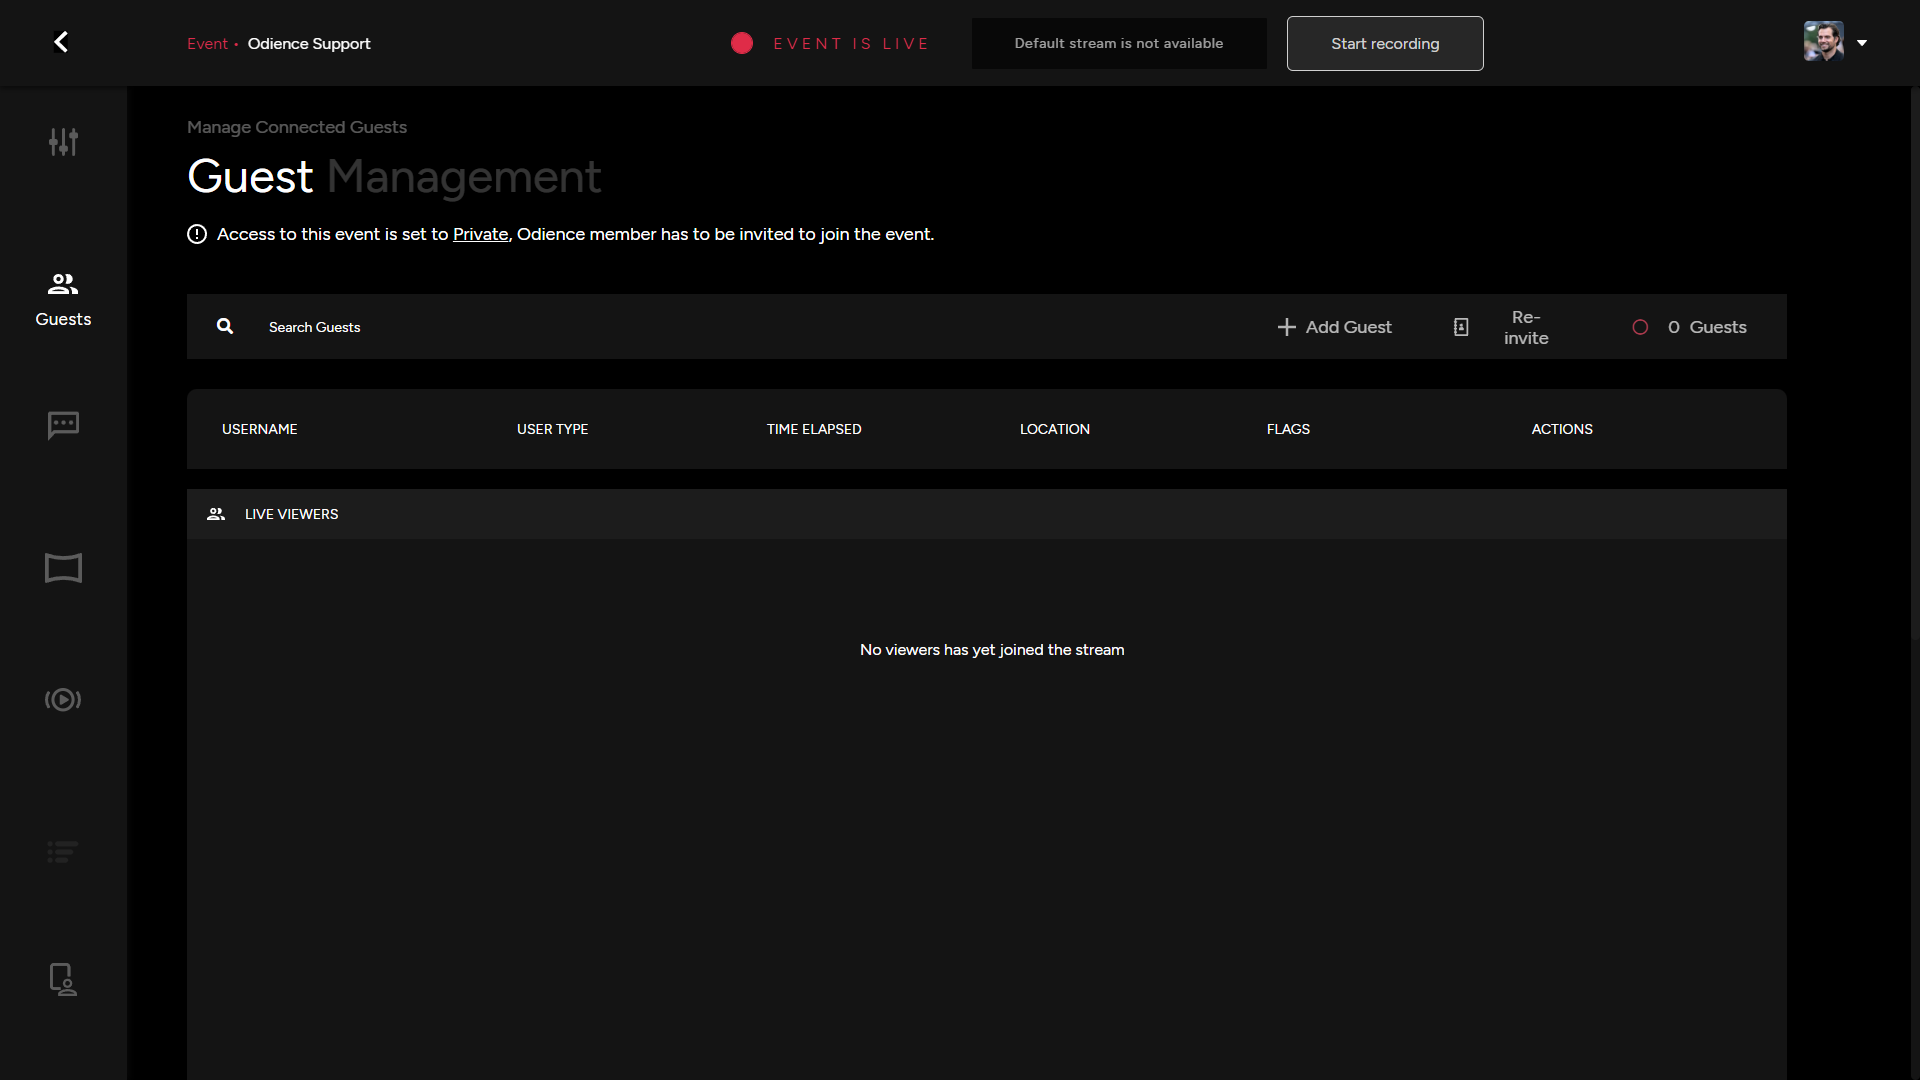
Guest Management
General
- The guest dashboard allows you to invite new guests after the event has gone live or re-invite guests who have already been invited to your event.
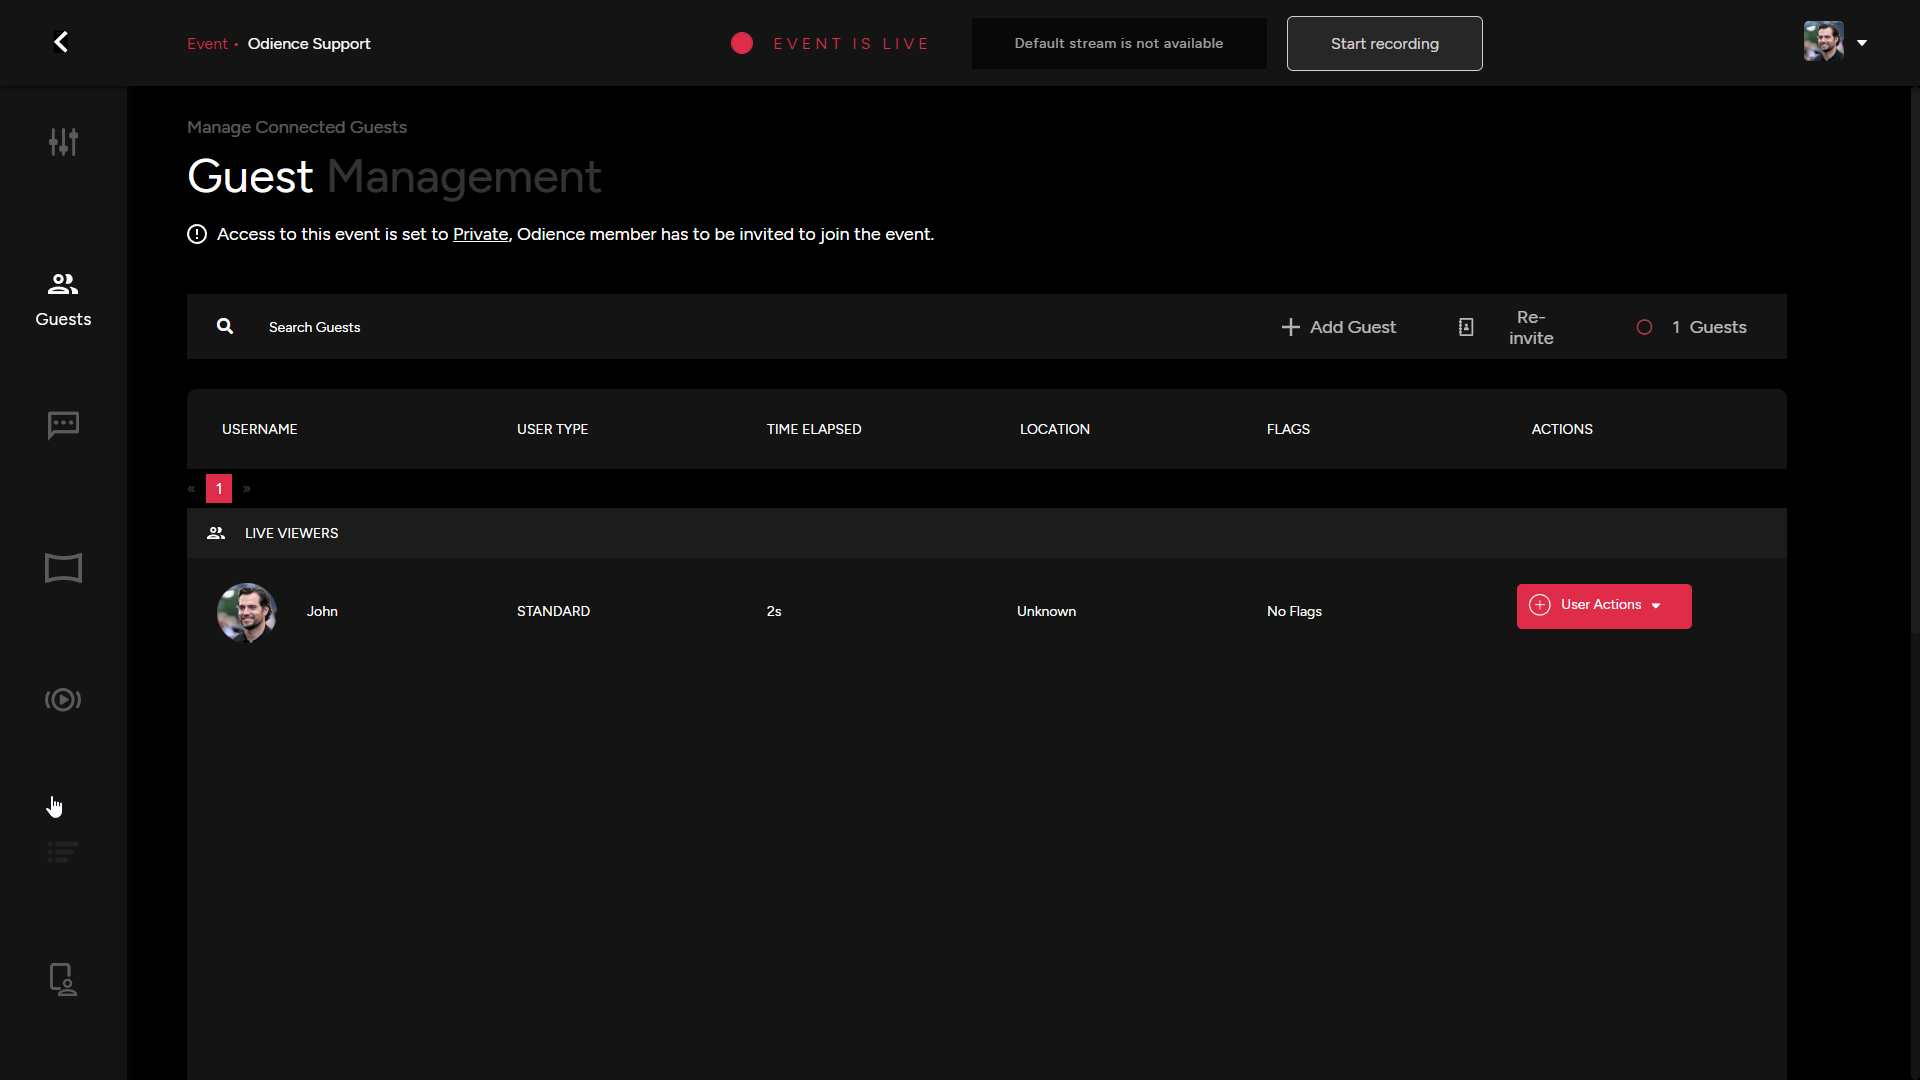
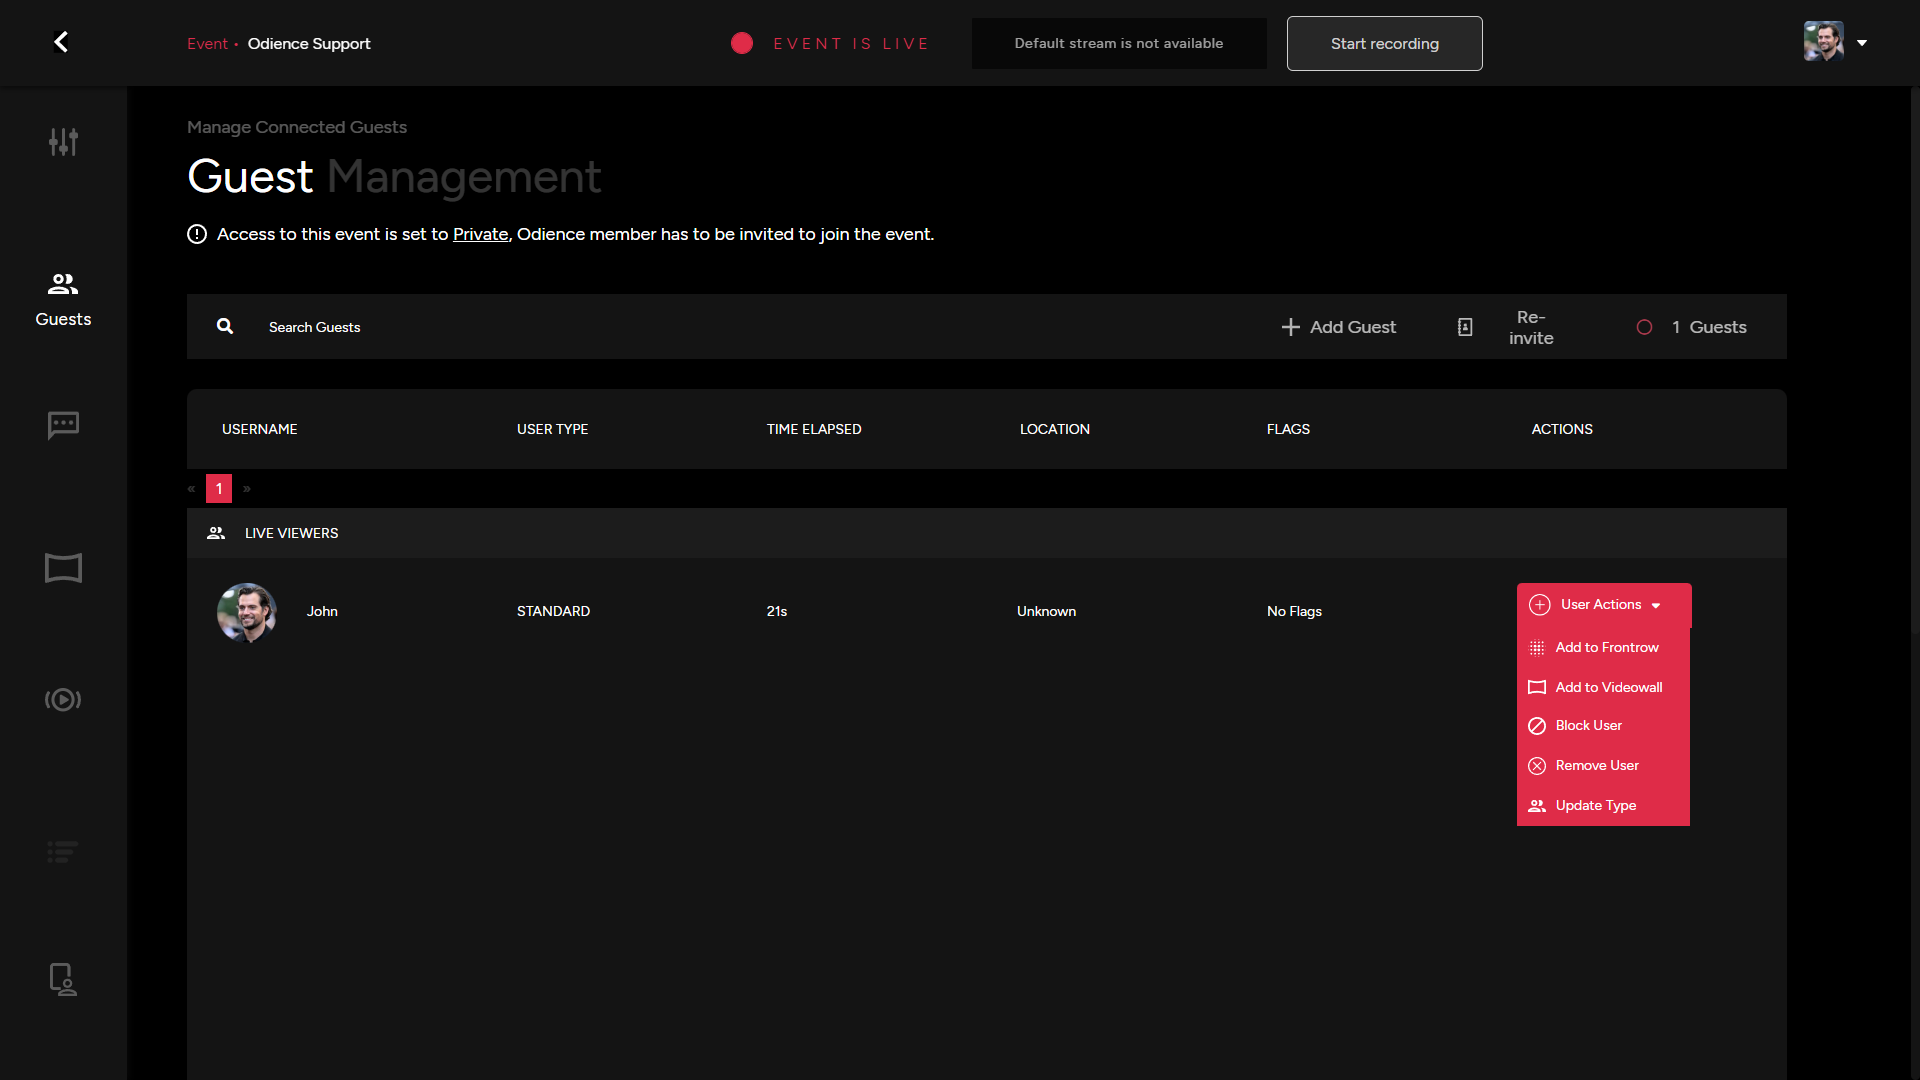
User Actions
- There are several individual actions you can utilize for individual users.
- Add user to Front Row. This will send them an invitation to join Front Row.
- Add user to Video Wall, this will send the user an invitation to be a featured guest on the Video Wall.
- Blocking a user will prevent them from engaging in the stream chat
- Removing a user will remove them from the event entirely & will therefore be blocked from rejoining.
- Updating a user type... (TBD)
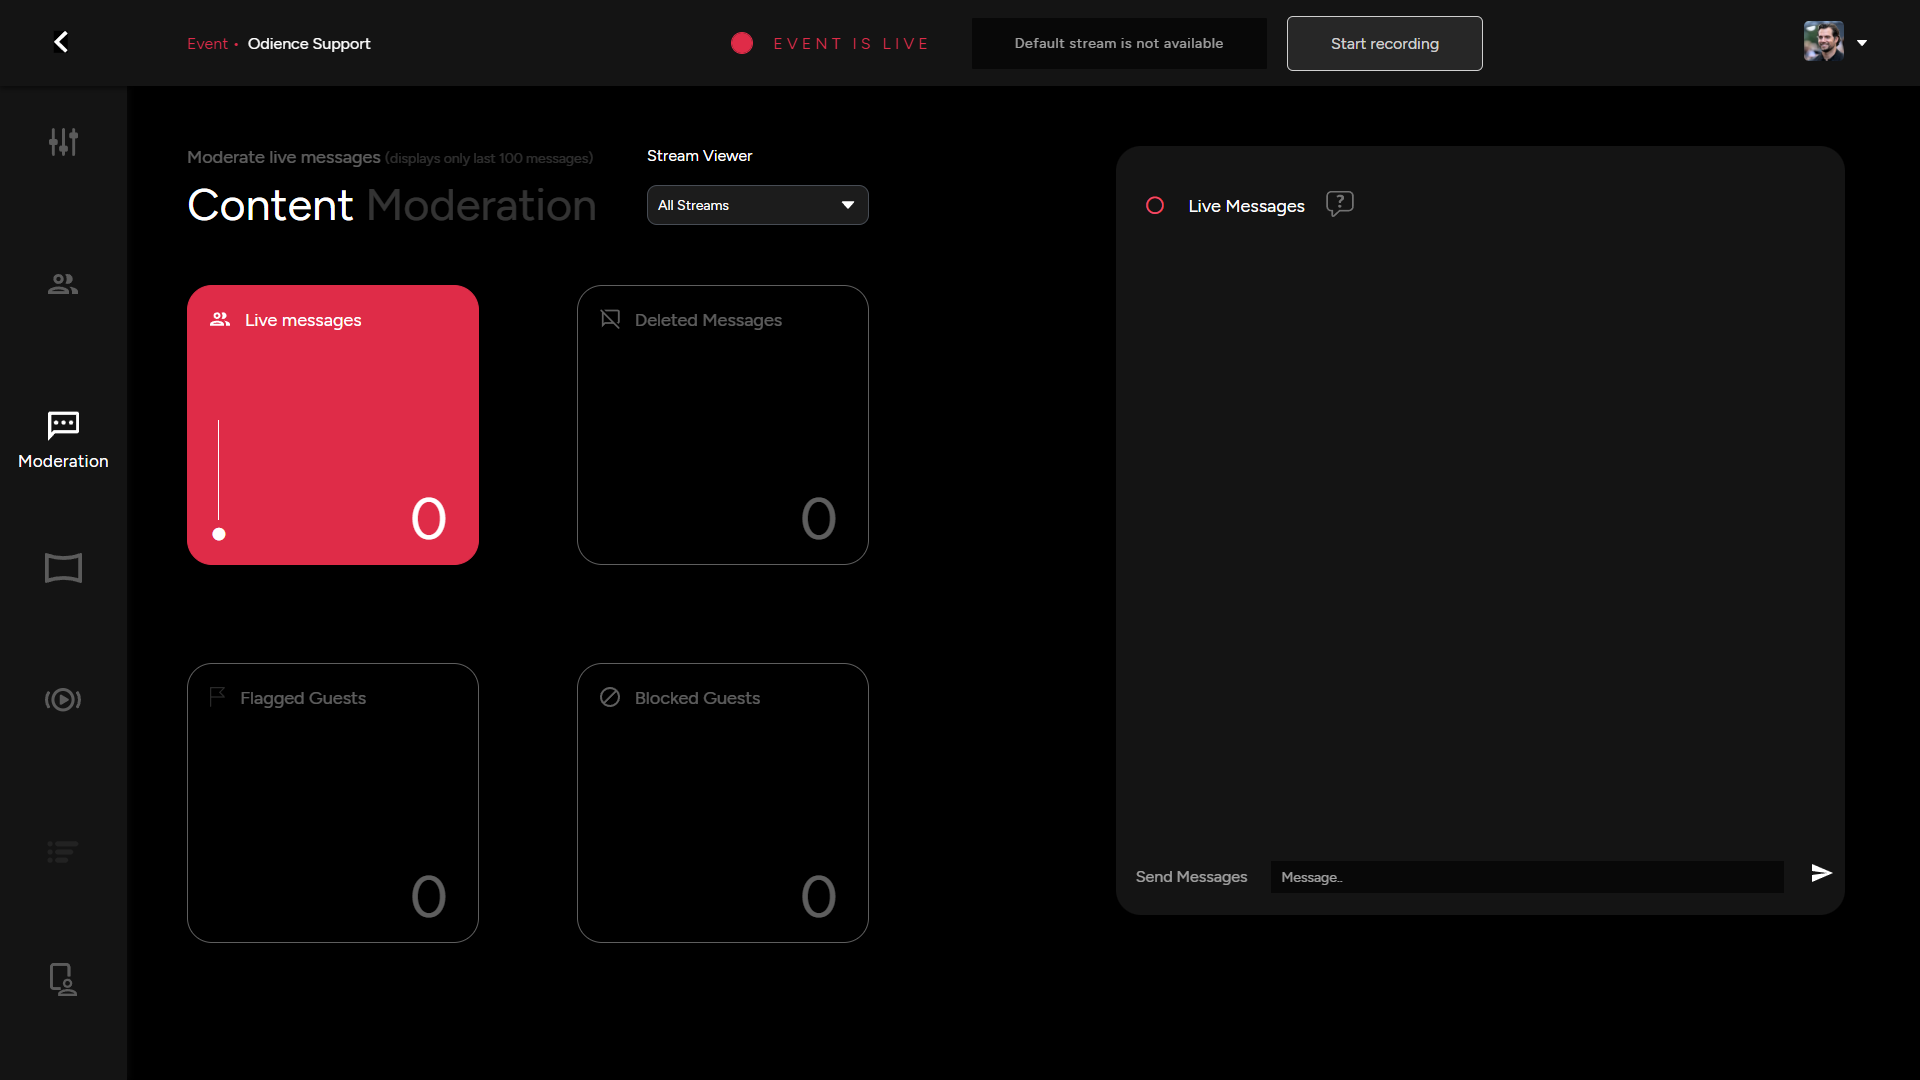
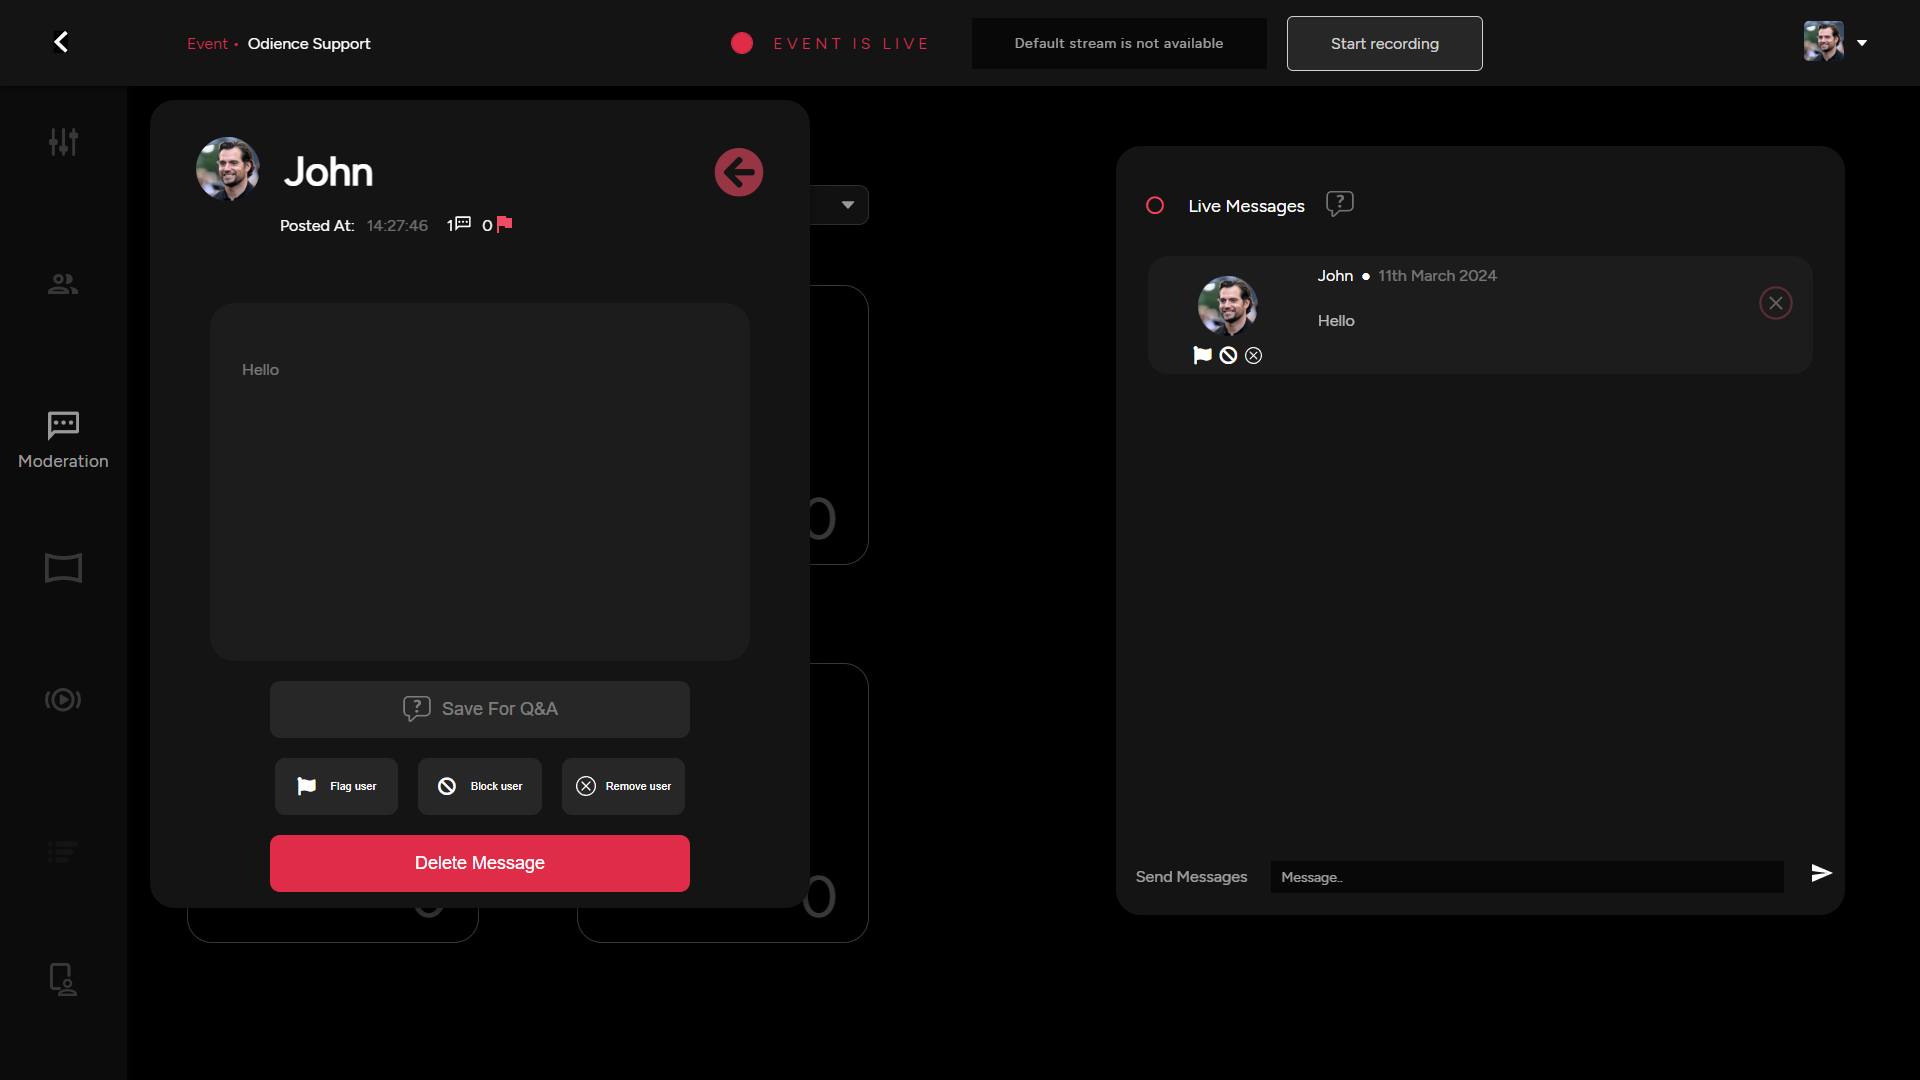
Content Moderation
Content Moderation
Manage the live messages running through the chat. Delete messages, flag guests, block guests or save messages to reference later in your event for a Q&A session.
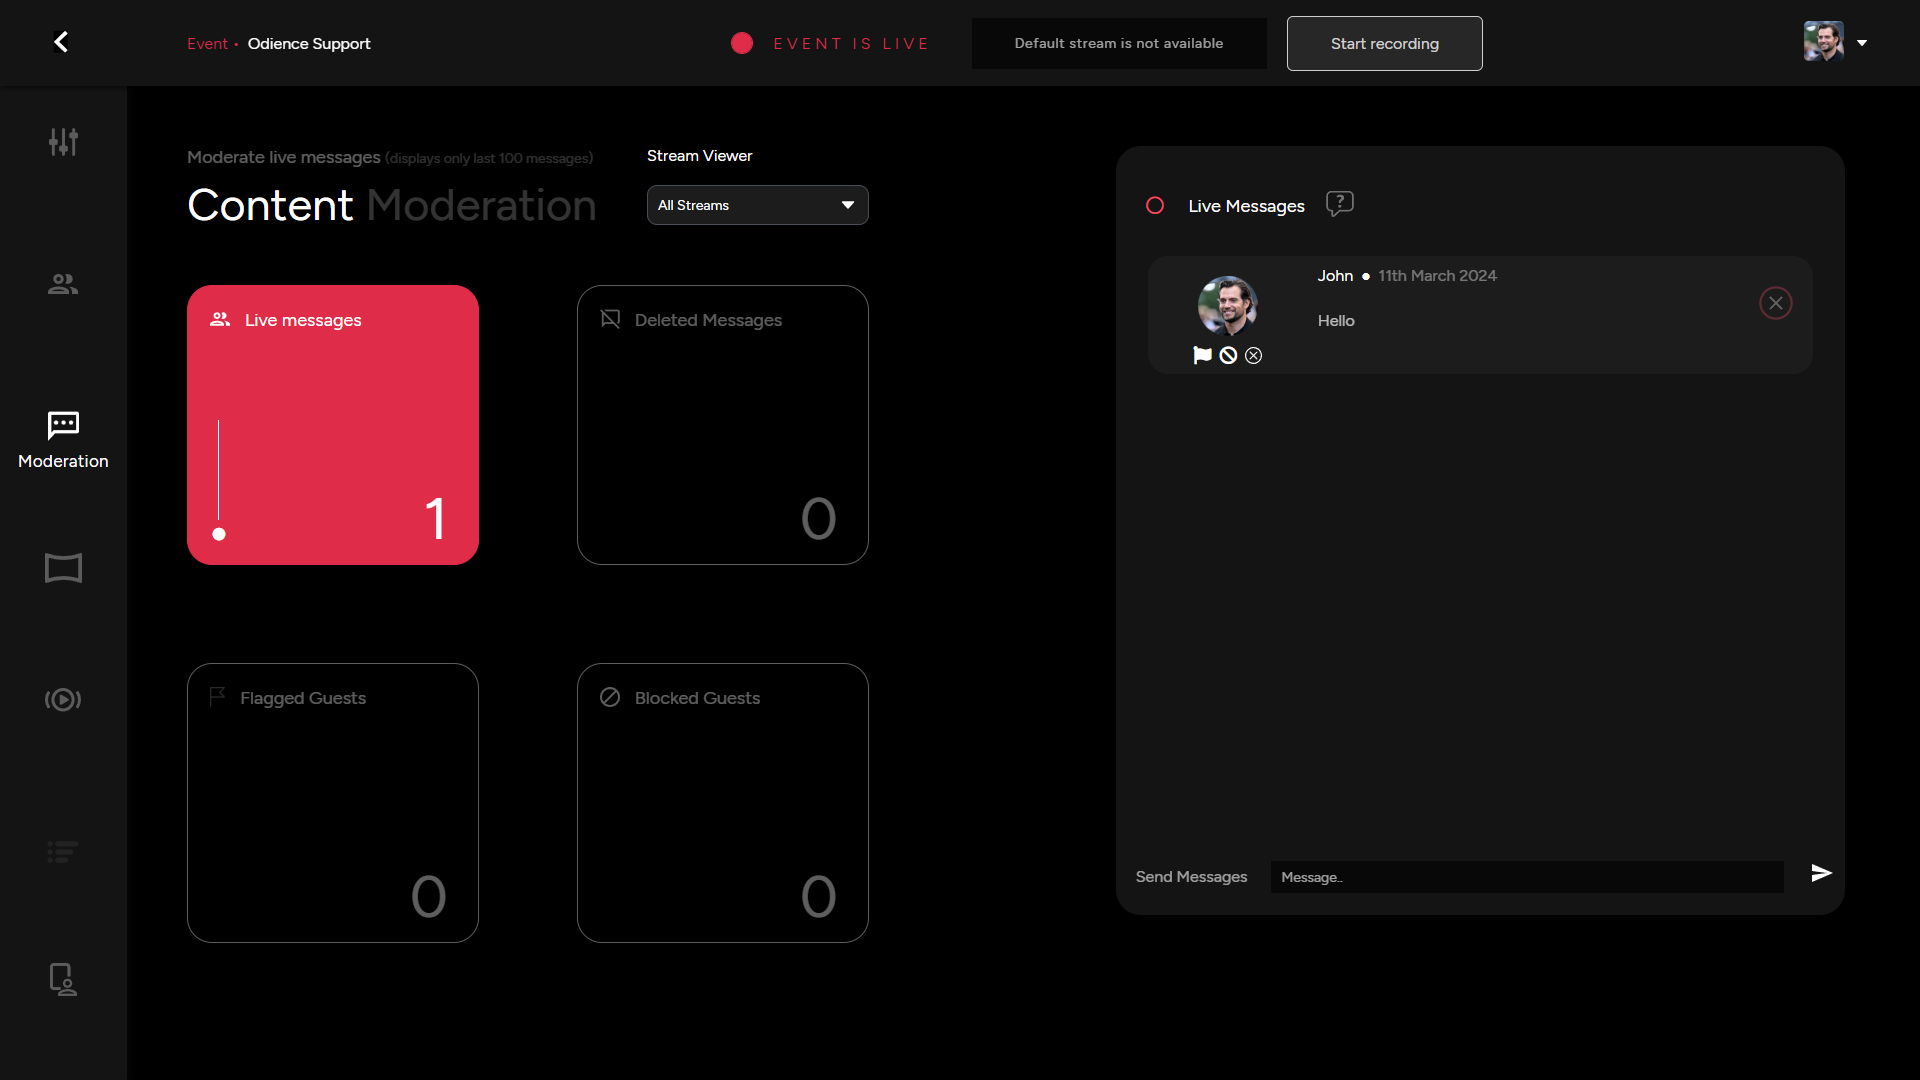
Guest Message Options
Different view to access all features outlined above, except this area has the Save for Q&A option.
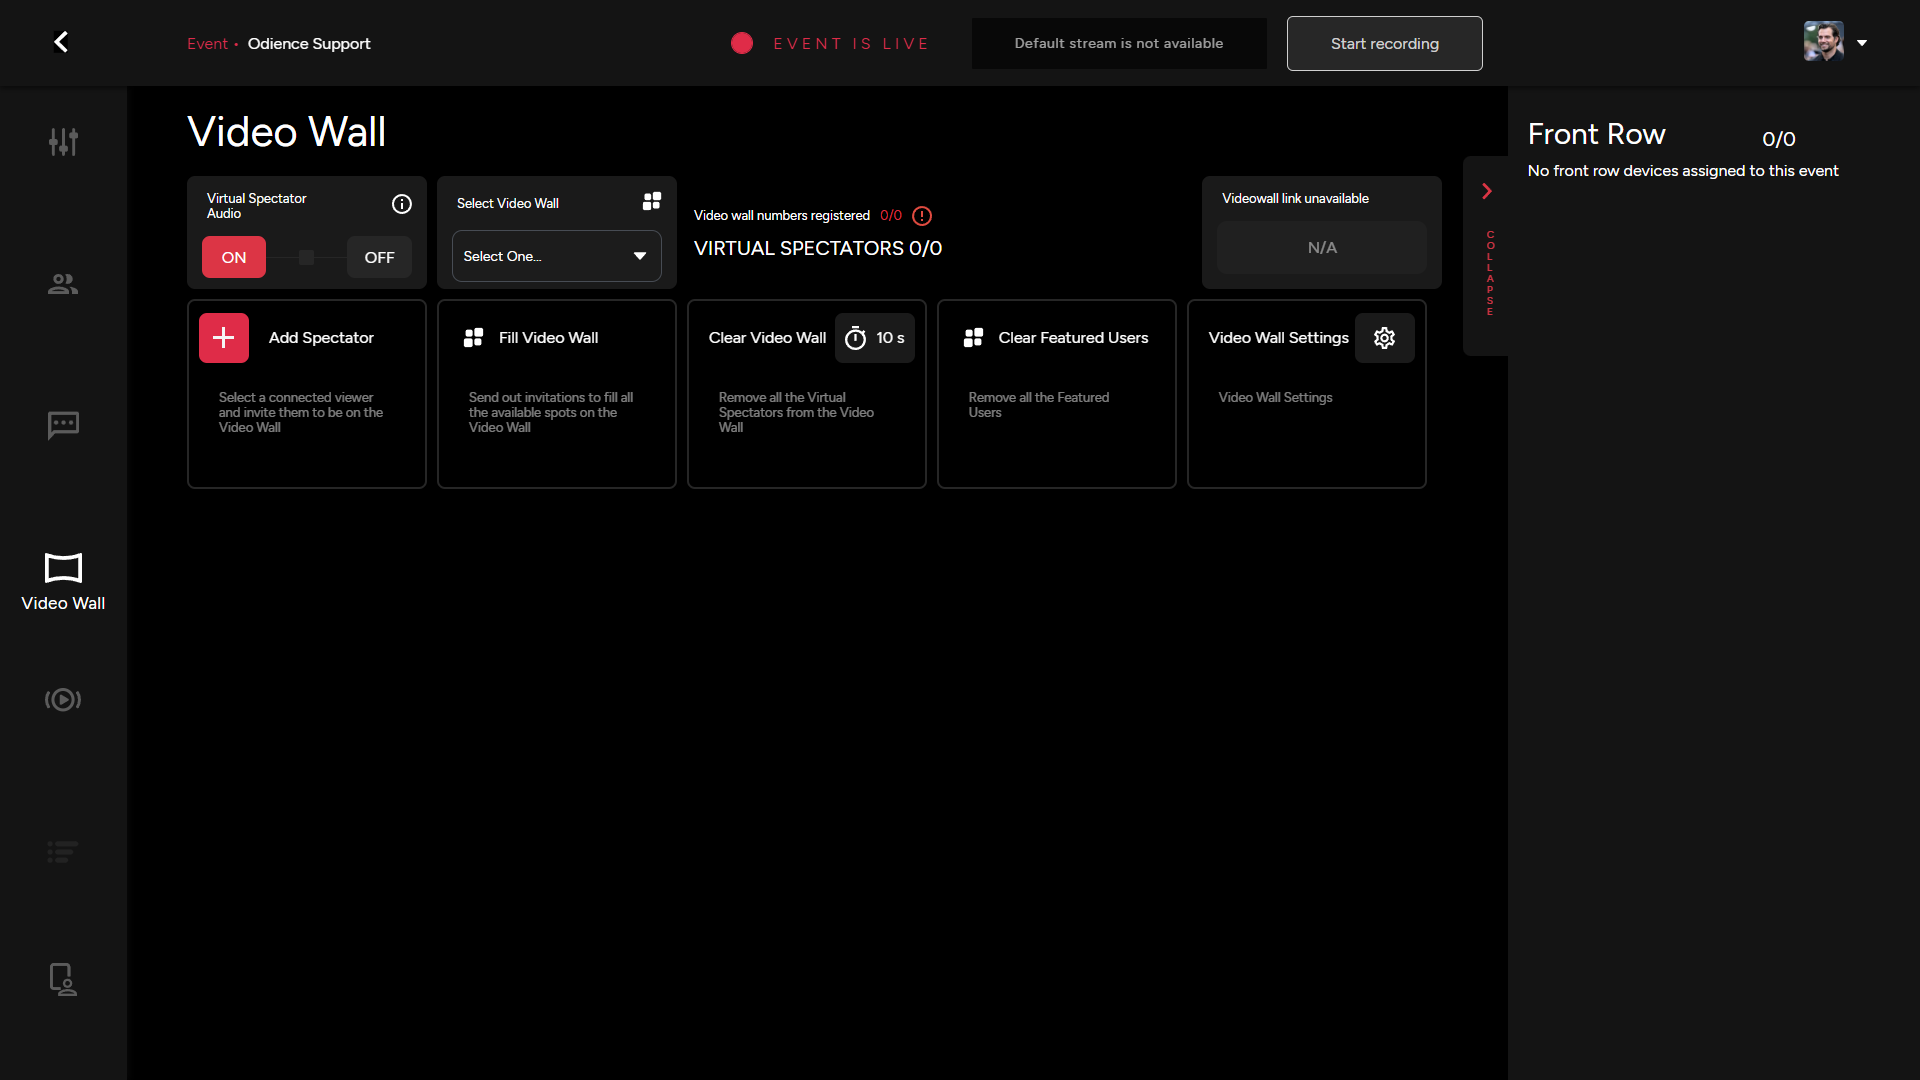
Video Wall Management
Virtual Spectator Audio
- Turn on or off the virtual spectator audio

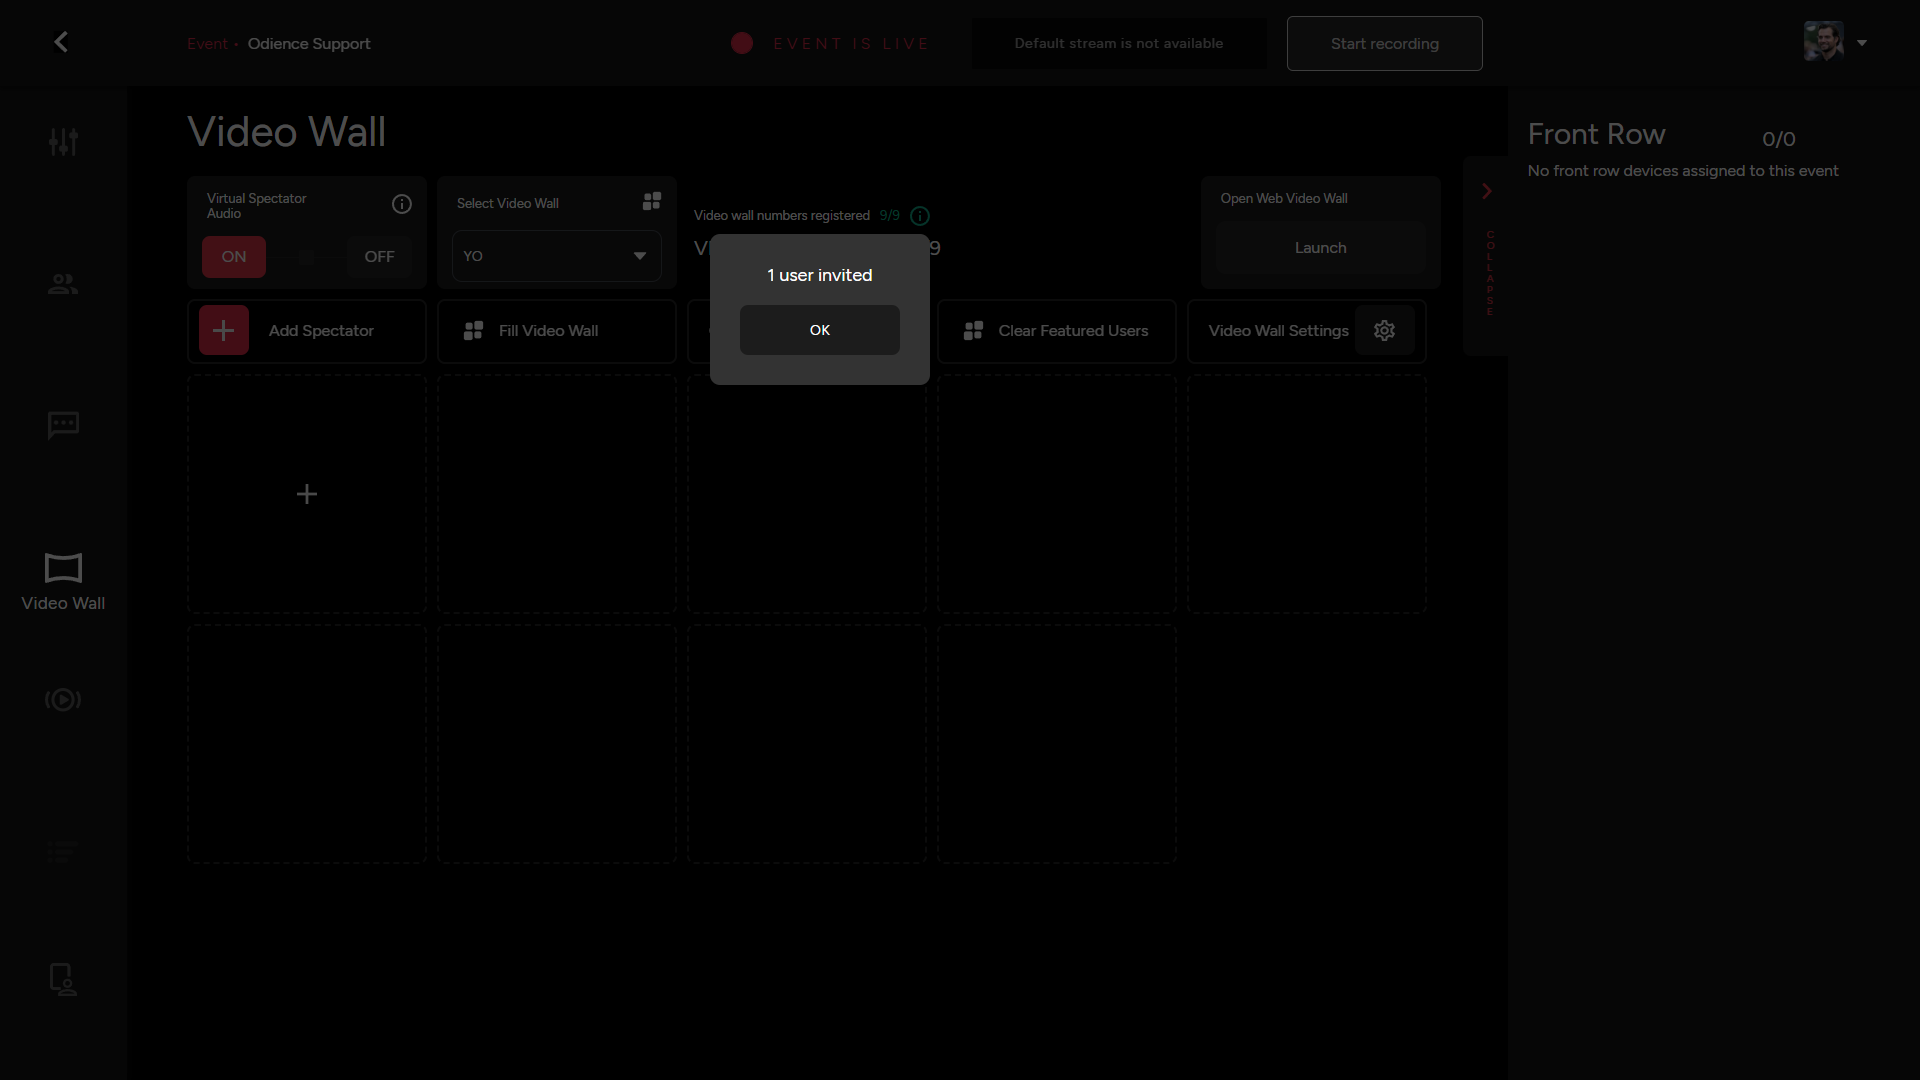
Add Spectator
- Select a connected viewer and invite them to be on the Video Wall

Fill Video Wall
- Quick access to remove all the virtual spectators from the video wall
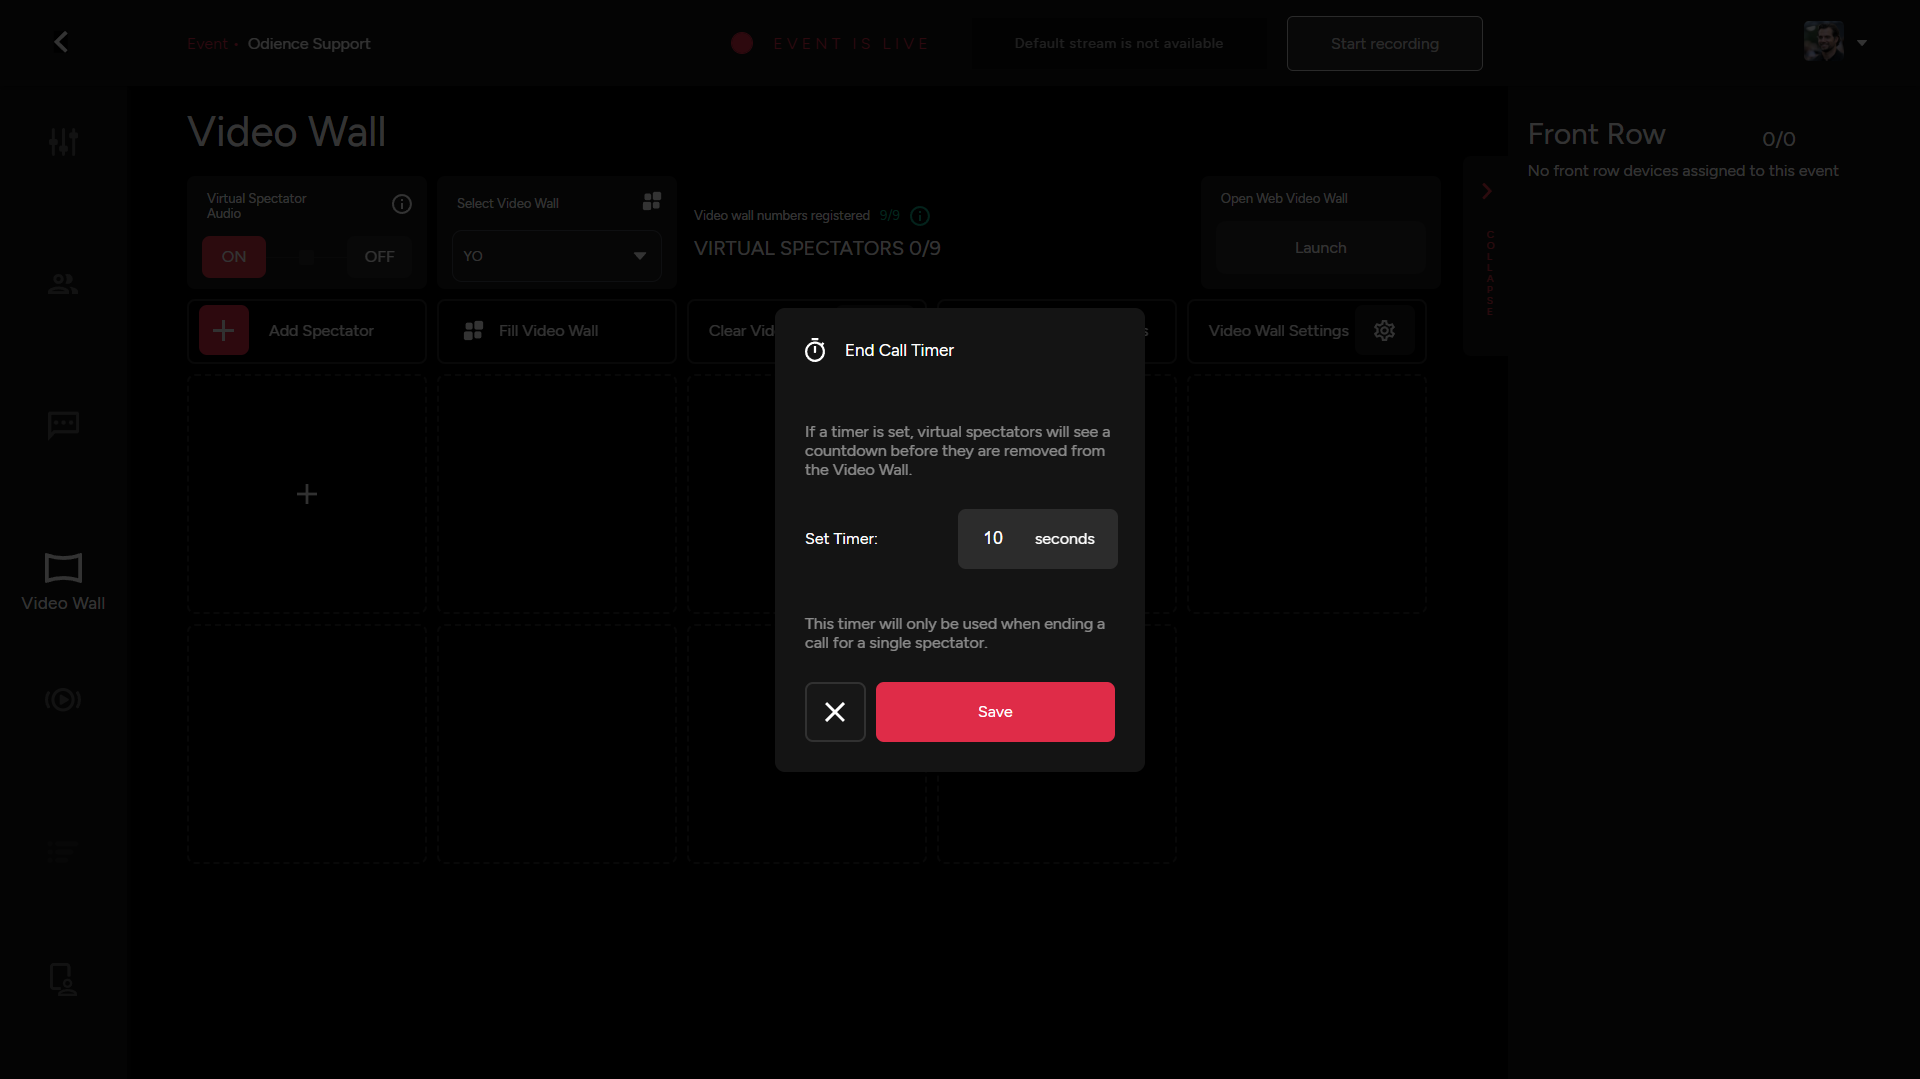
Clear Video Wall & Set End Call Timer
- Remove all the Virtual Spectators from the video with the click of a button. Set a Call Time, this will only be used when ending a call for a single spectator.
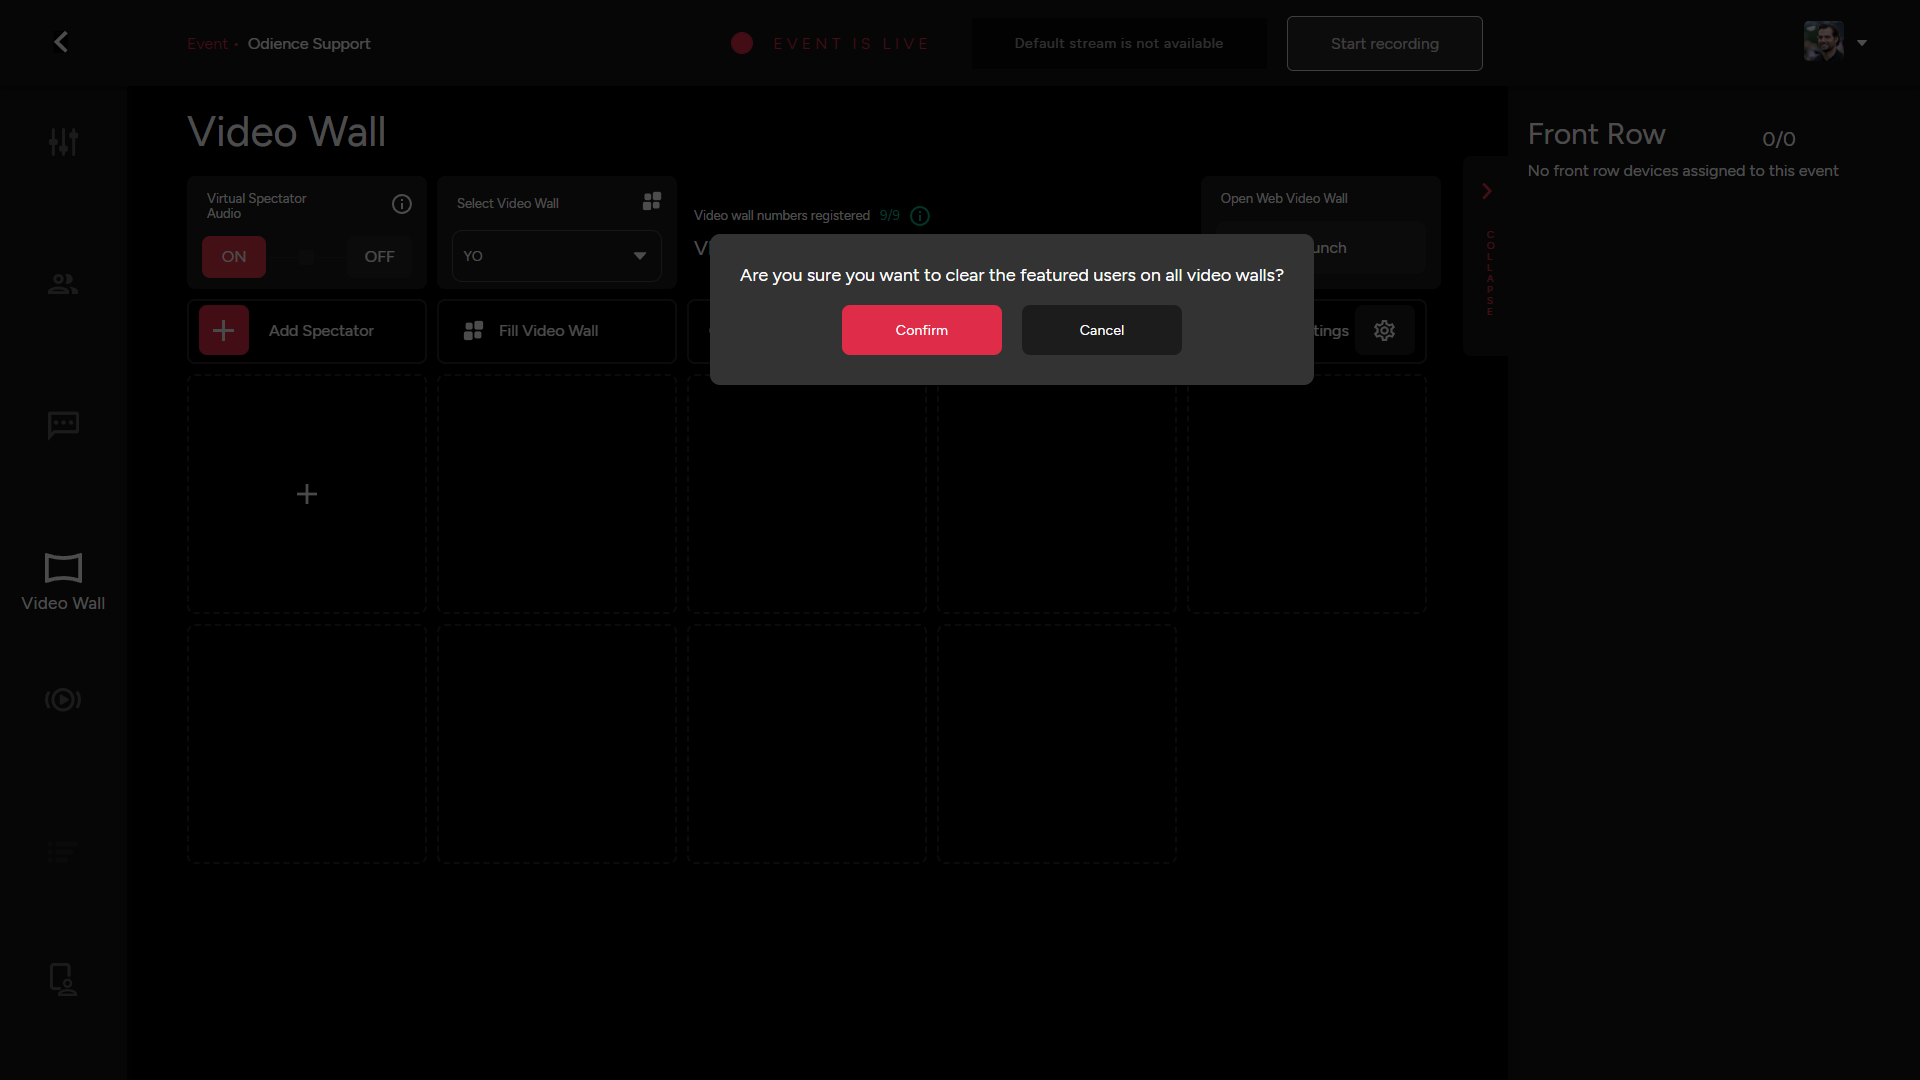
Clear Featured Users
- Remove all the Featured Users with the click of a button
Video Wall Settings
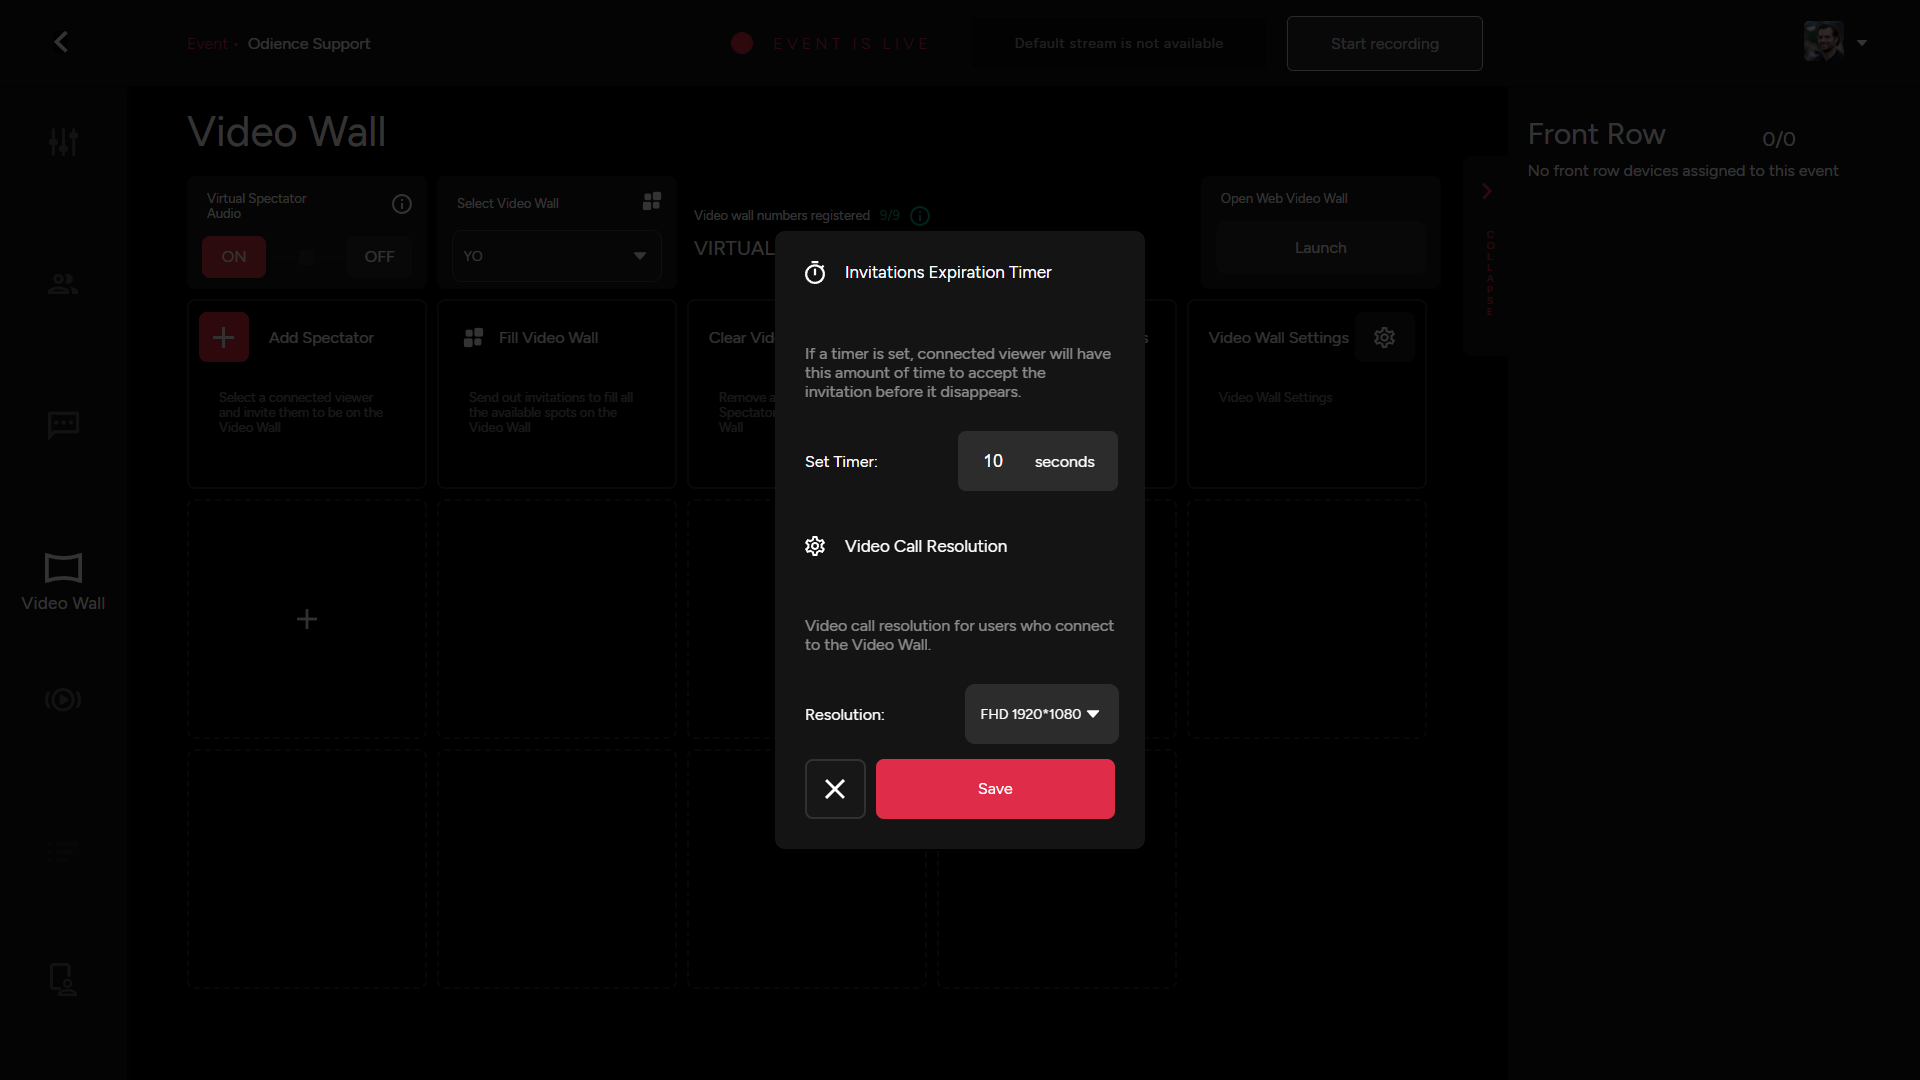
- Set the amount of time a connected viewer will have to accept an invitation before it disappears. Set video resolution, we support from SD 640x480 all the way to FHD 1920x1080.
Video Wall Link
- Launch Web Video Wall from this section.
Note: Will include sample of Web Video Wall when it starts working.
Front Row
- TBA
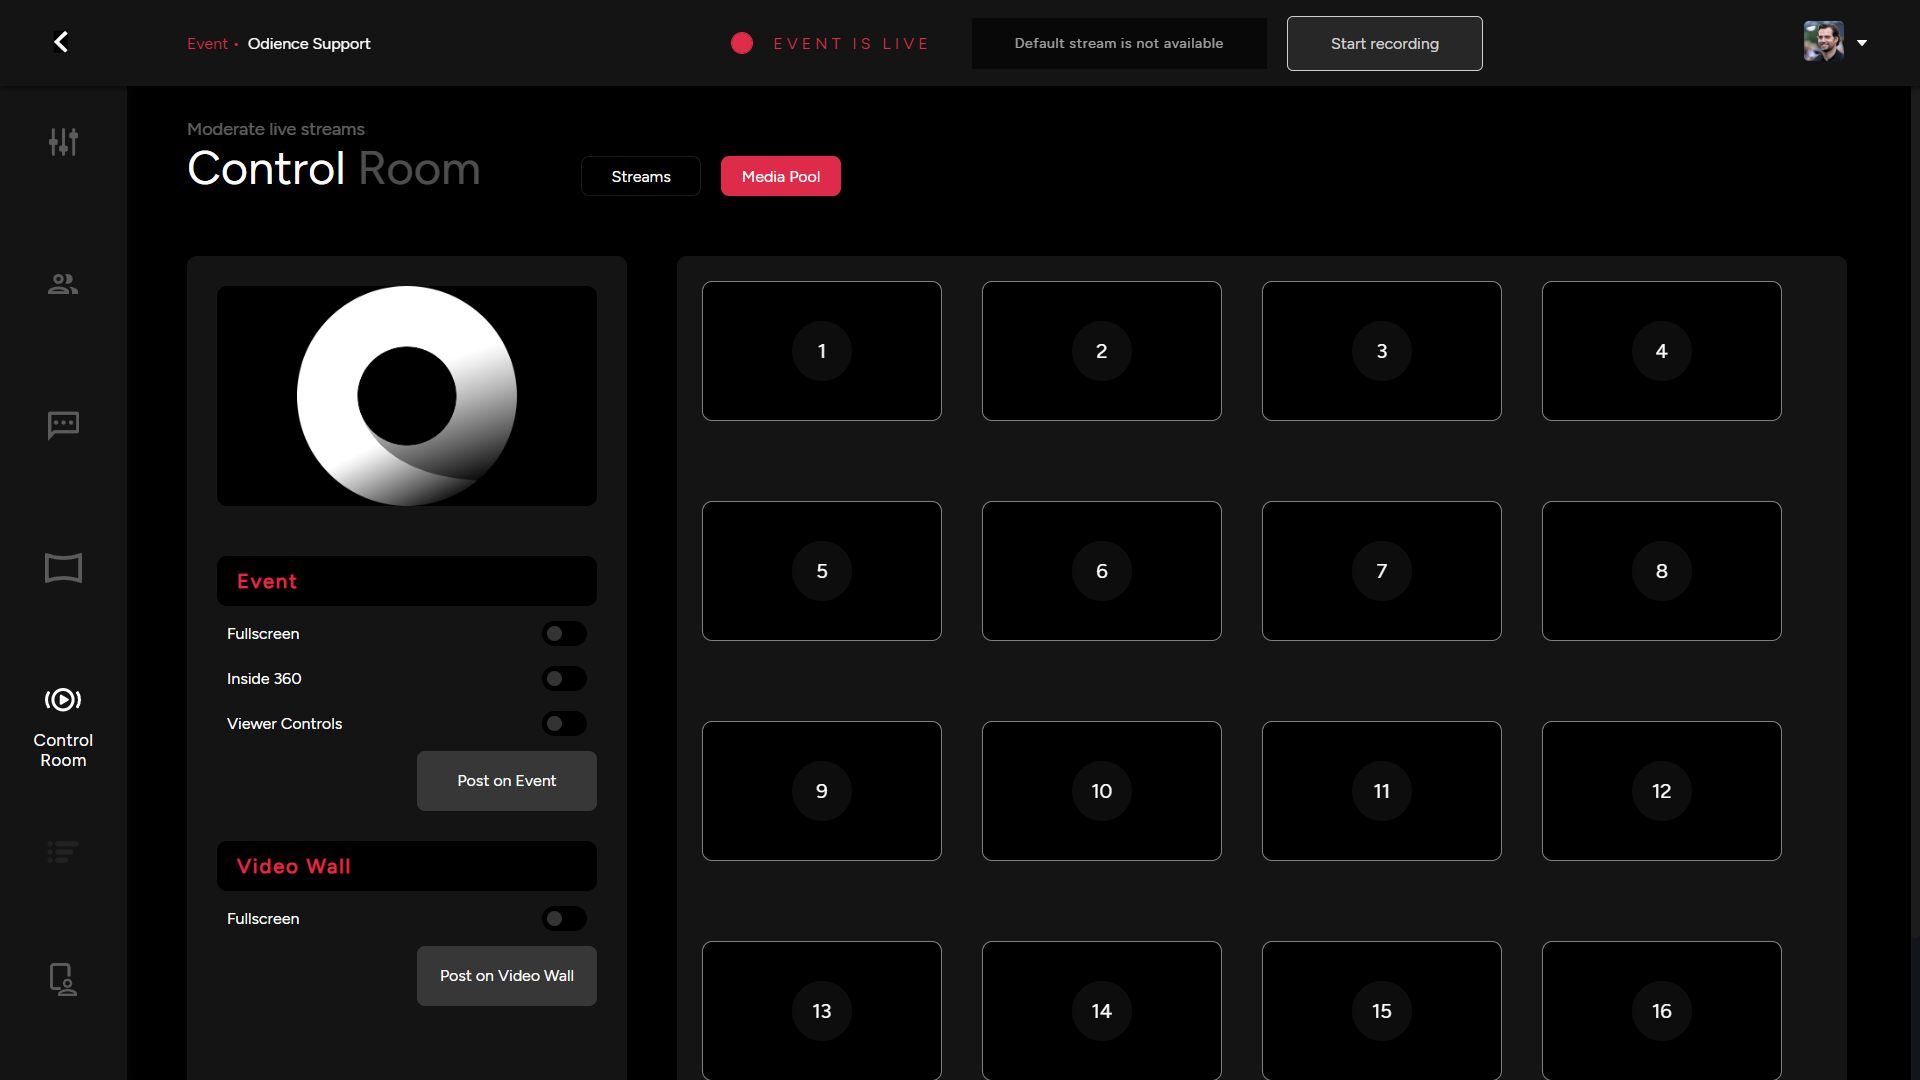
Control Room
Control Streams
- Live Switching is a feature that allows viewers to switch between different streams assigned to an event. Note, if Live Switching is ON, the Moderator will control what the viewers are watching. In the section right below, you may activate or deactivate streams assigned to your event.
Media Pool
- Manage all media elements attached to your event or video wall. Feel free to import new media from your PC or via a URL.

Poll Bot Management
- Start and end your event poll from this section. This is also where Poll results will appear before being featured to the audience. This will only be available for events that have a Poll bot assigned to them.
Presenter Control Hub
The Presenter tab is the control hub for the event host. The host can start & end the event, Control product carousel appearance, Start poll, manage participants and a variety of interactions associated the participants such as Featured Message, Front Row, Featured Spectator and much more.
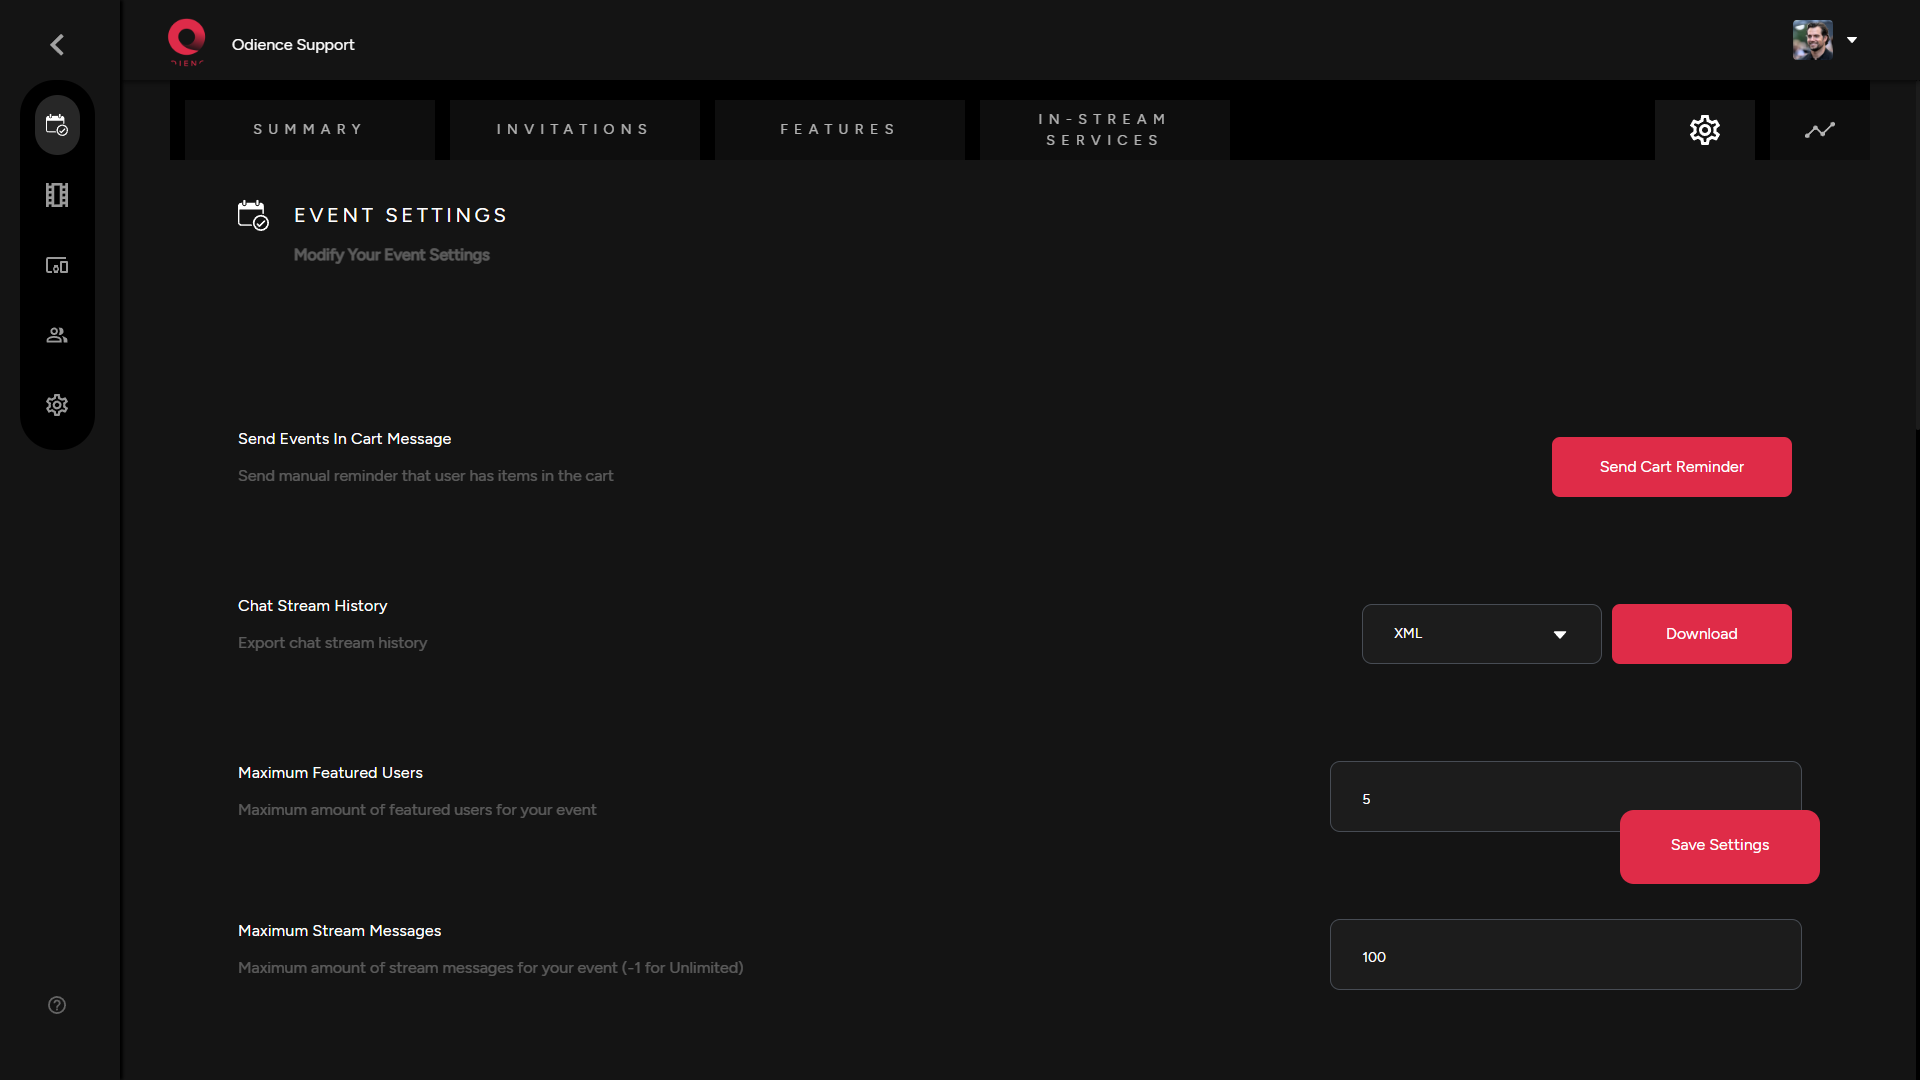
Event Settings
Modify Event Settings
- Modify a plethora of Event Settings
Event Statistics & KPI's
Event Statistics
Statistics Overview
- Get a high level view of your Event Statistics, such as Users Invited, Users Attended, Users Items Purchased, etc.

Export Stream History
- Export Stream Chat History, select from three options including XML, RTF & CSV format.

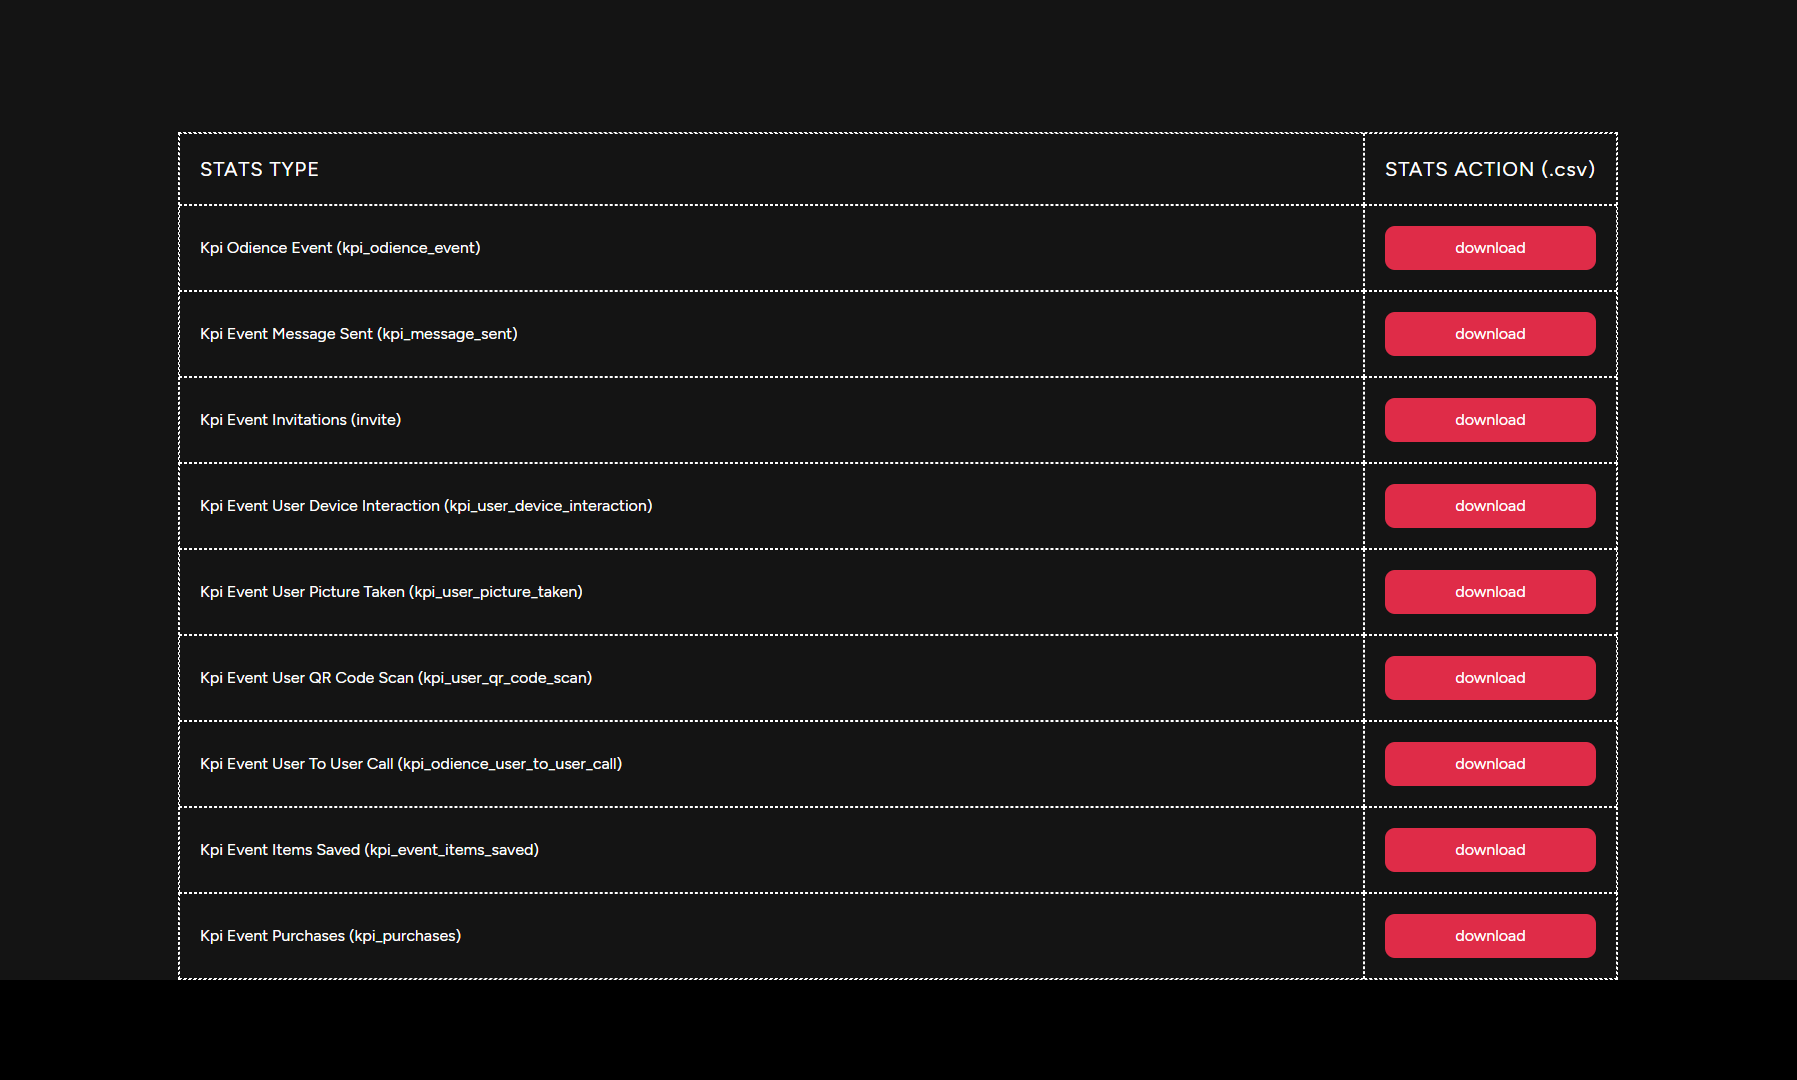
Individual Statistics
- Access a plethora of event statistics to gain insight on a specific aspects of your event such number of chatbot messages, user device traffic, user purchases and cart information, chatbot purchase, etc.

- Note: To export a PDF document of an individual statistic, click the icon in the bottom right corner.
KPI Export
- The KPI report section provides access to more statistics that primarily focuses on the performance of user driven engagement features.
Note: KPI Export is only available for Pro and Enterprise accounts. For more information on different accounts, see our guide on Account Types.